

As much as we’d like them to, computers don’t always work as they should, and while it’s uncommon, they can sometimes stop working altogether and crash. This is what’s often called a Blue Screen of Death (formerly a Black Screen of Death), or BSOD, which is actually a mechanism in Windows 11 to help you diagnose problems with your system. A BSOD can also be referred to as a stop error or a bug check, which is when a critical process to the normal operation of Windows runs into a problem and forces the computer to restart.
There’s a wide range of possibilities for what can cause a BSOD, but most of the fixes are along the same lines. Depending on what is causing the issue, fixes can be more or less complicated. You may have to update or uninstall some software, or you may need to replace something in your hardware. Either way, we’ll dive into possible fixes here.
Windows 11: Everything you need to know
Windows 11 is the latest and greatest operating system from Microsoft, and it packs a ton of changes. Here’s what you need to know.
Common Windows 11 BSOD errors
Narrow down the cause of the problem

When you see a Blue Screen of Death on Windows 11, it’s a good idea to act quickly to see the information displayed on it. On this screen, you’ll see an error code that can help you narrow down the problem. If you missed it, you can also use the Windows Event Viewer to see the error code after the fact and find out what went awry.
Here are some examples of BSOD error codes you might see and what they mean:
- CRITICAL_PROCESS_DIED: This error means a critical Windows process was terminated for one reason or another. It can be self-inflicted, such as terminating an essential Windows process in Task Manager, but it can also indicate bigger problems with the system.
- SYSTEM_THREAD_EXCEPTION_NOT_HANDLED: This problem means there was an error that Windows’ error handler wasn’t able to catch, and it’s often related to device drivers. If you think that’s the issue, you may need to uninstall a recent driver update or install a newer update instead.
- IRQL_NOT_LESS_OR_EQUAL: This is a memory-related error that can occur when a driver or process requests access to a memory address it doesn’t have the rights to access. Updating drivers or Windows itself is usually the fix for this issue.
- VIDEO_TDR_TIMEOUT_DETECTED or VIDEO_TDR_FAILURE: These errors can appear when the graphics driver on your PC fails to respond when it should, preventing the display of graphics. Updating the graphics driver can usually fix this issue.
- PAGE_FAULT_IN_NONPAGED_AREA: This error means a system process or driver has referred to a memory address that doesn’t exist. It may be fixed with a driver or system update, or it may point to an error with your computer’s memory. Some antivirus software can also cause this issue.
- SYSTEM_SERVICE_EXCEPTION: This somewhat generic error may not say much, but it often comes with a driver that can be blamed for the problem. These can be system-level drivers, which can’t be updated in quite the same way as typical device drivers.
- DPC_WATCHDOG_VIOLATION: This error often appears due to incompatible hardware drivers. It was very prevalent during the early days of Windows 10, though most of these problems have been addressed. You may need to update your drivers to fix this issue.
- NTFS_FILE_SYSTEM: This means there’s an error with the file system on your computer. A System File Check (SFC) can usually fix this issue.
- DATA_BUS_ERROR: This error generally refers to all kinds of hardware issues, though a common cause can be broken RAM. If you’re seeing this error, you may need to replace a hardware component. If you installed a new piece of hardware on your PC, it’s also a good idea to try to install the appropriate drivers for it.
As you can probably glean from the list above, many of these issues have similar steps for fixing them, so you shouldn’t have to try to fix them individually. We’ll review some of the most common fixes for these issues. This is also not an extensive list of all error codes, but again, many of the same fixes are likely to apply.
Find error codes with Event Viewer
If you missed the error codes on the Blue Screen of Death, you can try to find them later by using the Windows Event Viewer. This program logs all the errors on your system, and it can help you find more information about them. To find out more about what caused your PC to crash, you can follow these steps:
- Press Windows + X (or right-click the Start menu icon) and choose Event Viewer.
- In the main view, right-click the Critical option and choose View all instances of this event. Critical errors are all the errors that cause your computer to shut down.
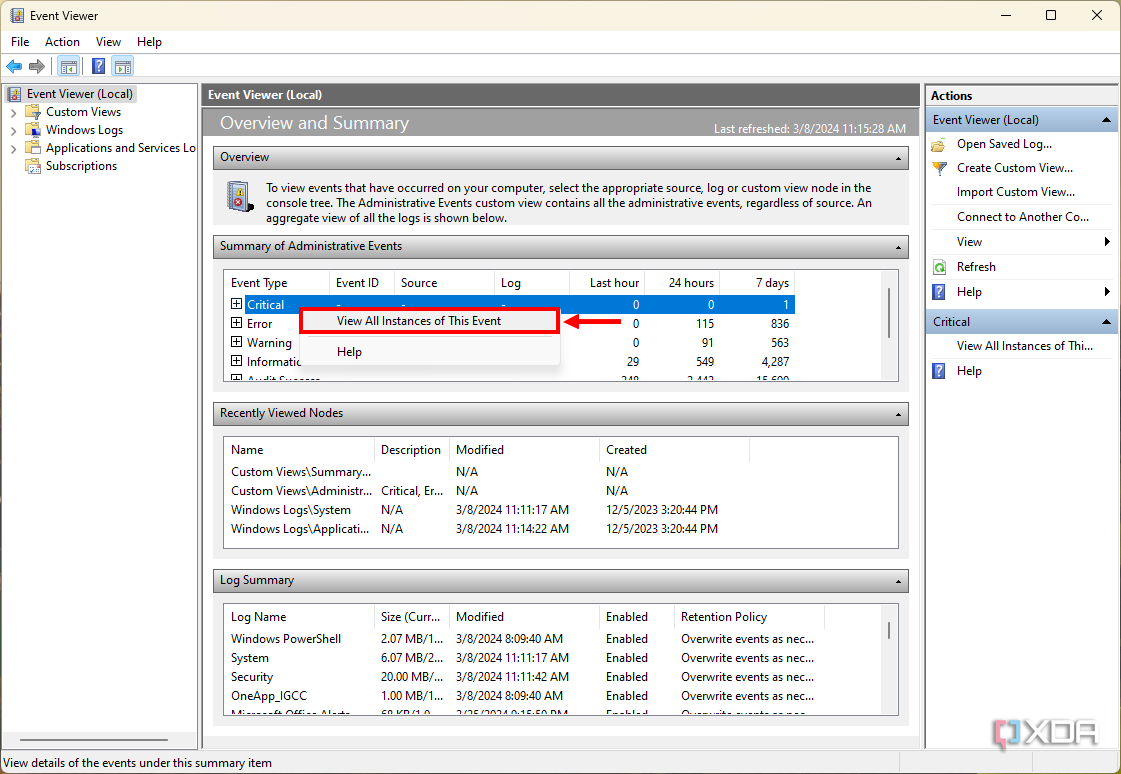
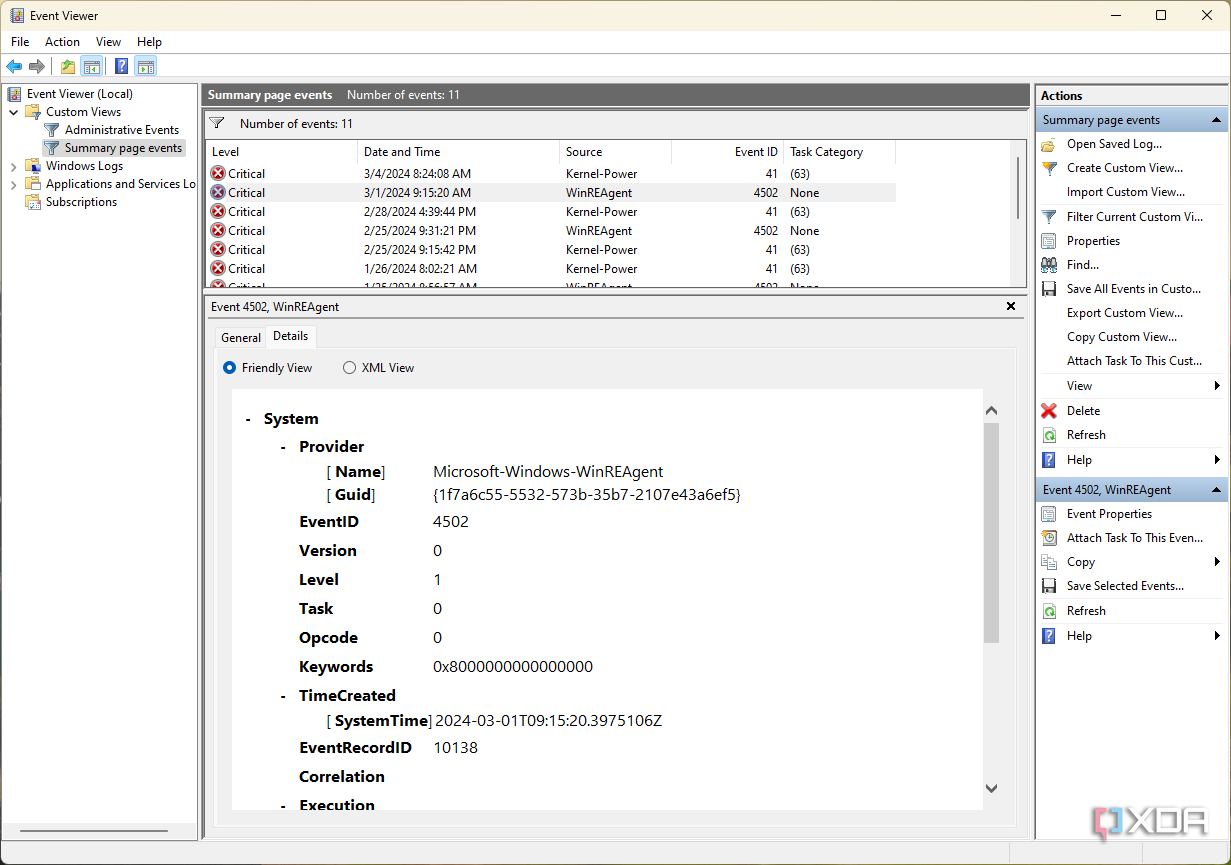
- Look for the error that happened when you saw the BSOD and click it.
- Error information will be shown at the bottom of the Event Viewer window, and you can use that to find more information on how to fix it if needed.


How to use Event Viewer to check for errors on Windows 11
If you’re running into problems with your Windows 11 PC, you can use the Event Viewer to find more information about what’s causing it.
Unplug new and non-essential devices
Maybe they’re causing the issue
One thing that may be causing your computer to run into a BSOD, especially if you recently changed your setup, is using a new device that isn’t compatible or doesn’t have proper drivers installed. Remove any non-essential devices and peripherals from your PC and try restarting it to see if it’s fixed.
After this, maybe look for the appropriate drivers for those devices or install any Windows updates before plugging them back in.
Fix Windows 11 BSODs by installing updates
Update Windows 11
A good start for fixing all kinds of Windows 11 BSODs is to update the operating system, especially if you haven’t done so in a while. To update Windows 11:
- Open the Settings app.
- Go to Windows Update on the menu on the left.
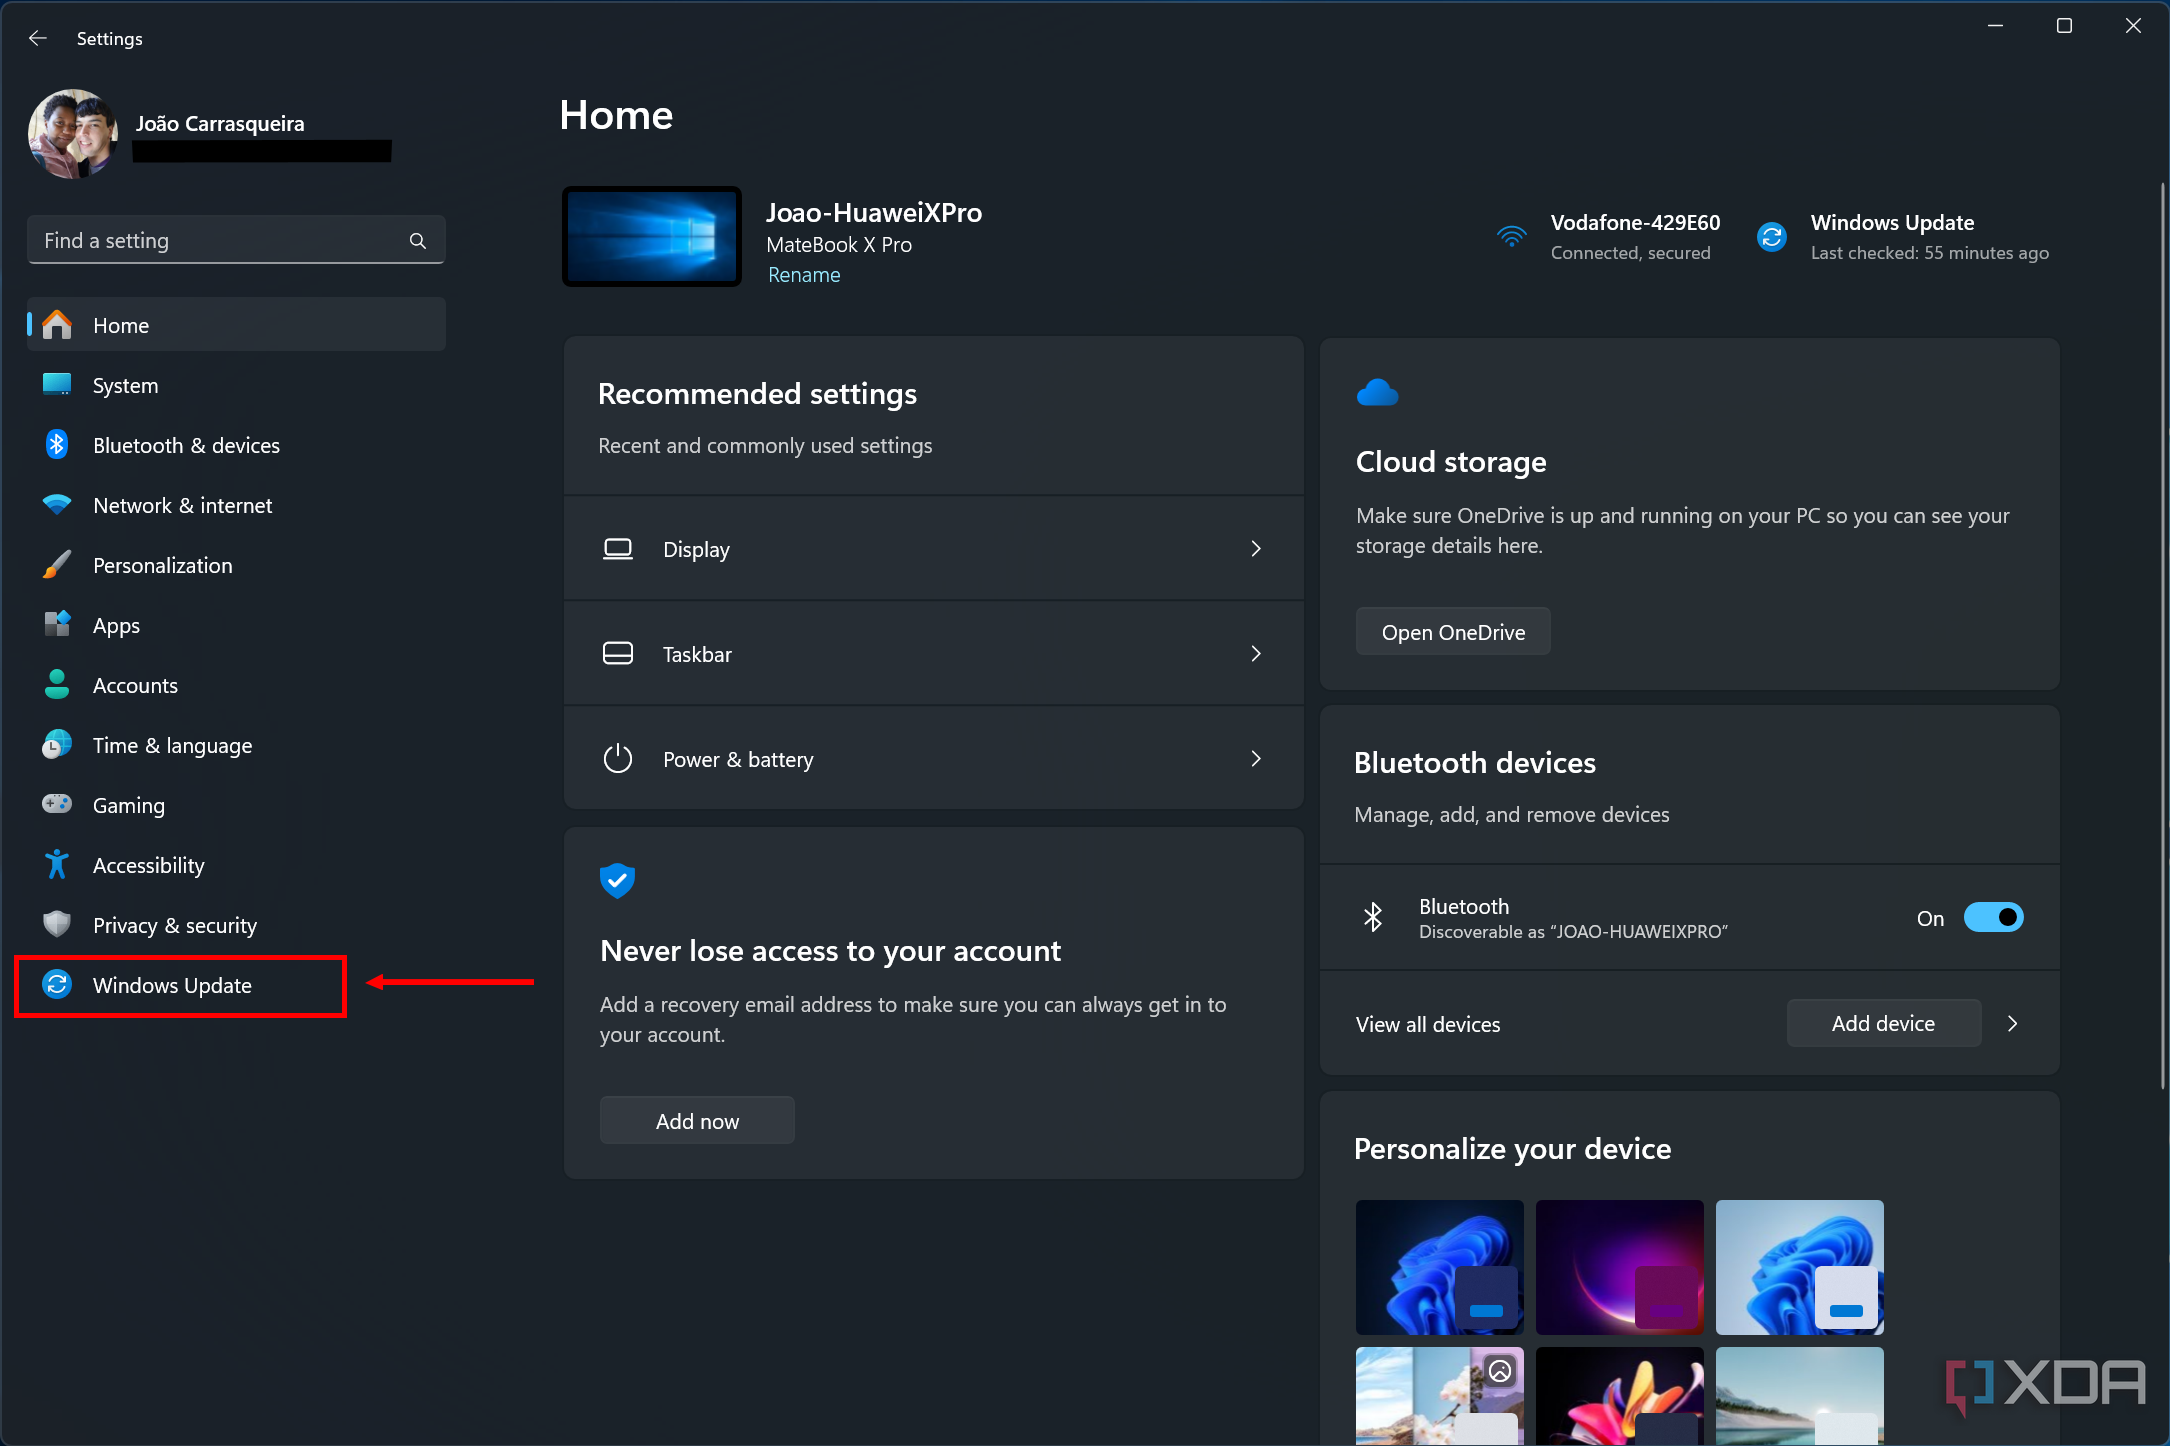
- Click Check for updates and wait for them to download and install.
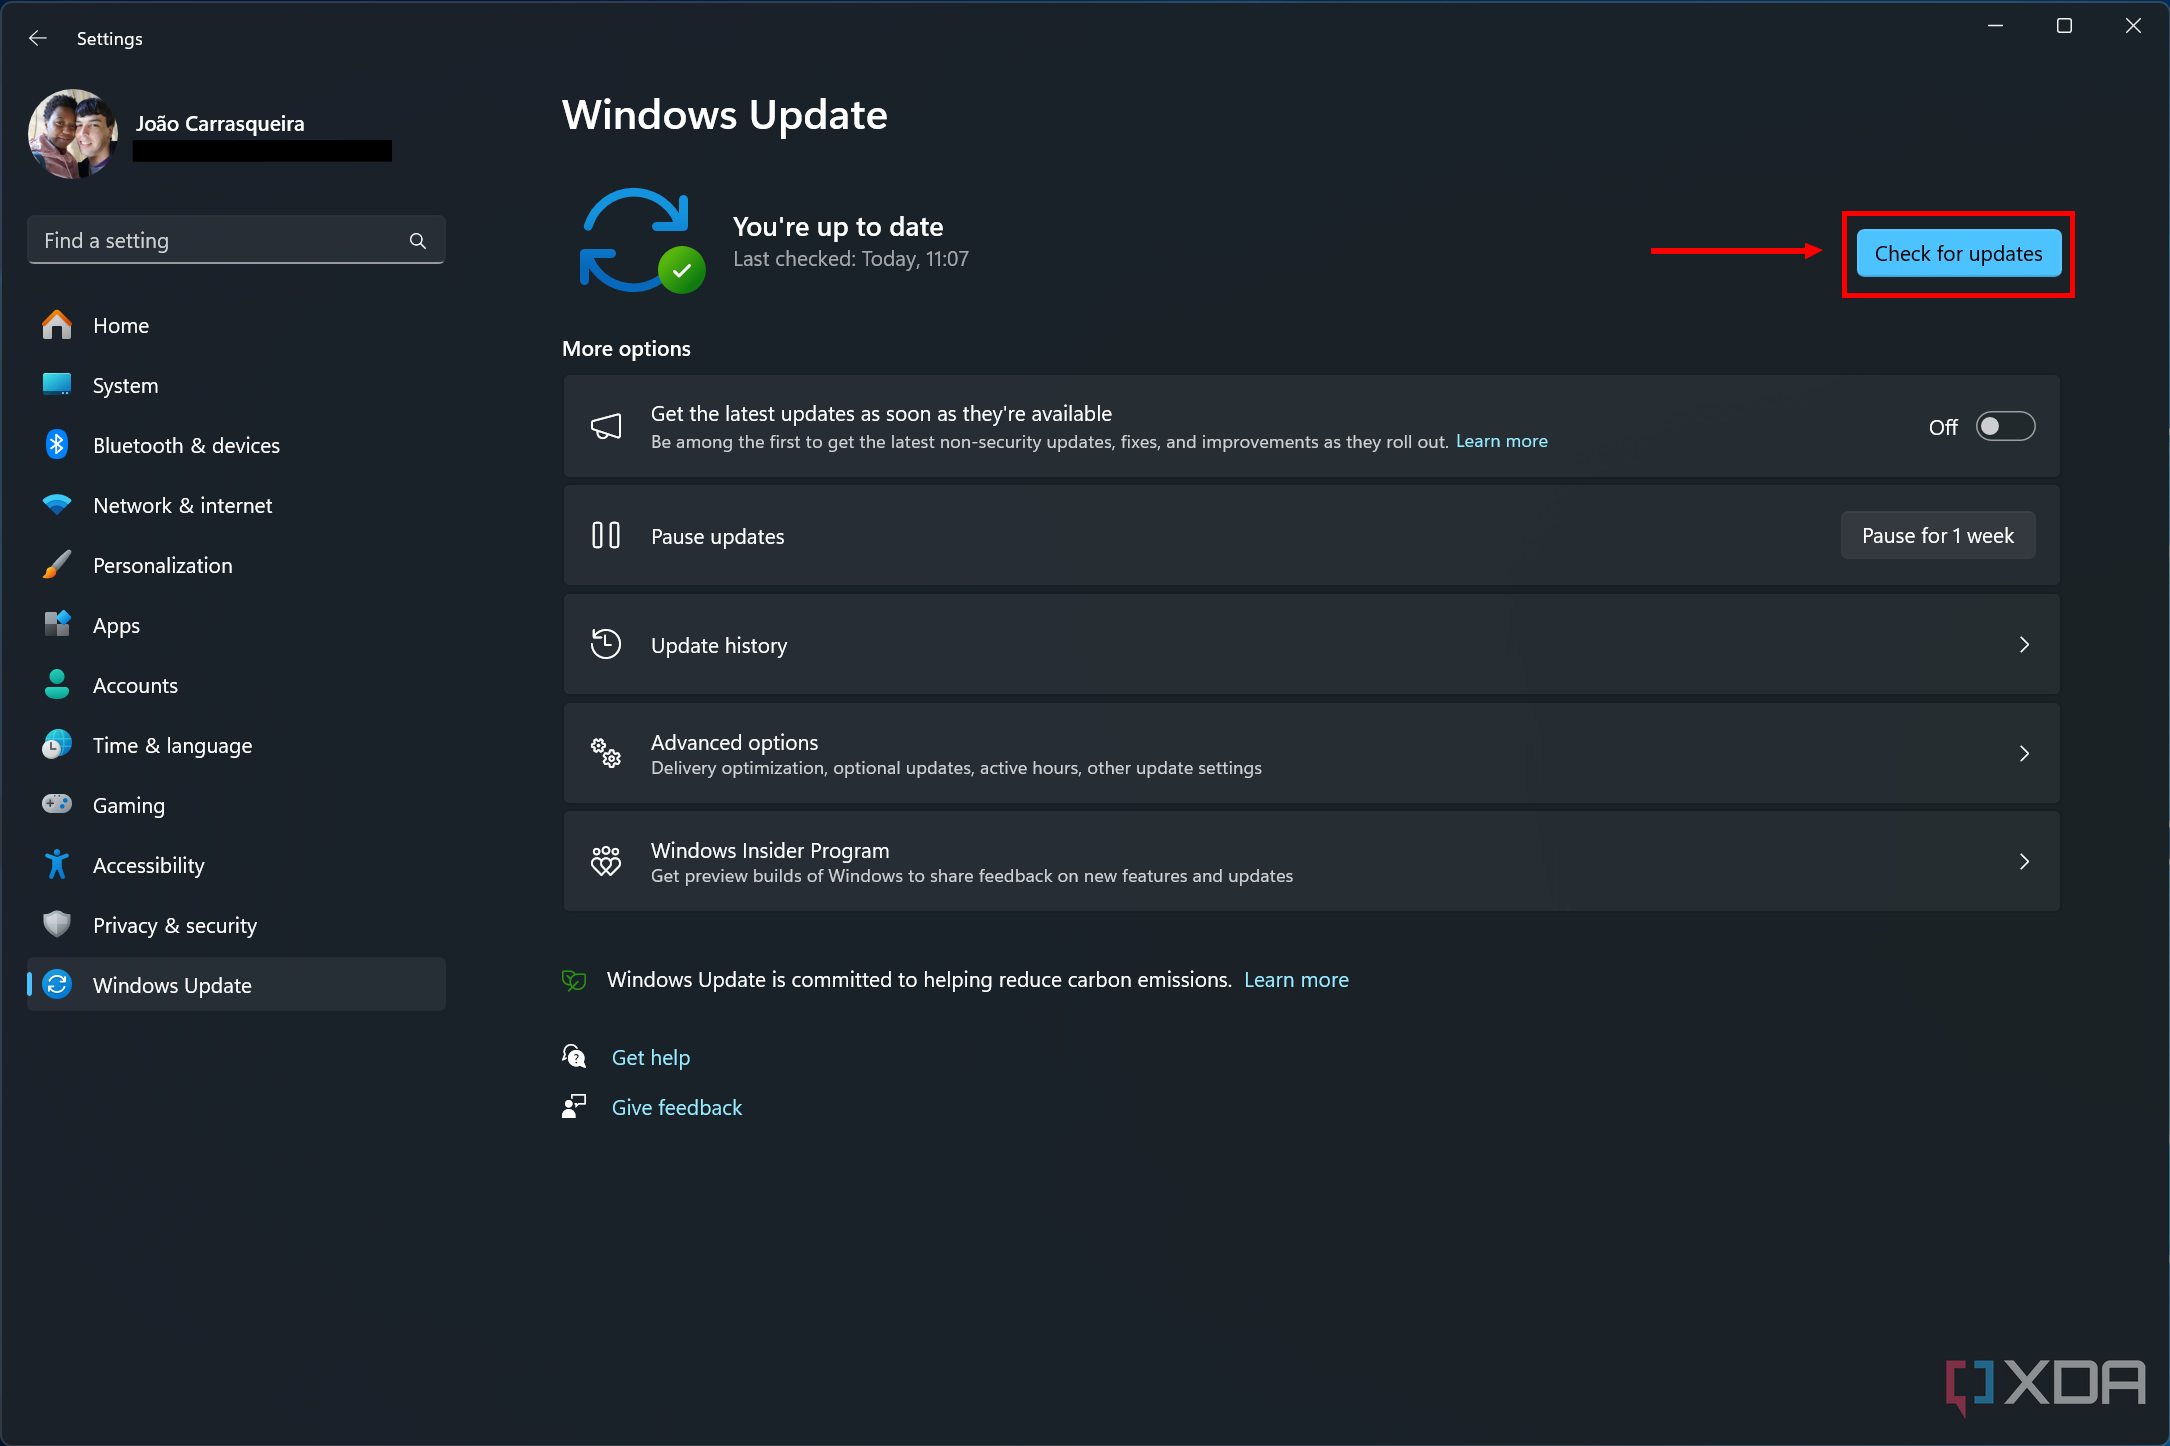
- You may be prompted to reboot your computer to finish installing updates.


After this, try doing what you were doing before and see if you still get the same error.
Update your drivers
If you narrowed down the issue to a specific device on your computer, try updating the drivers for that device on your computer. The best way to do this is to look for drivers on the manufacturer’s website to make sure you’re getting the latest and greatest. Alternatively, you can use Device Manager to look for updates:
- Press Windows + X (or right-click the Start menu icon) and choose Device Manager.
- Find the device category for what’s causing the issue and expand it. Devices with errors can also be highlighted in Device Manager, so you can start there.
- Right-click the device and choose Update driver.
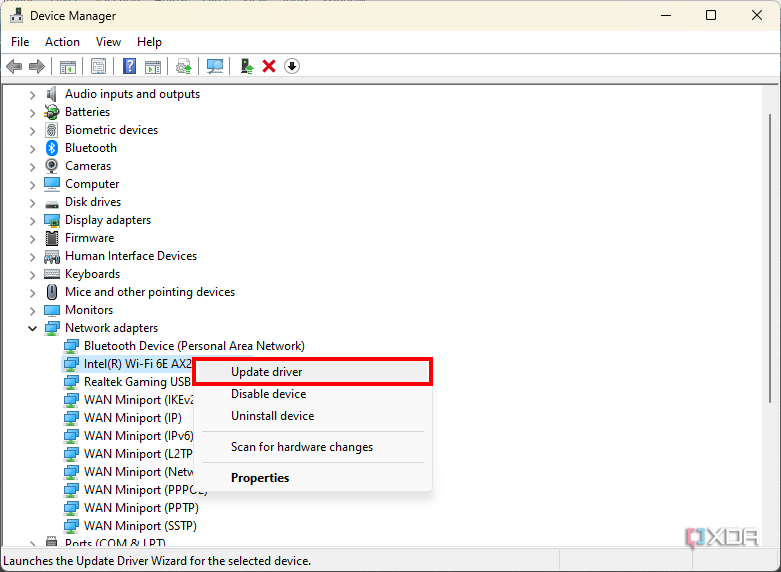
- Select Search automatically for drivers.

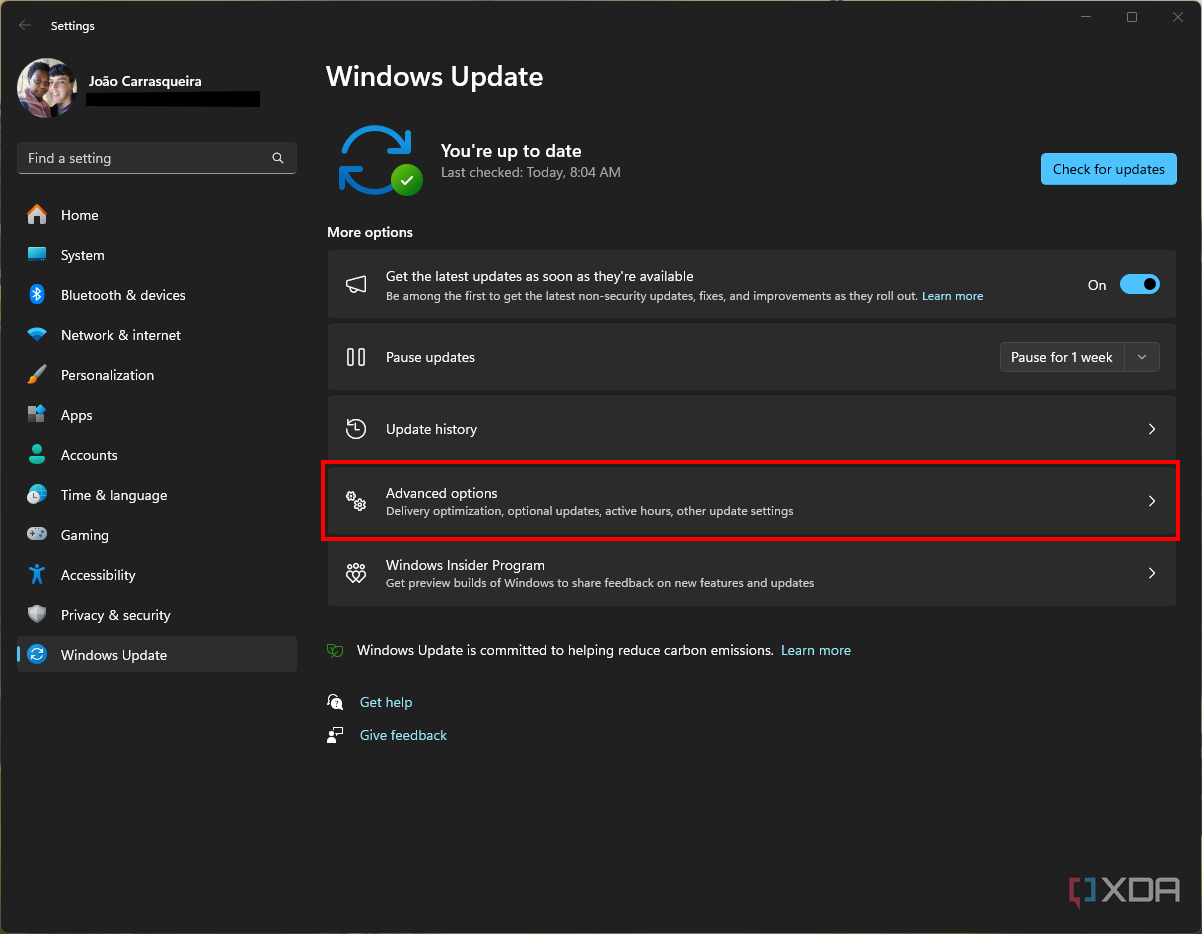
- It’s possible Windows won’t find any new drivers. You can click Search for updated drivers on Windows Update to see if there’s anything there.


- Click Check for updates.
- If no updates install automatically, click Advanced options.
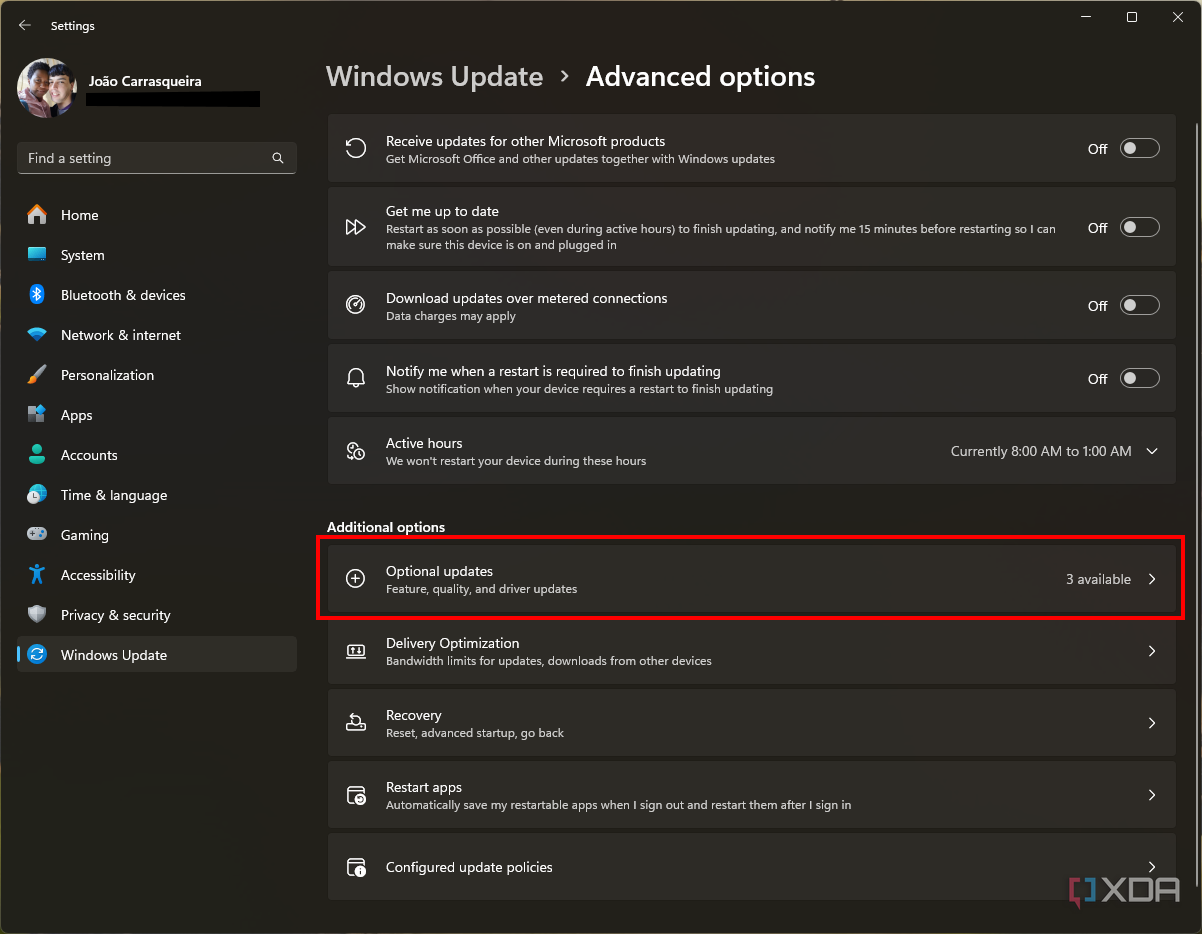
- Choose Optional updates and see if there are any driver updates in there
- Select the updates you need and click Download and install.
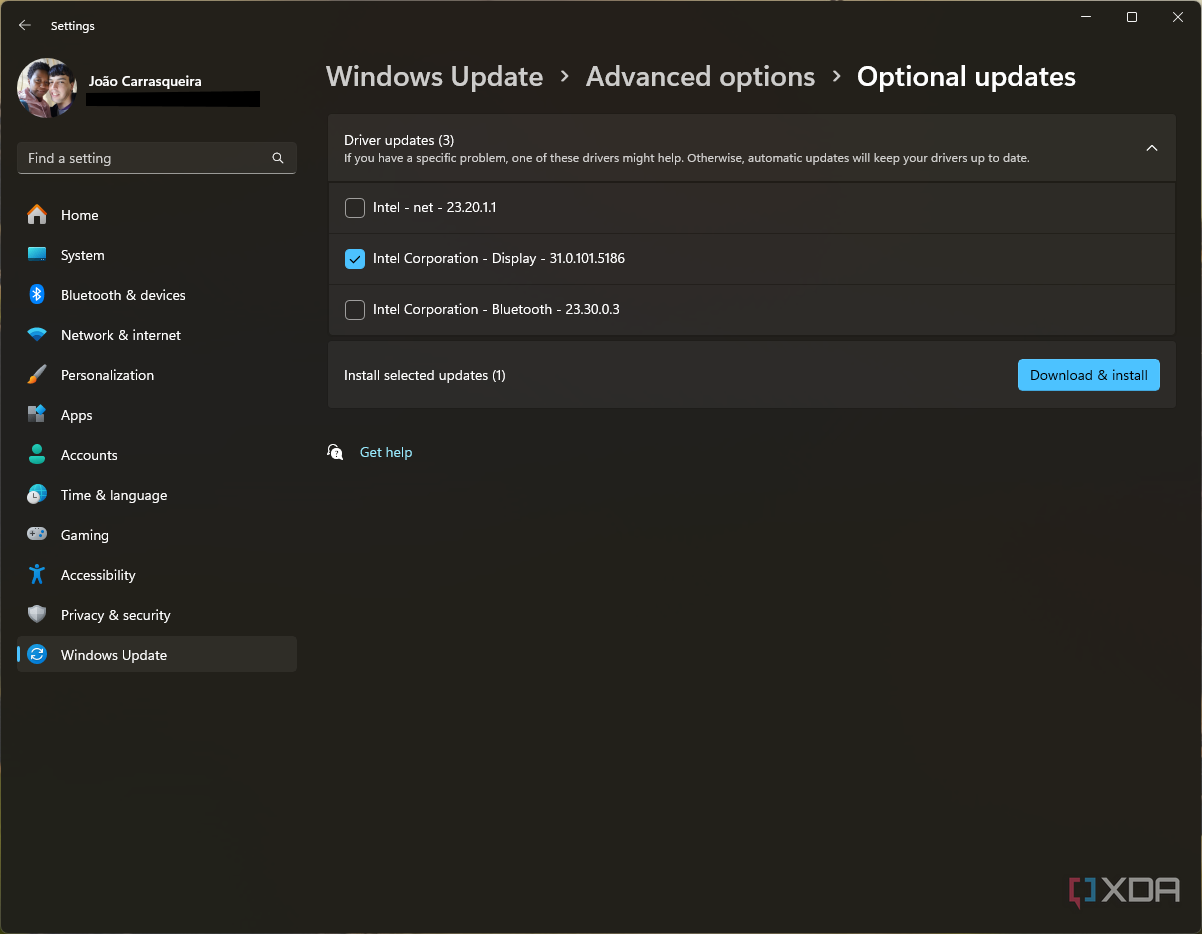
- You may be prompted to reboot your computer to finish installing drivers.


Update apps
If the BSOD you’re facing is happening when running a specific app, it’s possible that said app is the one to blame for the issue. In this case, check for updates for the app from the manufacturer’s website or within the app itself. Some apps may also be updated through the Microsoft Store. To do this:
- Open the Microsoft Store.
- Click the Library button in the bottom left of the app.

- Click Get updates to install updates for all your apps.

Uninstall updates
Sometimes buggy updates can be the problem
If the BSOD you’re seeing happened after a recent update, it’s possible that the solution you’re looking for is the opposite. Instead of installing a new update, you may need to revert to an older one that didn’t have the problem. Here’s what you need to do if that’s the case:
- Open the Settings app.
- Click Windows Update on the menu on the left.

- Choose Update history.

- Click Uninstall updates.

- Find the update that you believe caused the issue (try to match the date when the issues started with the date when the update was installed).
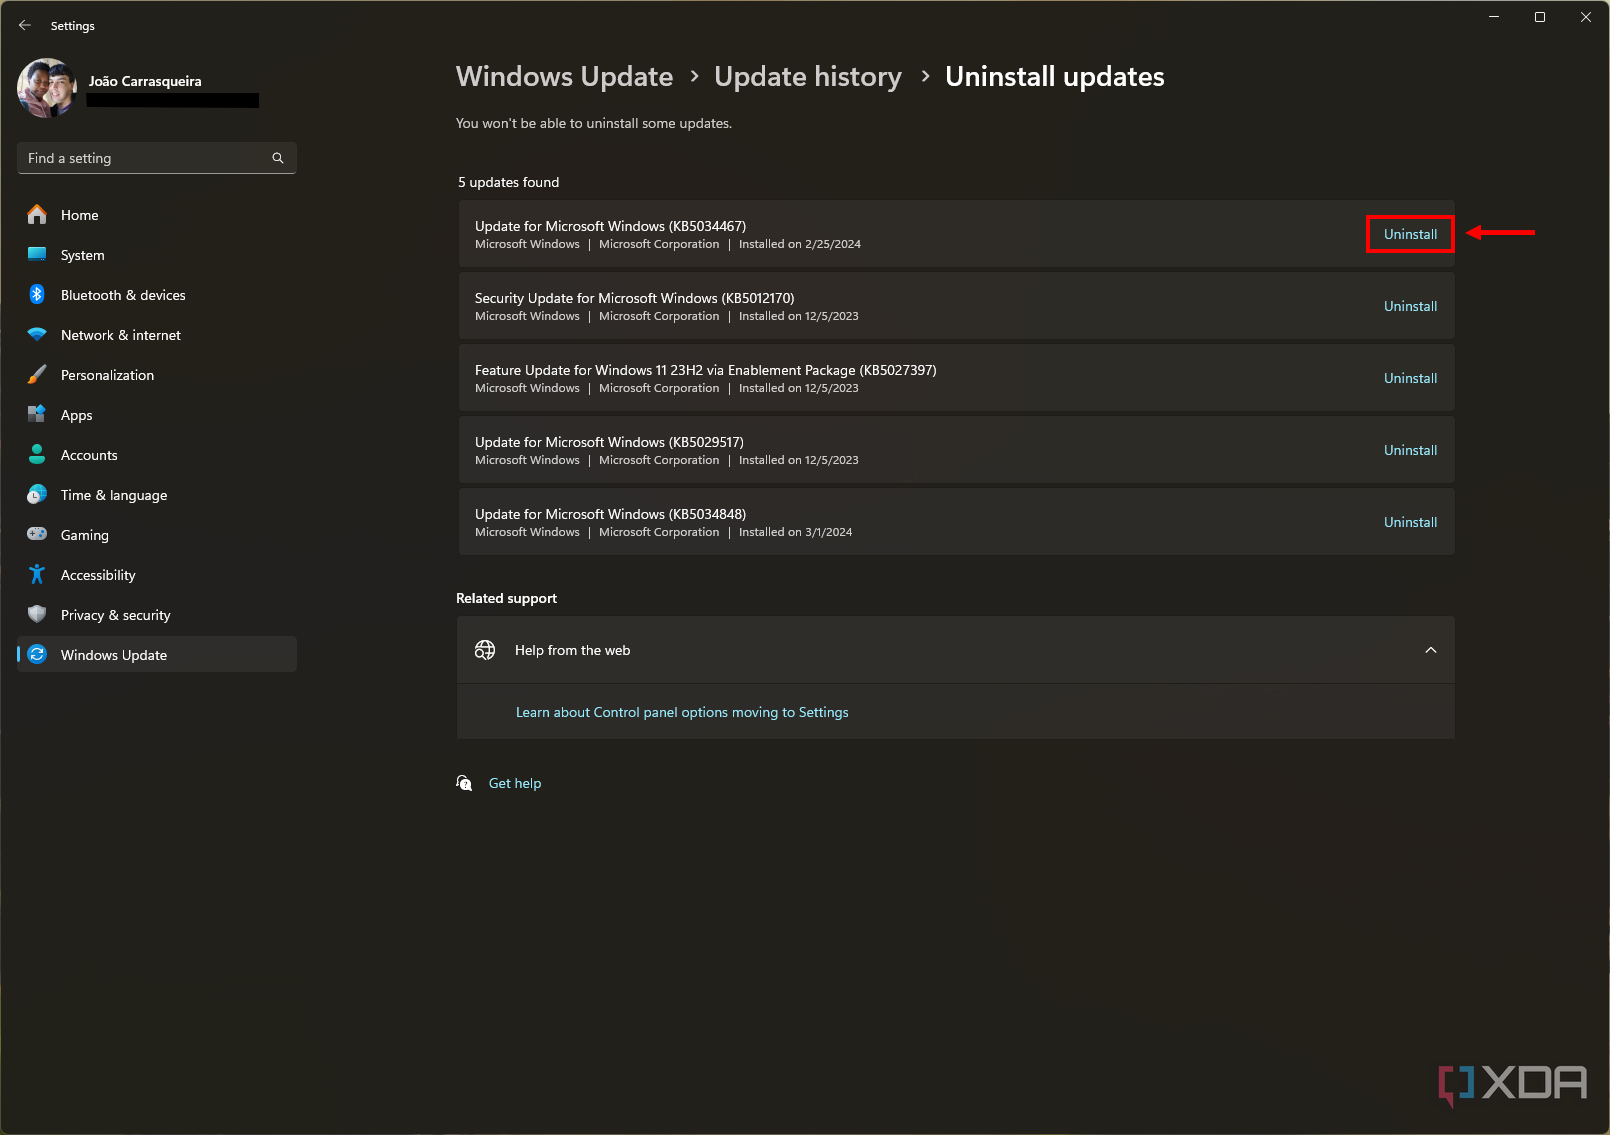
- Click Uninstall next to it.


How to uninstall updates if your computer won’t boot
For more serious problems
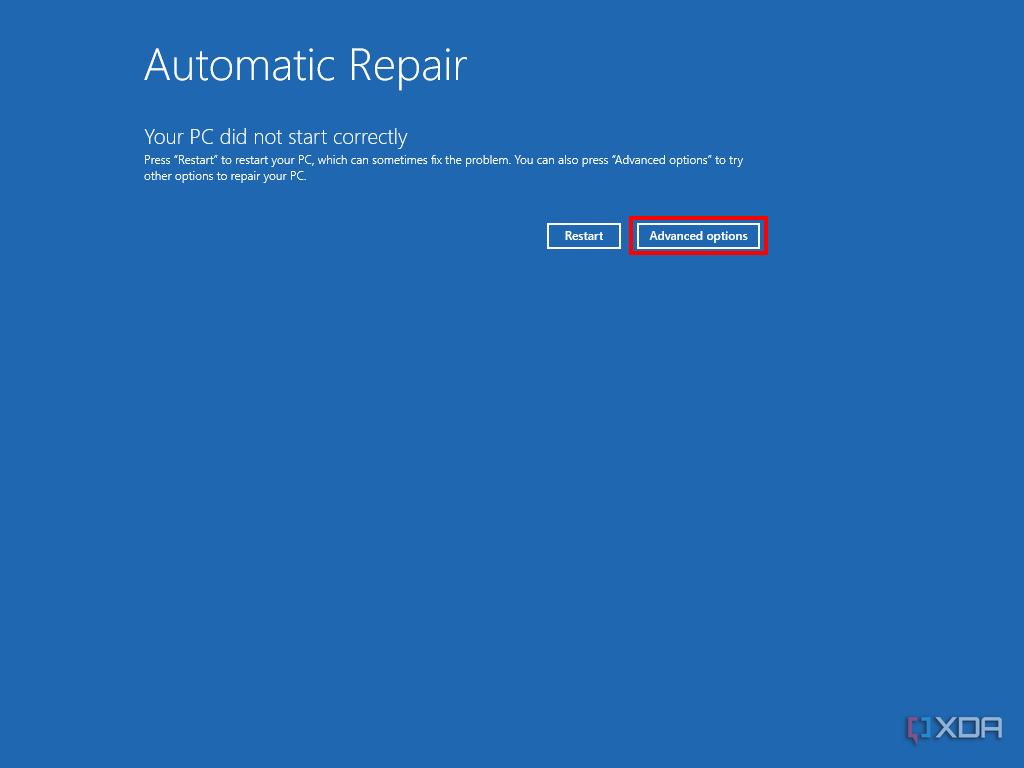
If the BSOD problem is so bad you can’t get to any part of Windows to fix it, you can use the Windows Recovery Environment (WinRE) to do it. If your computer fails to boot three times in a row, you should see WinRE automatically, but if it isn’t showing up, you can force it by using these steps:
- Turn on your computer.
- When you see the Windows logo (or your PC manufacturer’s logo), press and hold the power button to turn off the PC.

- Turn on the computer again and repeat step 2.
- After booting for the third time, Windows should automatically try to diagnose issues automatically. Click Advanced options.
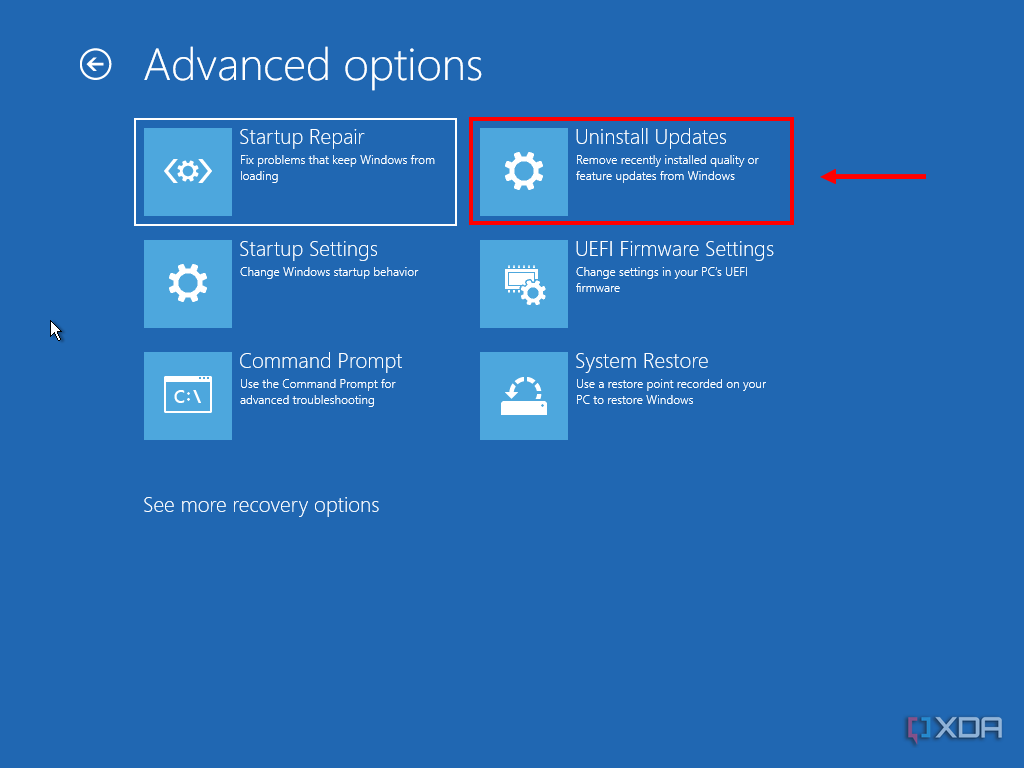
- Choose Troubleshoot and then Advanced options.

- Click Uninstall updates.
- Choose Uninstall latest quality update to uninstall the latest cumulative update you installed. If you’ve tried this already, you can try to Uninstall latest feature update if you think this is the problem.
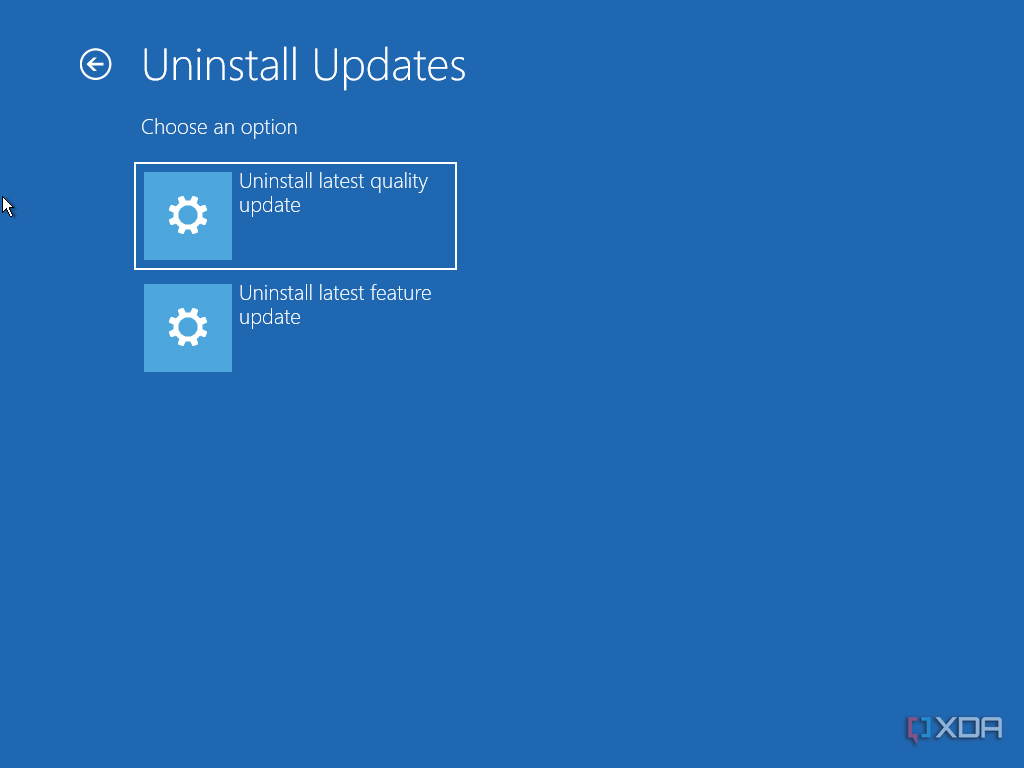


If a recent update was causing the issue, this should be able to get you back to your PC. A good idea is to temporarily pause updates using the Settings app until a fix becomes available.

How to stop receiving updates on Windows 11
Whatever your reason, if you’d rather Microsoft left your PC alone here’s how to stop getting Windows 11 automatic updates.
Uninstall updates using Safe Mode
If you can’t get to the Settings app or don’t think the update causing the issue is the latest one, you can also use Safe Mode to uninstall specific updates. To access Safe Mode:
- If the Windows desktop is working:
- Open the Start menu.
- Hold the Shift key and click the Power button. Then Restart.
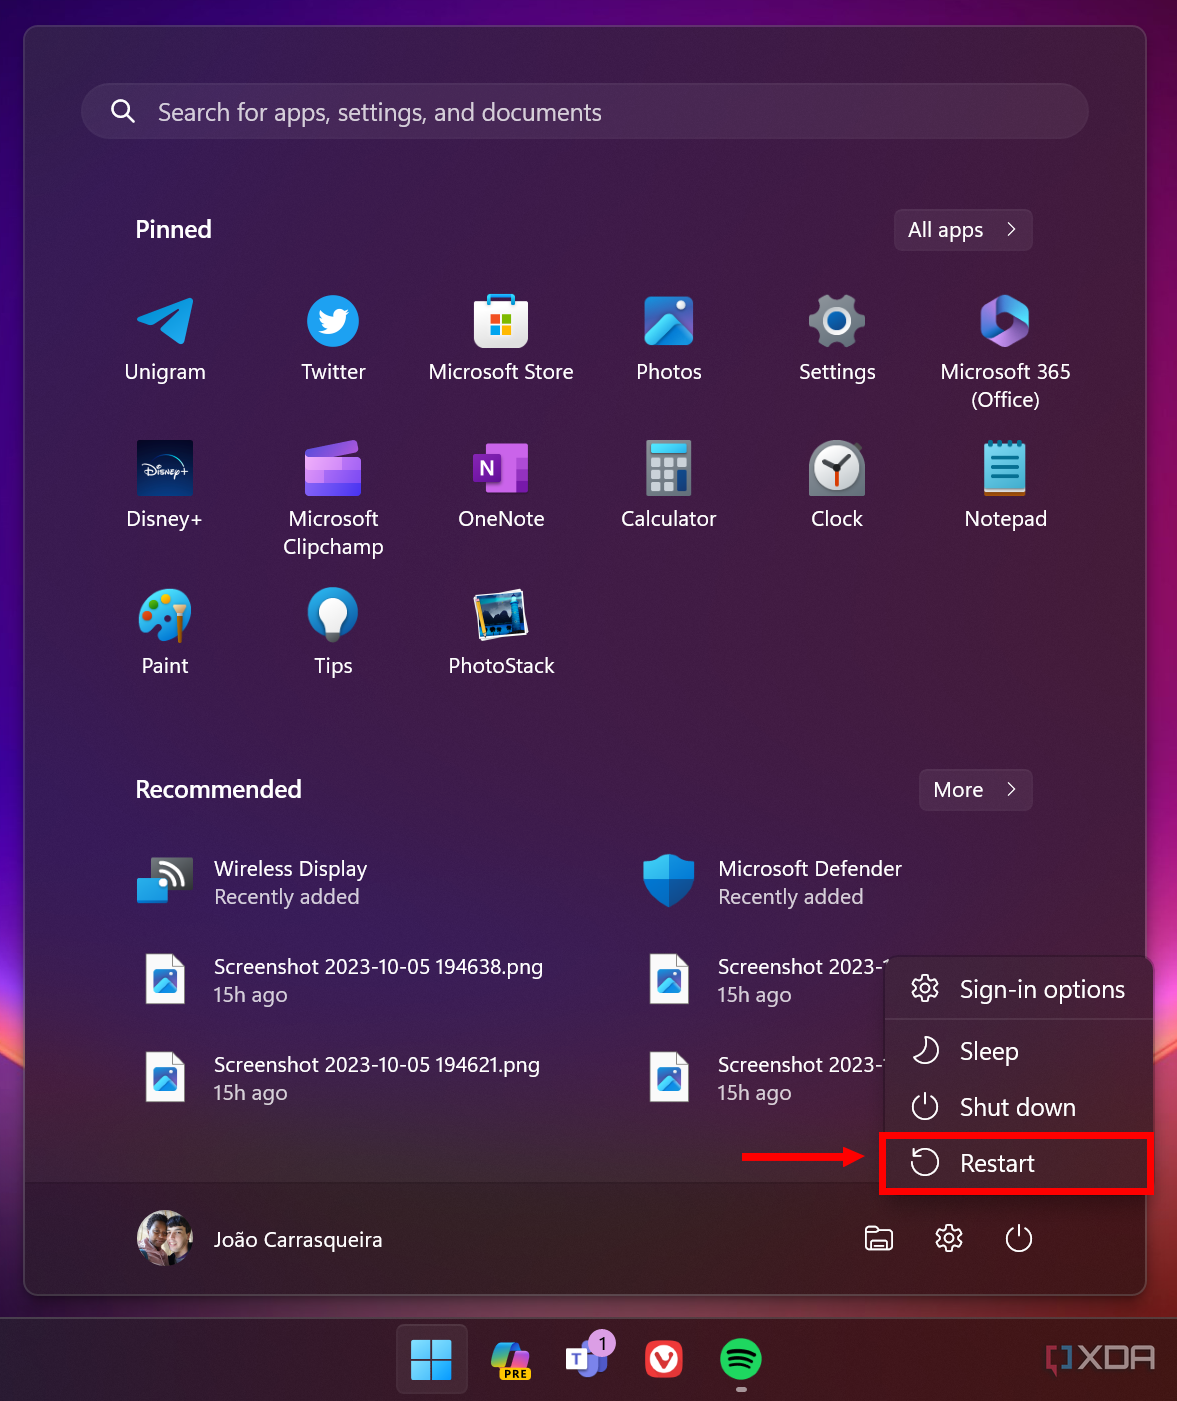
- This will take you to the Windows Recovery Environment.
- If you can’t use the Windows desktop, follow steps 1 through 4 in the section above to get to the Windows Recovery Environment.
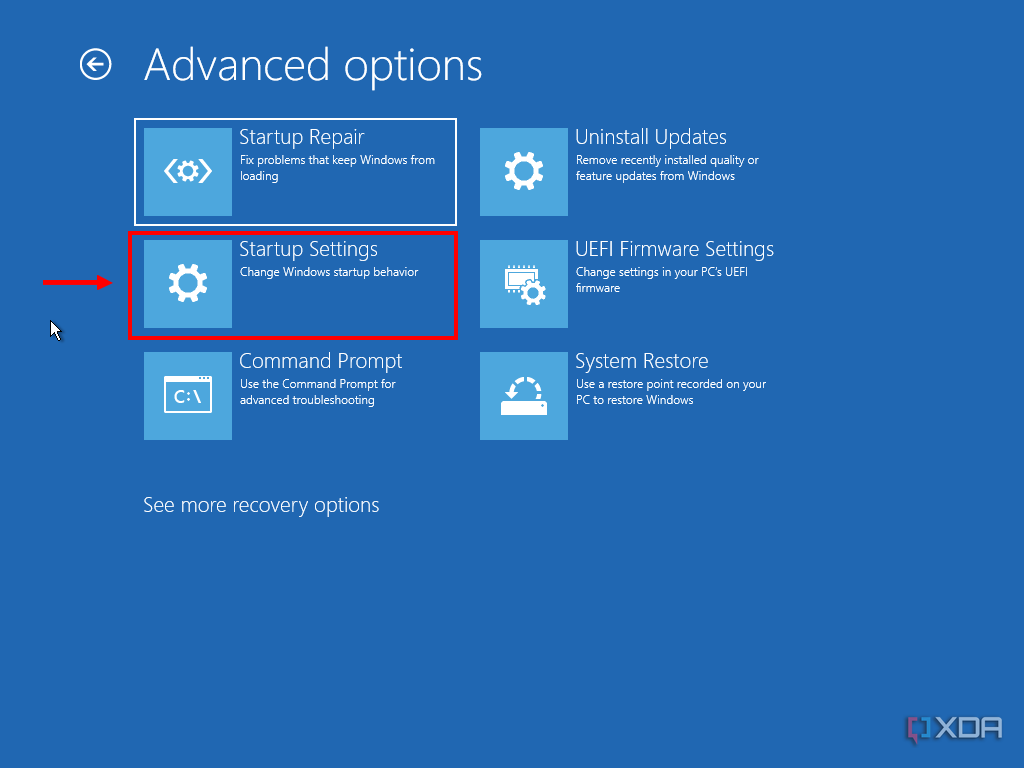
- Choose Troubleshoot and then Advanced options.
- Click Startup settings and then Restart.
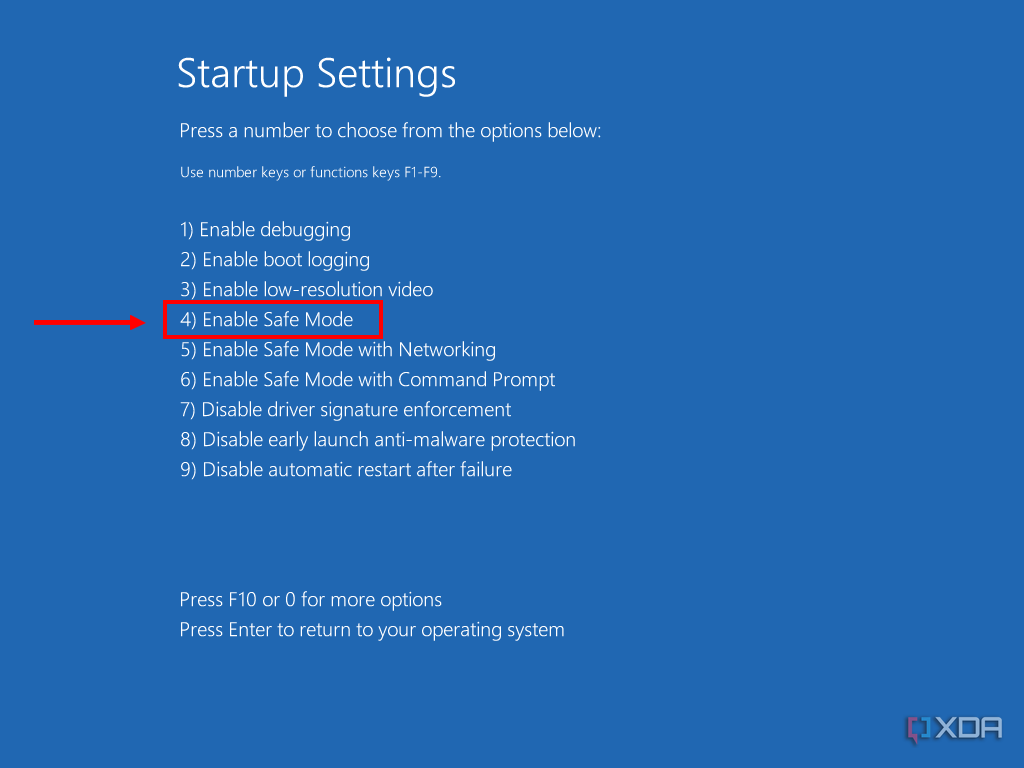
- Upon restarting, press 4 or F4 to restart the computer in Safe Mode.


If your device or drive encryption is enabled, you’ll need your BitLocker recovery key to enter Safe Mode. You can find keys linked to your Microsoft account
here
.
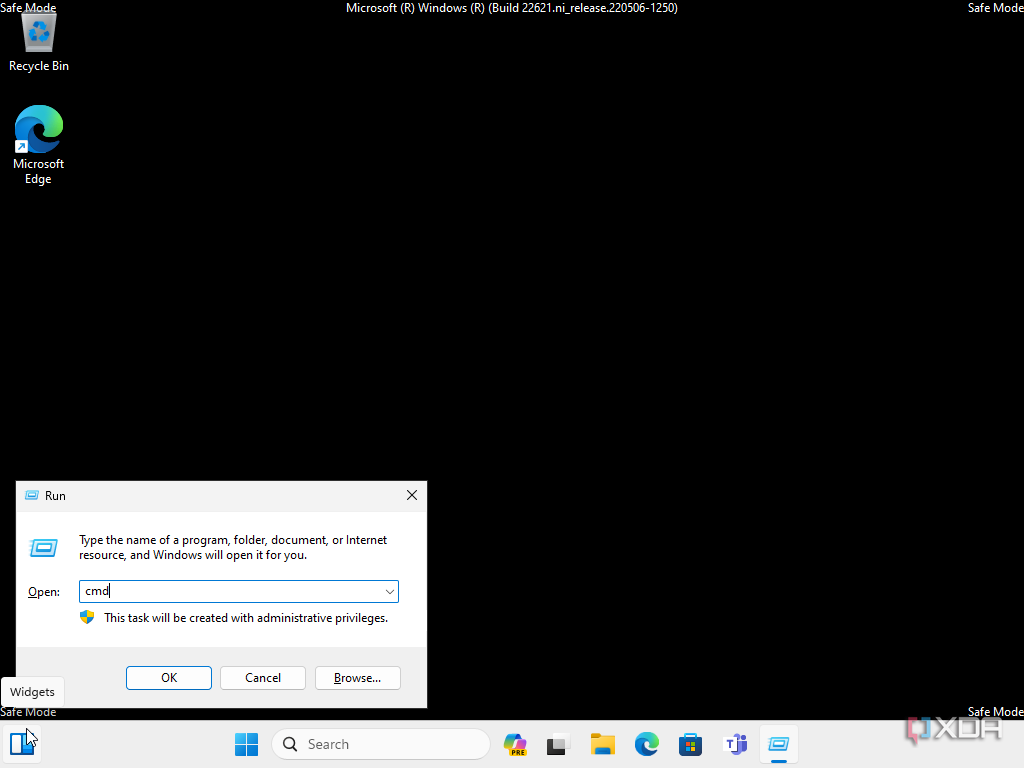
Once you’re in Safe Mode, you’ll need to use Command Prompt to see your list of installed updates and remove the problematic one:
- Press Windows + R to open the Run dialog.
- Type in cmd and hit Enter.
- Enter the following command and press Enter to see your list of installed updates:
wmic qfe list brief /format:table
- Look for the InstalledOn and HotFixID fields to help you determine which update may be causing the problem.
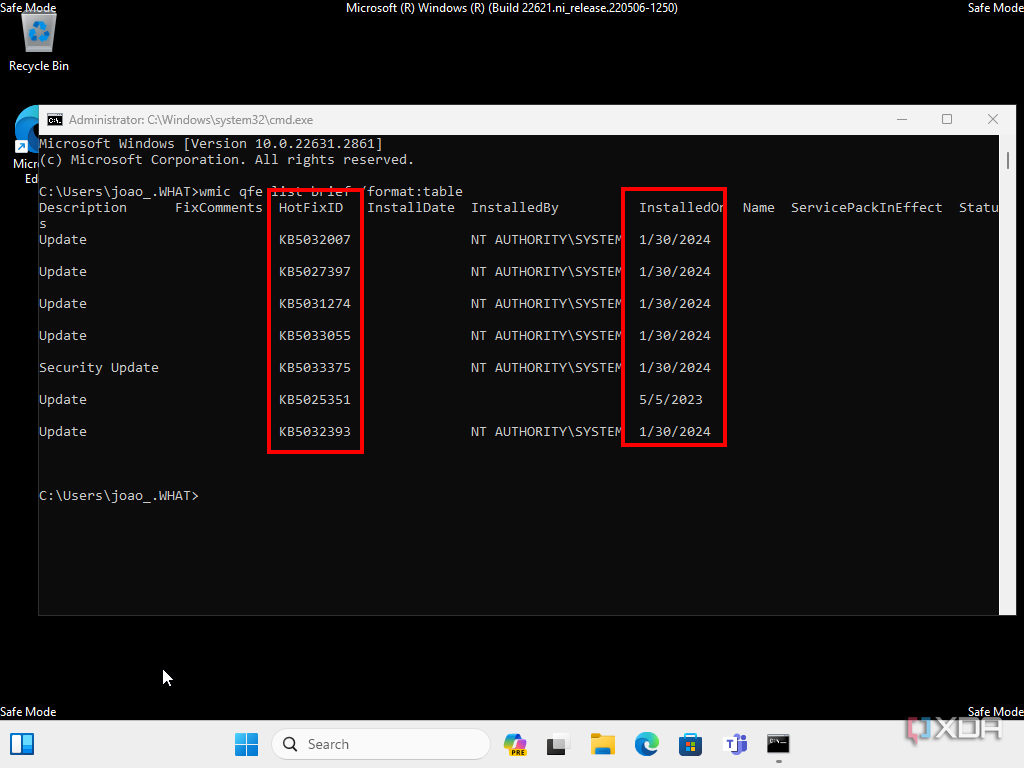
- Once you know it, using the following command to uninstall the update, replacing HotFixID with the appropriate number from the table (without the KB at the start).
wusa /uninstall /kb:HotFixID
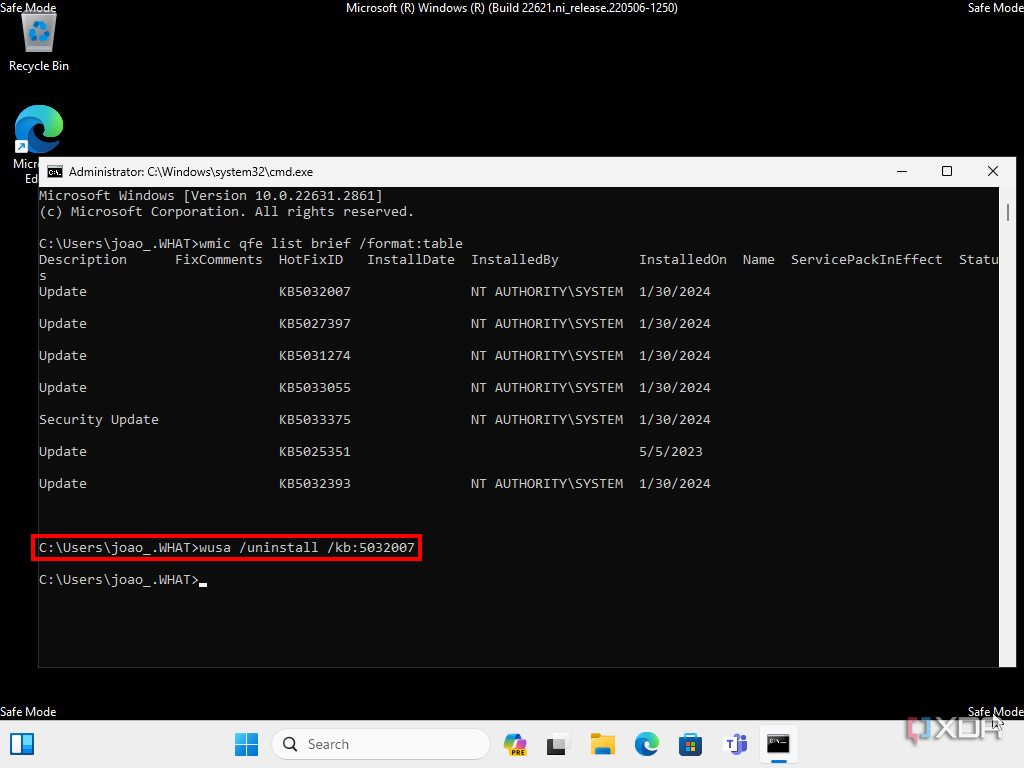
- Click Yes and follow the on-screen instructions if necessary.
- Restart the computer to apply the changes; things should be back in working order.


Uninstall or roll back drivers
New versions can be problematic
Sometimes, the problems you’re having can be caused by a faulty driver update. If installing the latest version didn’t fix the issue, or you already have the latest version, maybe you need to go back to a previous one. Here’s how to do that:
- From your desktop, press Windows + X (or right-click the Start menu icon) and choose Device Manager.
- Find the device that seems to be causing the issue or the one that was most recently updated.
- Right-click the device and choose Properties.
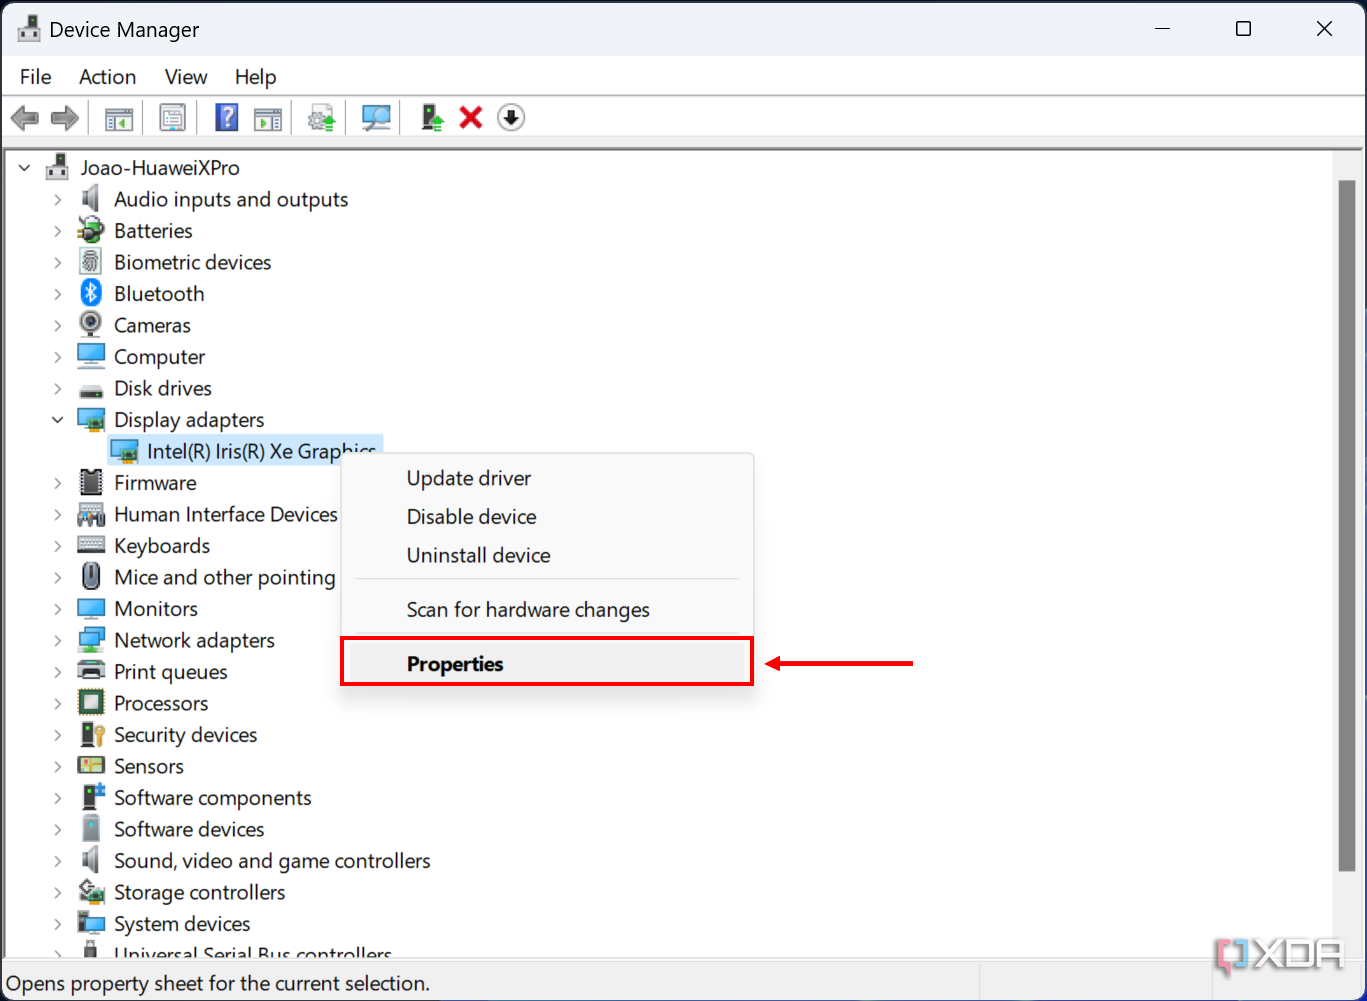
- Switch to the Driver tab.
- Click Roll Back Driver to go back to the previous driver version.
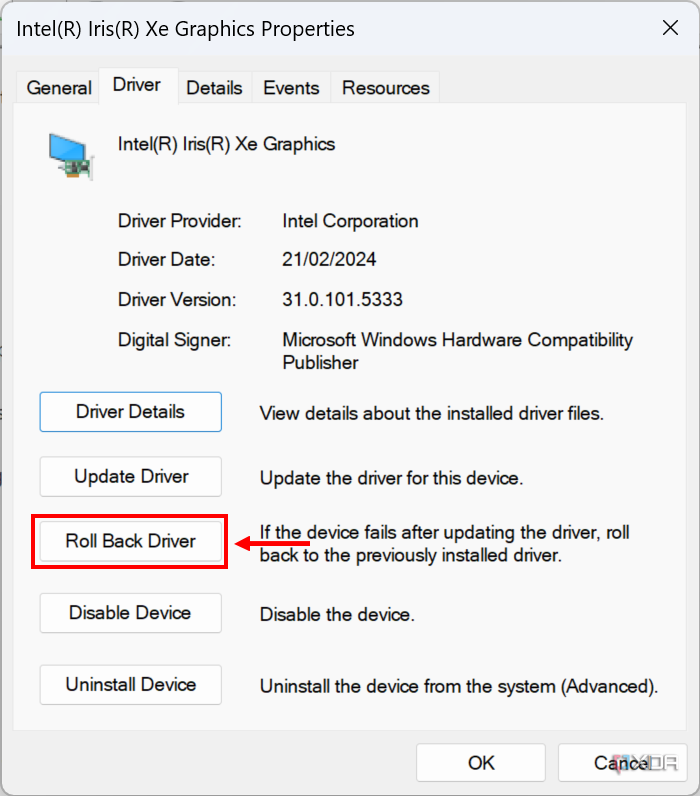
If this button is greyed out, there’s no previous driver version available, which may suggest the problem isn’t here.
- Choose any of the options in the dialog that appears and click Yes.


Alternatively, you can try to uninstall the driver altogether, but this may cause some devices to stop functioning, so you’ll want to download a driver beforehand so you can get things working again. To do this, you’ll need to use the Uninstall device option and then check the box that says Attempt to remove the driver for this device before clicking Uninstall.
If you can’t reach this option, you can check out the section above on using Safe Mode and try uninstalling problematic drivers that way. Safe Mode loads Windows with only the essential drivers, so if any of your drivers are the issue, you should be able to boot into it normally and diagnose from there.
Uninstall graphics drivers with Display Driver Uninstaller
If the issue you’re having is with your GPU, you might want to uninstall the driver, too. However, graphics drivers are very complex, and just uninstalling it normally may not be enough. If you want to fully clean up any files that might be causing issues, using a program called Display Driver Uninstaller, or DDU, is a good idea. This third-party program is designed to fully remove graphics drivers and any leftover files, allowing you to then install a new version without anything that might cause conflicts. Here’s how to use it:
- Start by downloading the new version of the driver you want to install so you have it ready for later.
- Download DDU from the official website and install/extract the files.
- Before using DDU, enter Safe Mode using the steps in the section above.
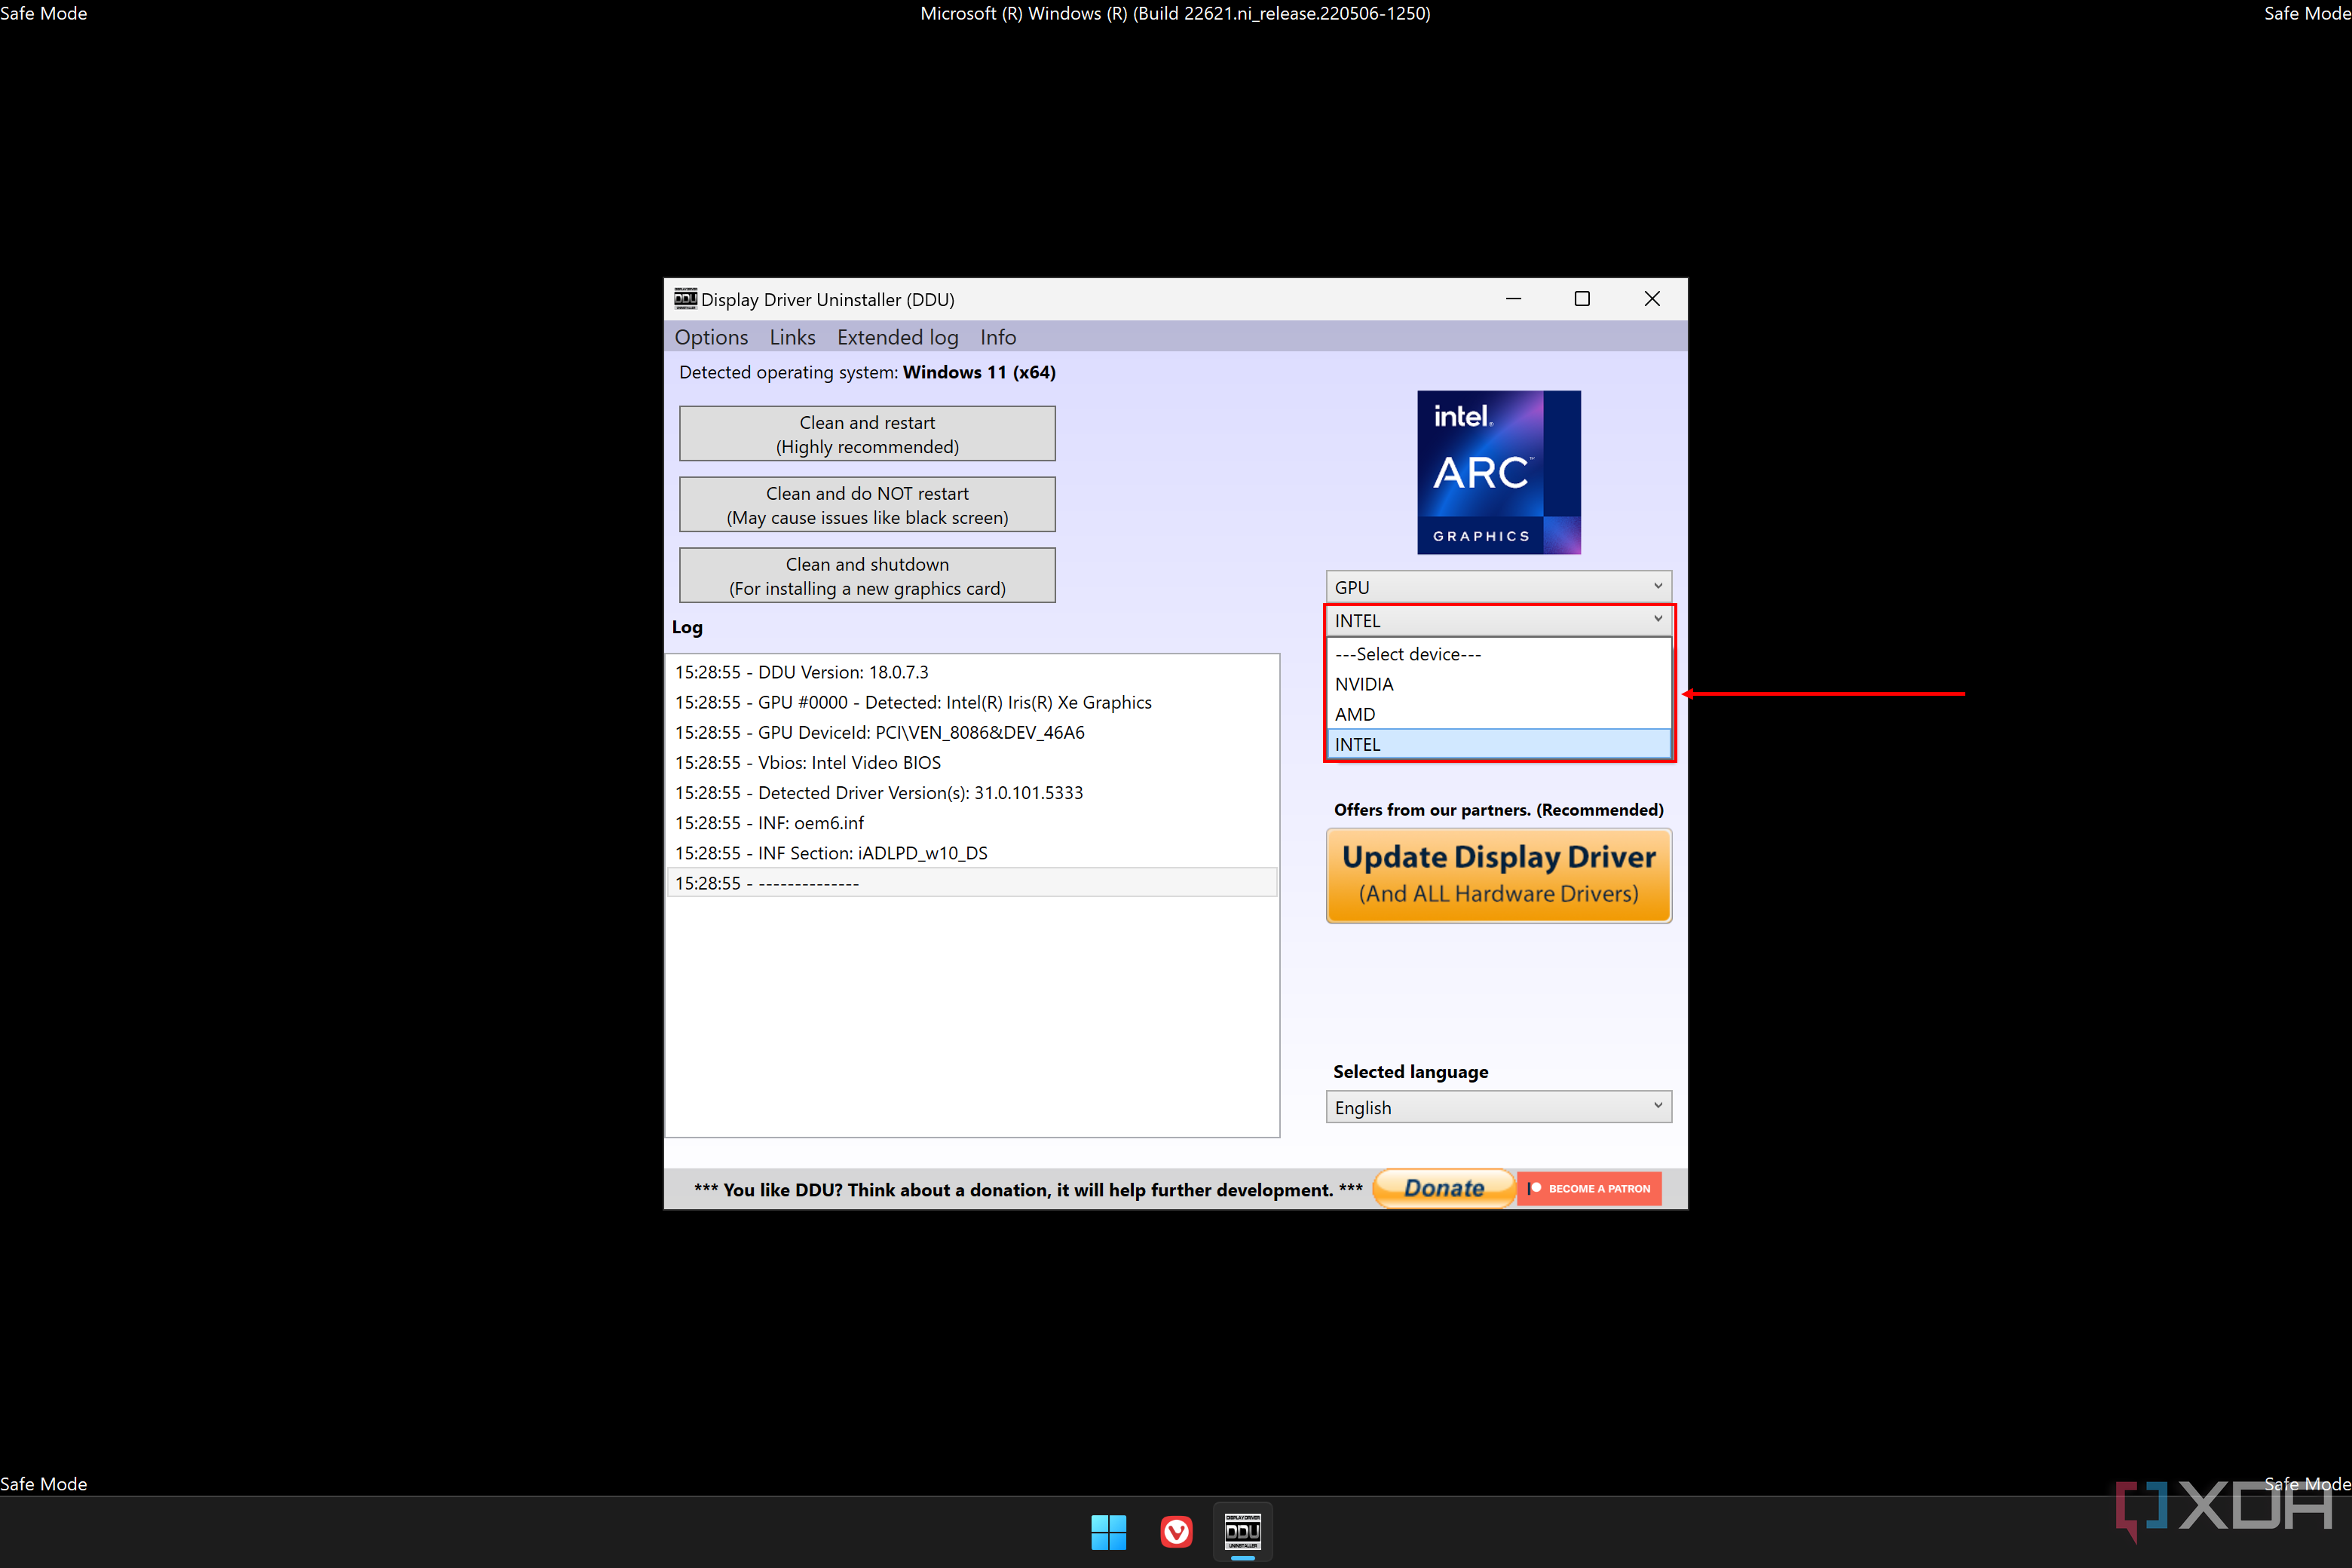
- Run DDU and accept the default settings.
- Under Type, choose GPU, then choose the graphics card brand you have. If you’ve switched GPUs, it’s also a good idea to first remove the driver for your old GPU, then repeat the process for the new GPU.
-
Click Clean and restart.
-
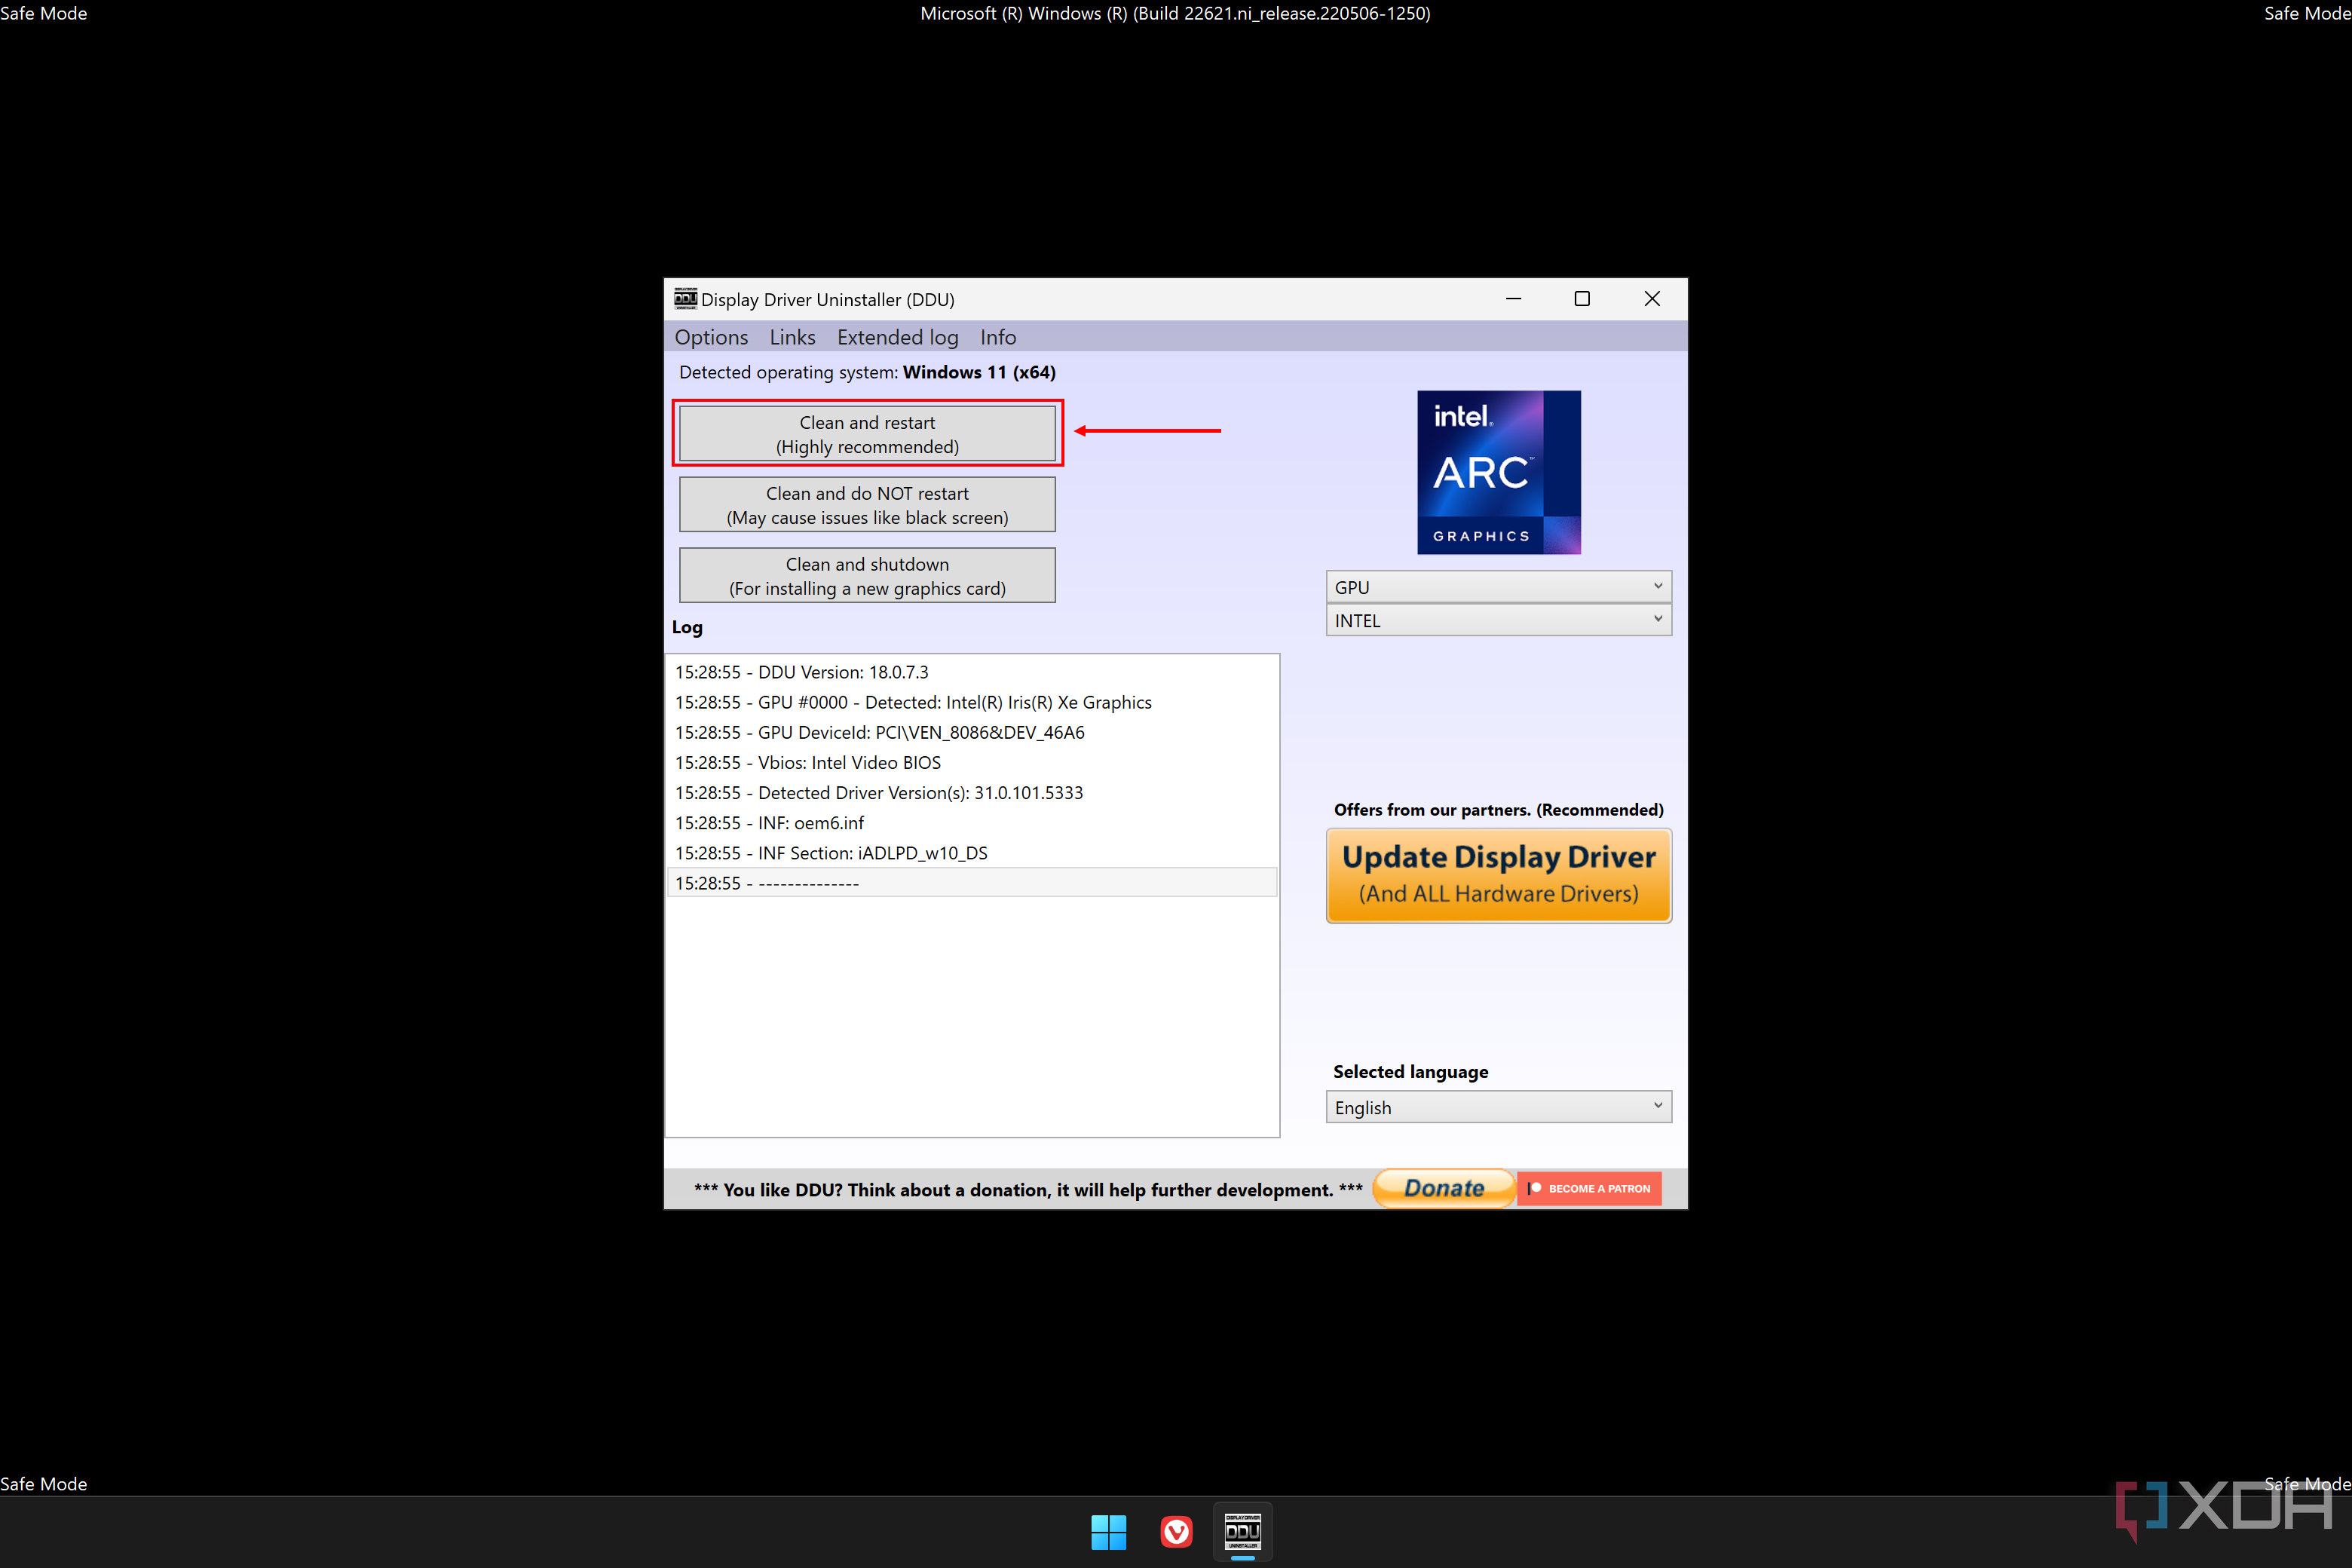
DDU will remove the drivers and any leftover files, then automatically restart the computer, which should boot in standard mode.
- Install the new driver you downloaded in step 1.


If you were having any issues with your graphics driver before, this should help fix them.
Uninstall apps
These can cause issues, too
If you’re having problems because of a specific app, then sometimes the best thing to do may be to just uninstall that app. To uninstall an app in Windows 11, follow these steps:
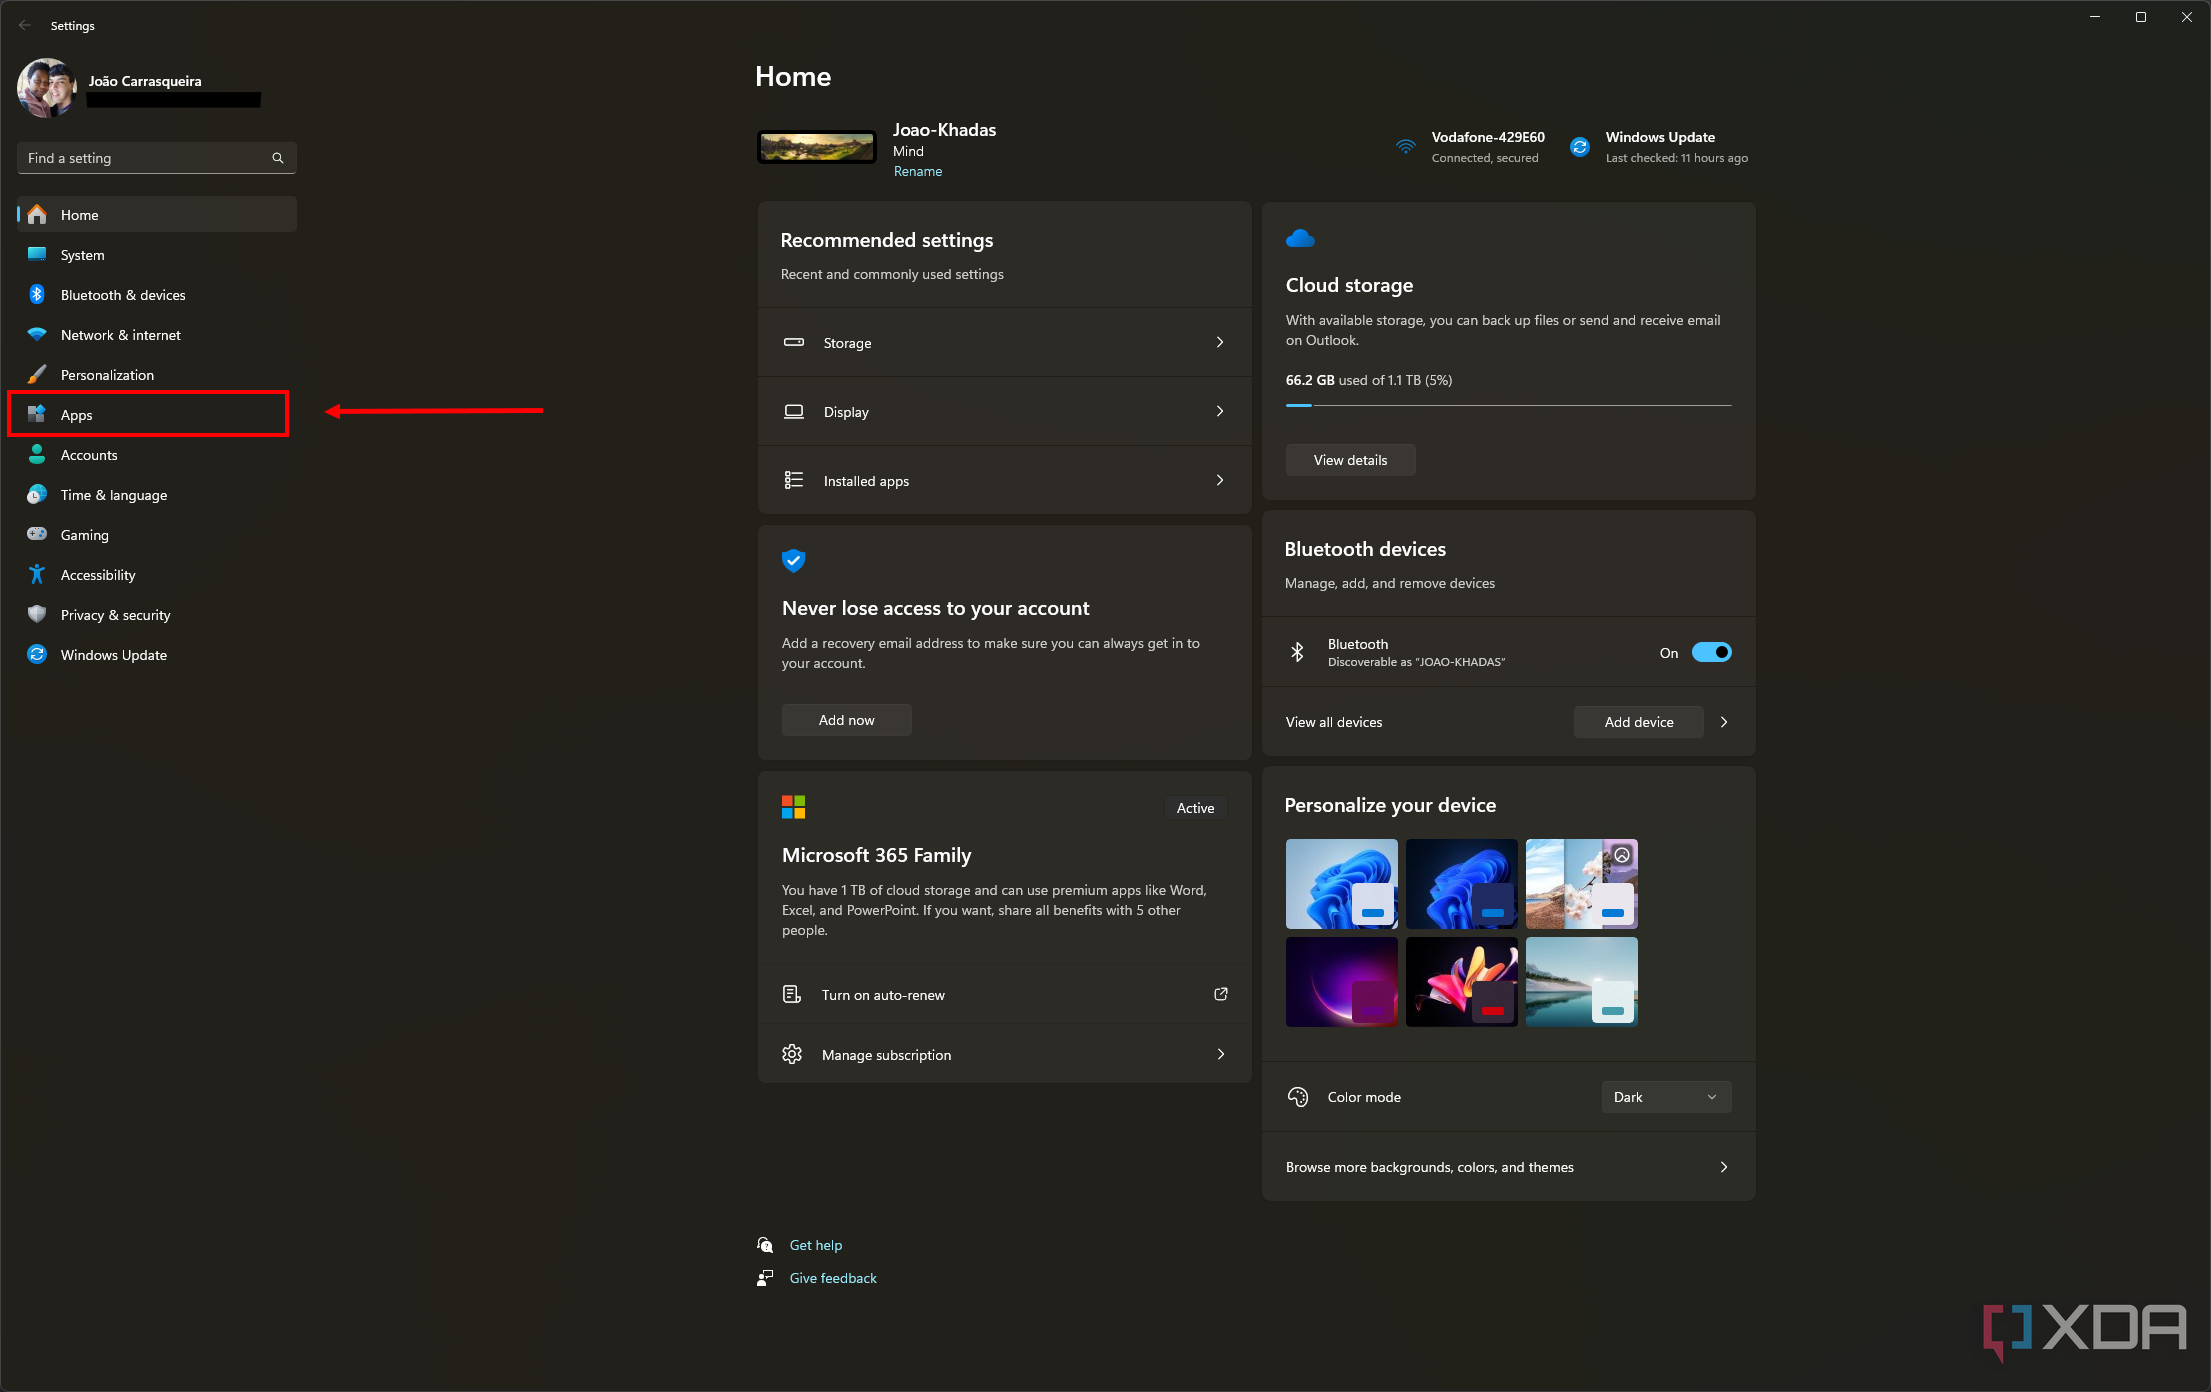
- Open the Settings app.
- Go to the Apps section on the left.
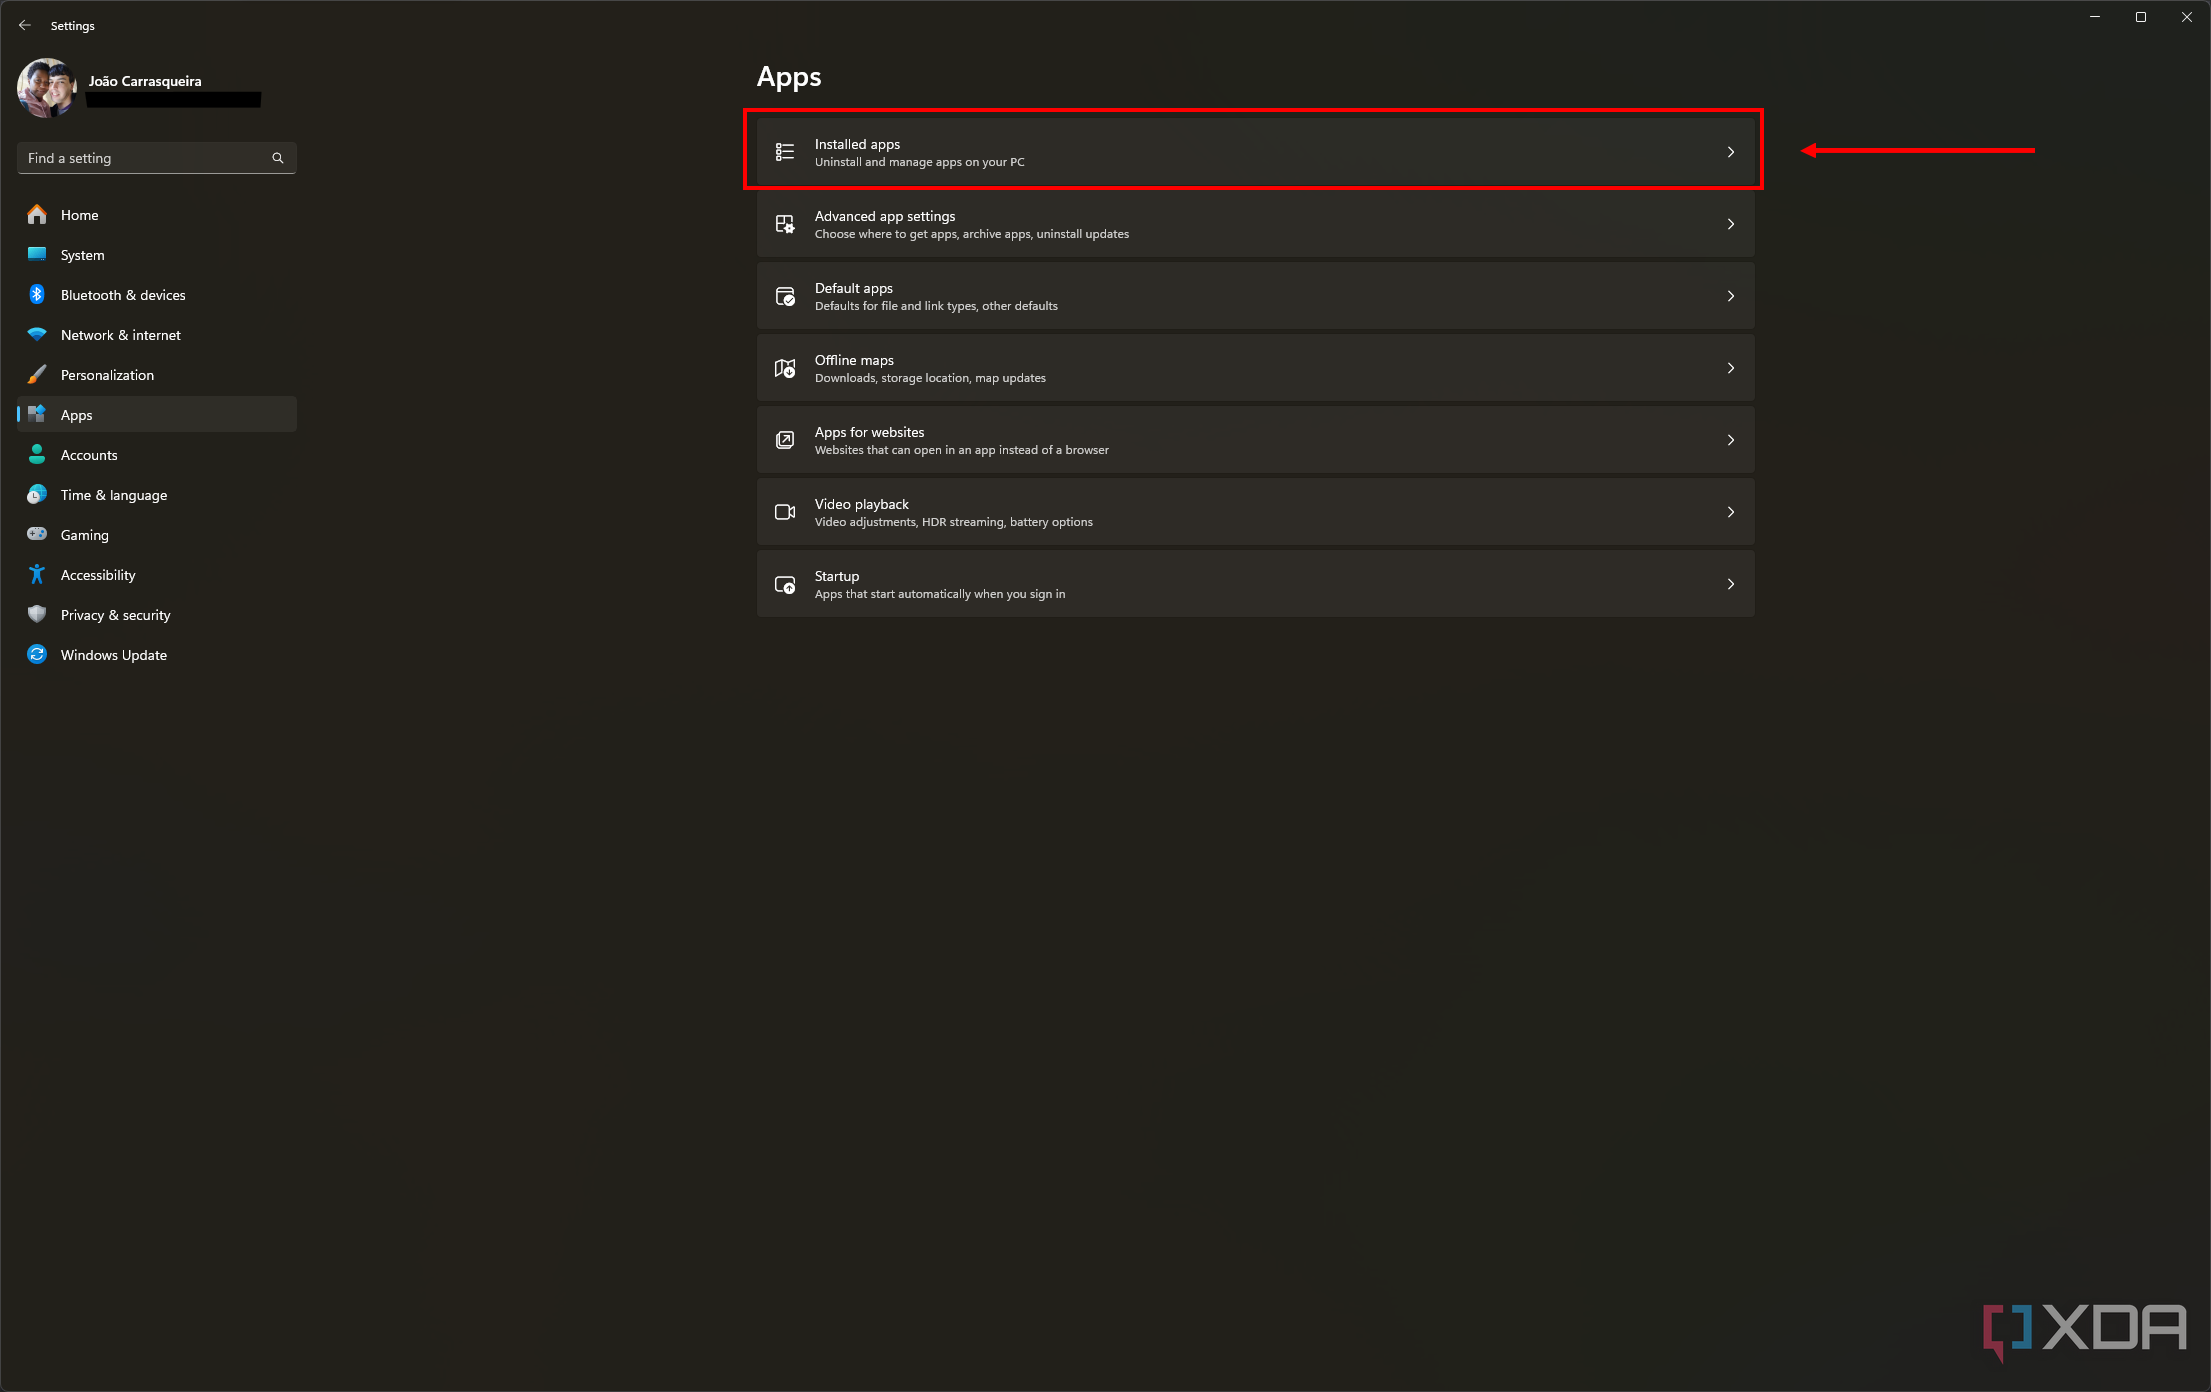
- Click Installed apps.
- Look for the app giving you issues, click the … (ellipsis) button, then click Uninstall.
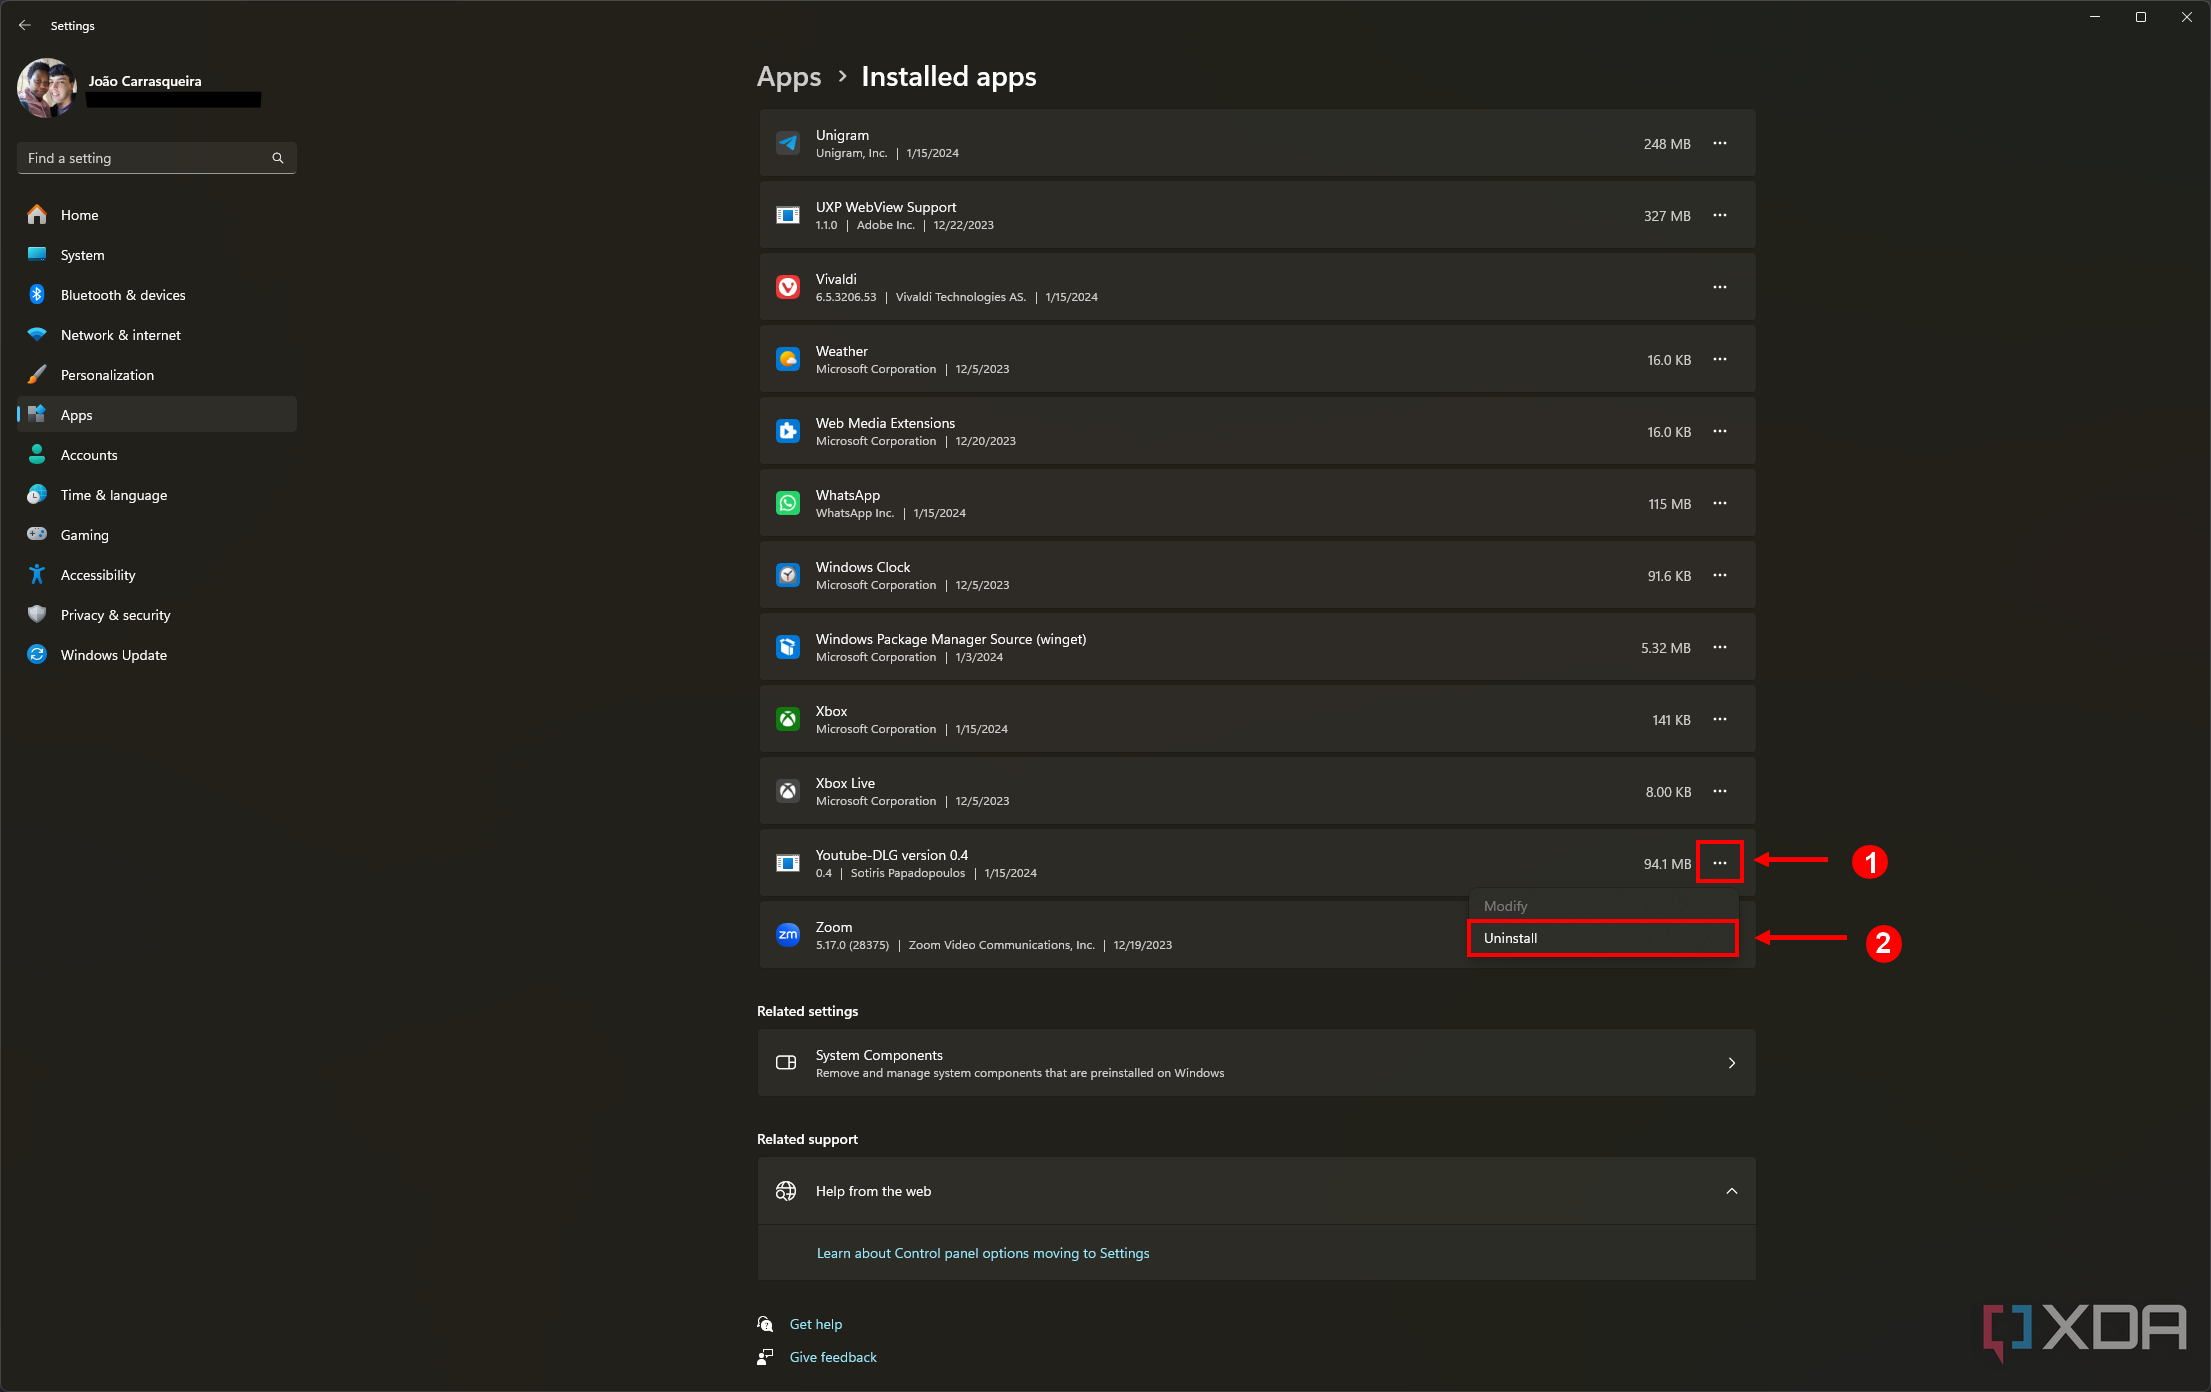
- Follow the steps to uninstall the app.
- Repeat for any other troublesome apps.


Uninstalling apps can also be a solution if you’re facing issues when installing a Windows 11 feature update, particularly when upgrading from Windows 10 to Windows 11. Some apps may cause conflicts with new versions of Windows, so it’s worth a shot.
Run DISM and SFC scans
Fix system and disk errors
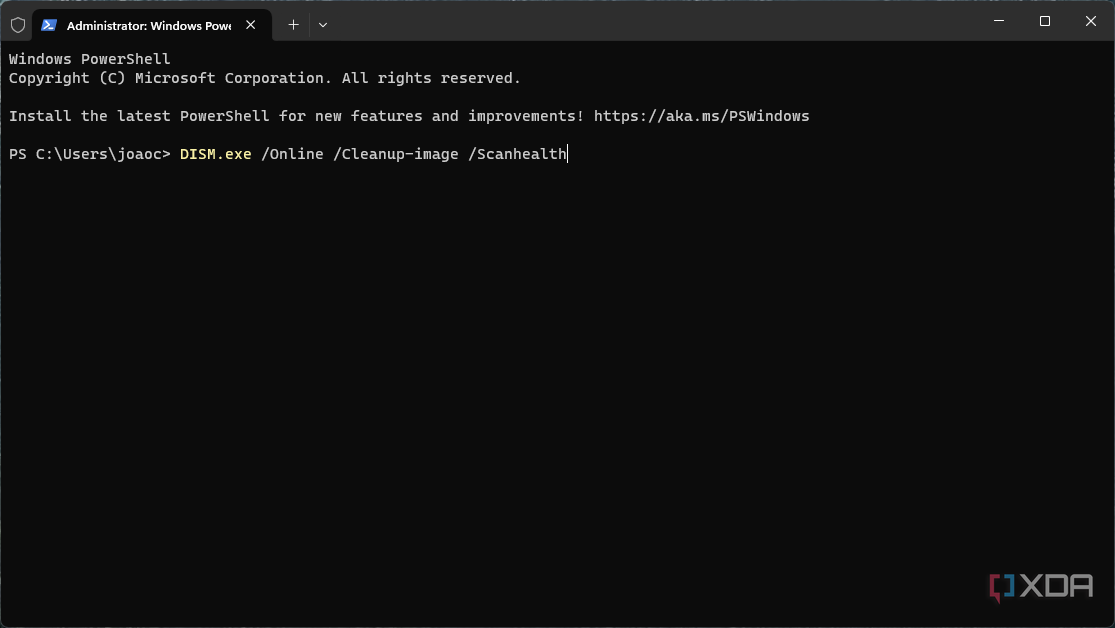
Another probable cause for a Blue Screen of Death on Windows 11 is that the system files themselves may be corrupted, or there may be an issue with the disk. If so, you can fix these issues with the SFC (System File Check) and DISM (Deployment Image Service and Management) tools, which are accessible through Windows Terminal or Command Prompt. It’s recommended that you use DISM first and then SFC. Here’s what you need to do:
- Press Windows + X on the desktop (or right-click the Start menu icon) and choose Terminal (Admin).
Some versions may say Windows Terminal (Admin) or even Windows PowerShell (Admin) for Windows 10.
- Enter the following command:
DISM.exe /Online /Cleanup-image /Restorehealth
- This process may take a while, so wait for it to finish.
- Once it’s done, enter the following command to run SFC:
sfc /scannow


This will also take some time, but once you’re done, it will have fixed any issues with the system image, which should address your problems.
Fix BSODs during a system upgrade
If the BSOD you’re running into occurs when you’re trying to update to a new feature update for Windows 11, it may be some kind of compatibility issue or a problem with the setup files. As mentioned above, you can try a few things, like uninstalling potentially troublesome apps and updating your drivers. However, there are a couple more specific steps that may also help.
Clean the Windows Update files
If the setup files are corrupted and causing issues during the upgrade, you may need to redownload them, which means deleting your existing ones first. Here’s how to do it:
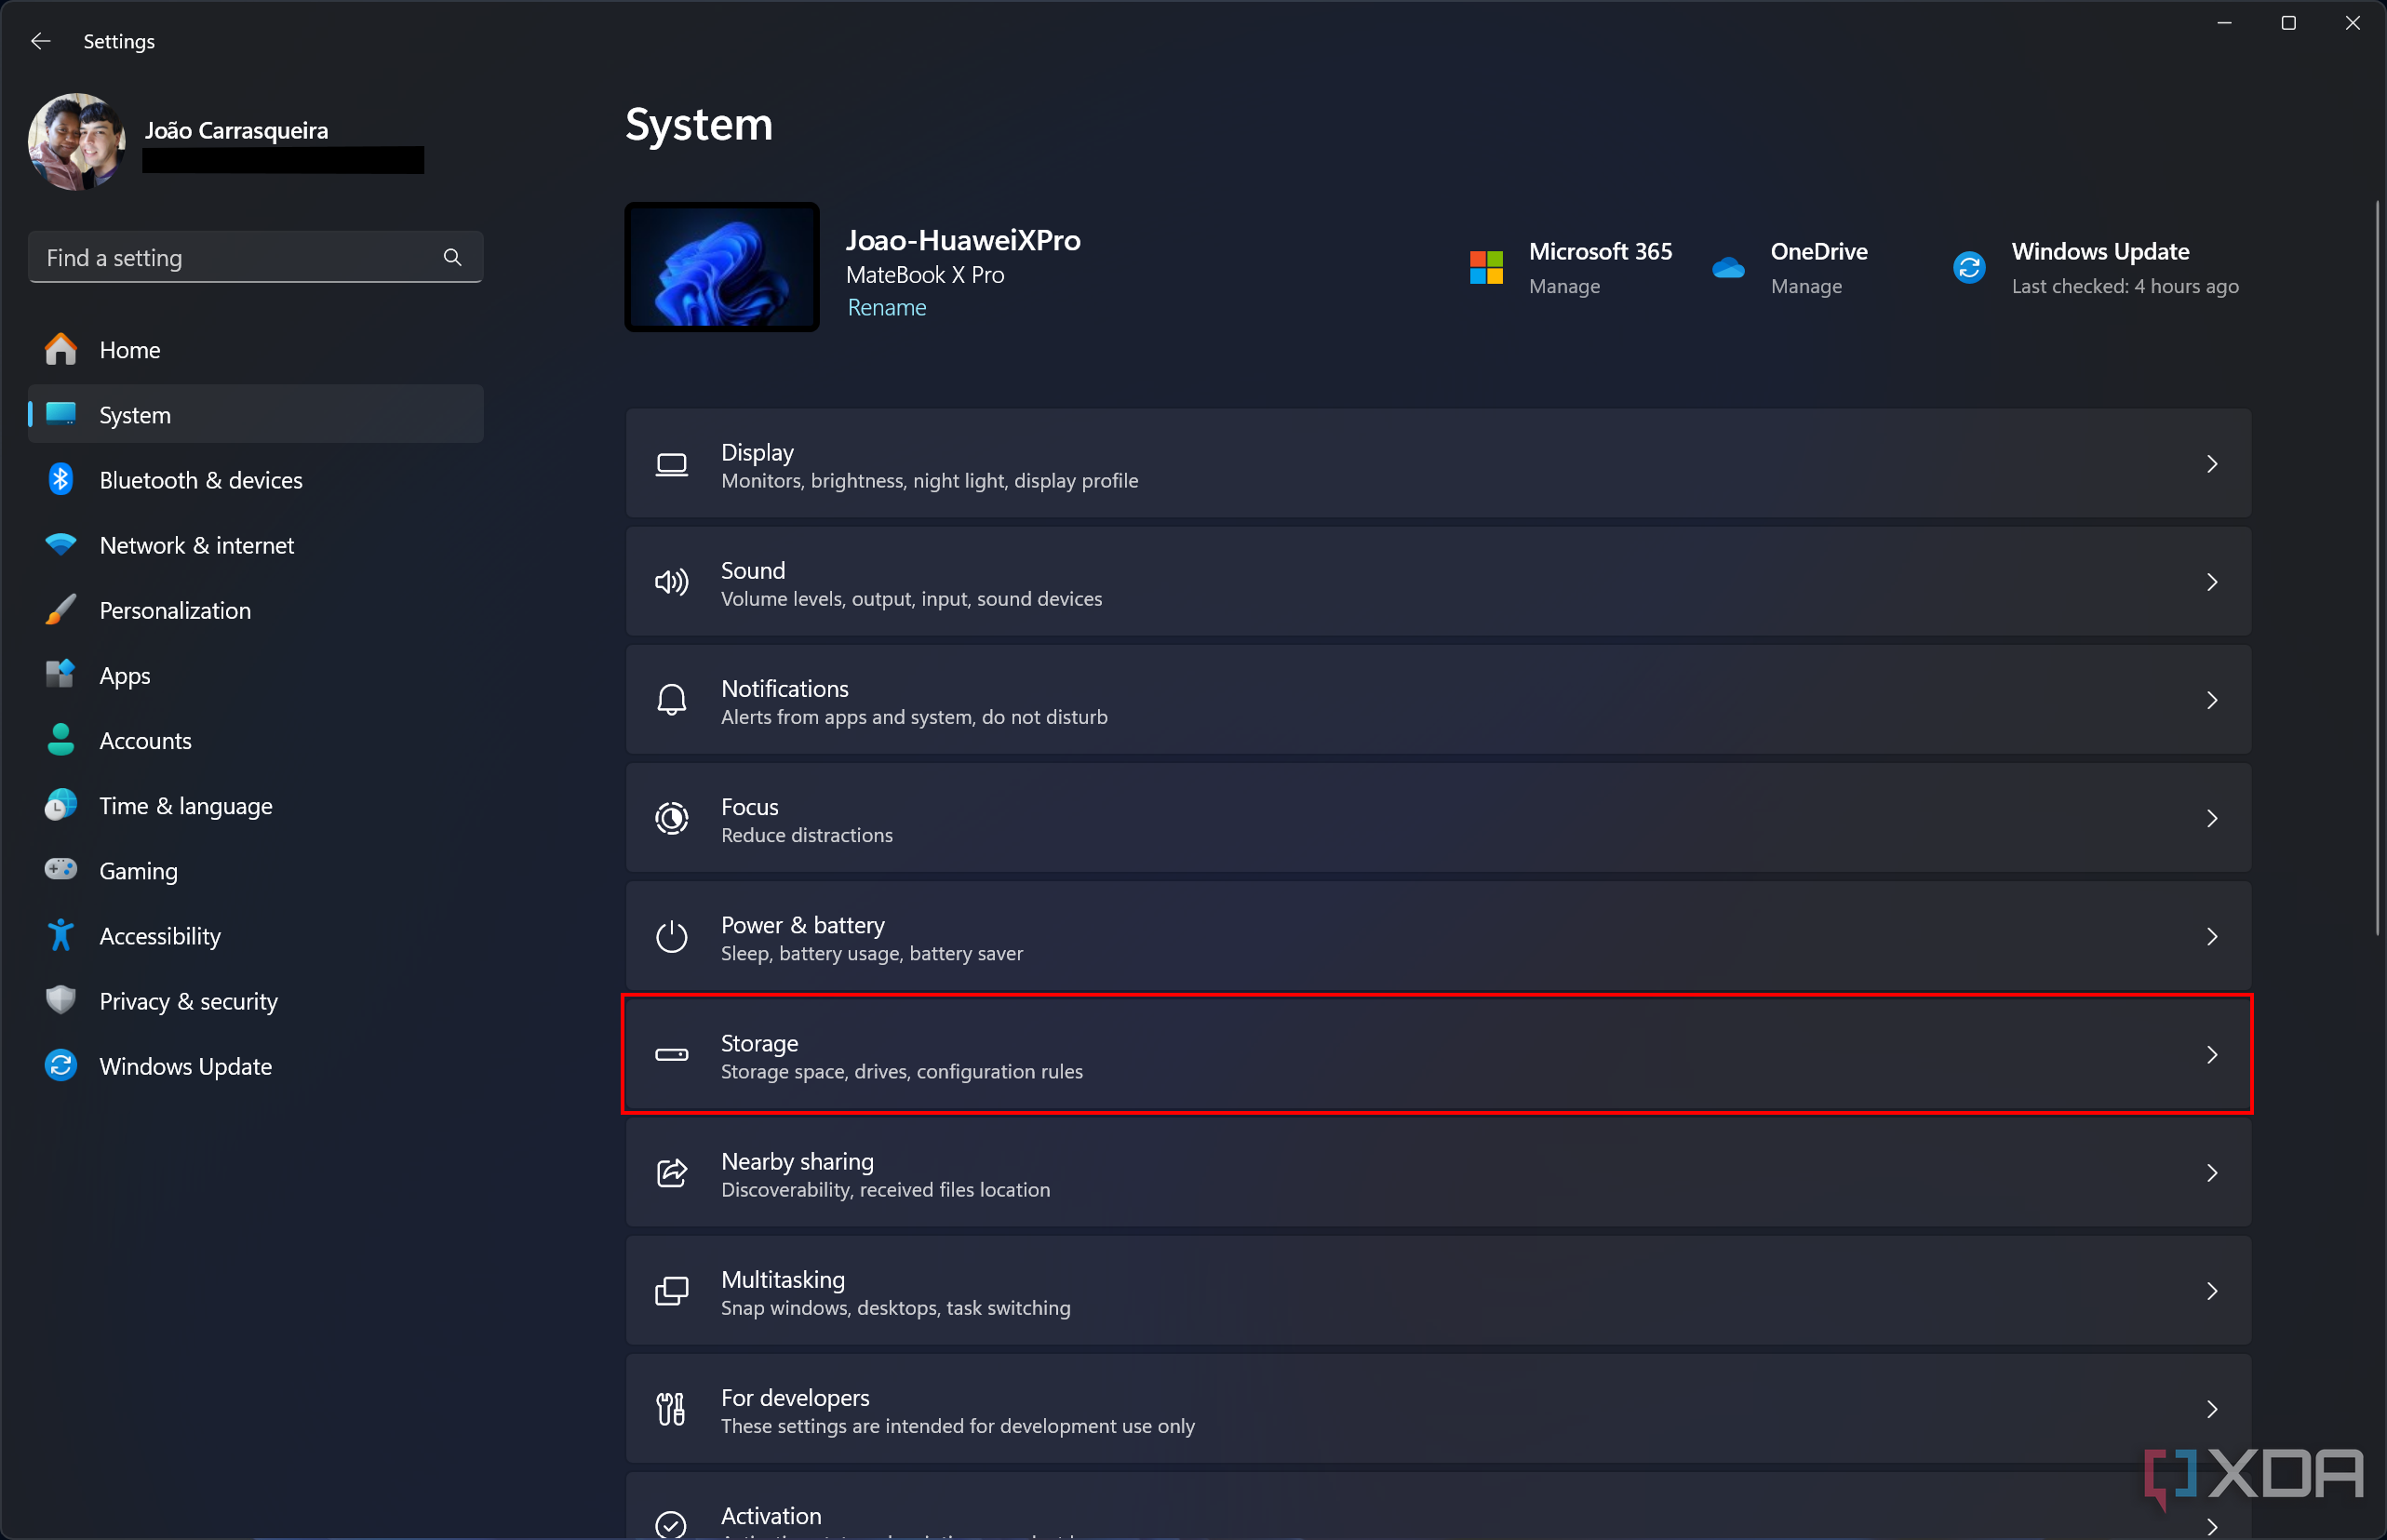
- Open the Settings app.
- Go to the System section on the left.
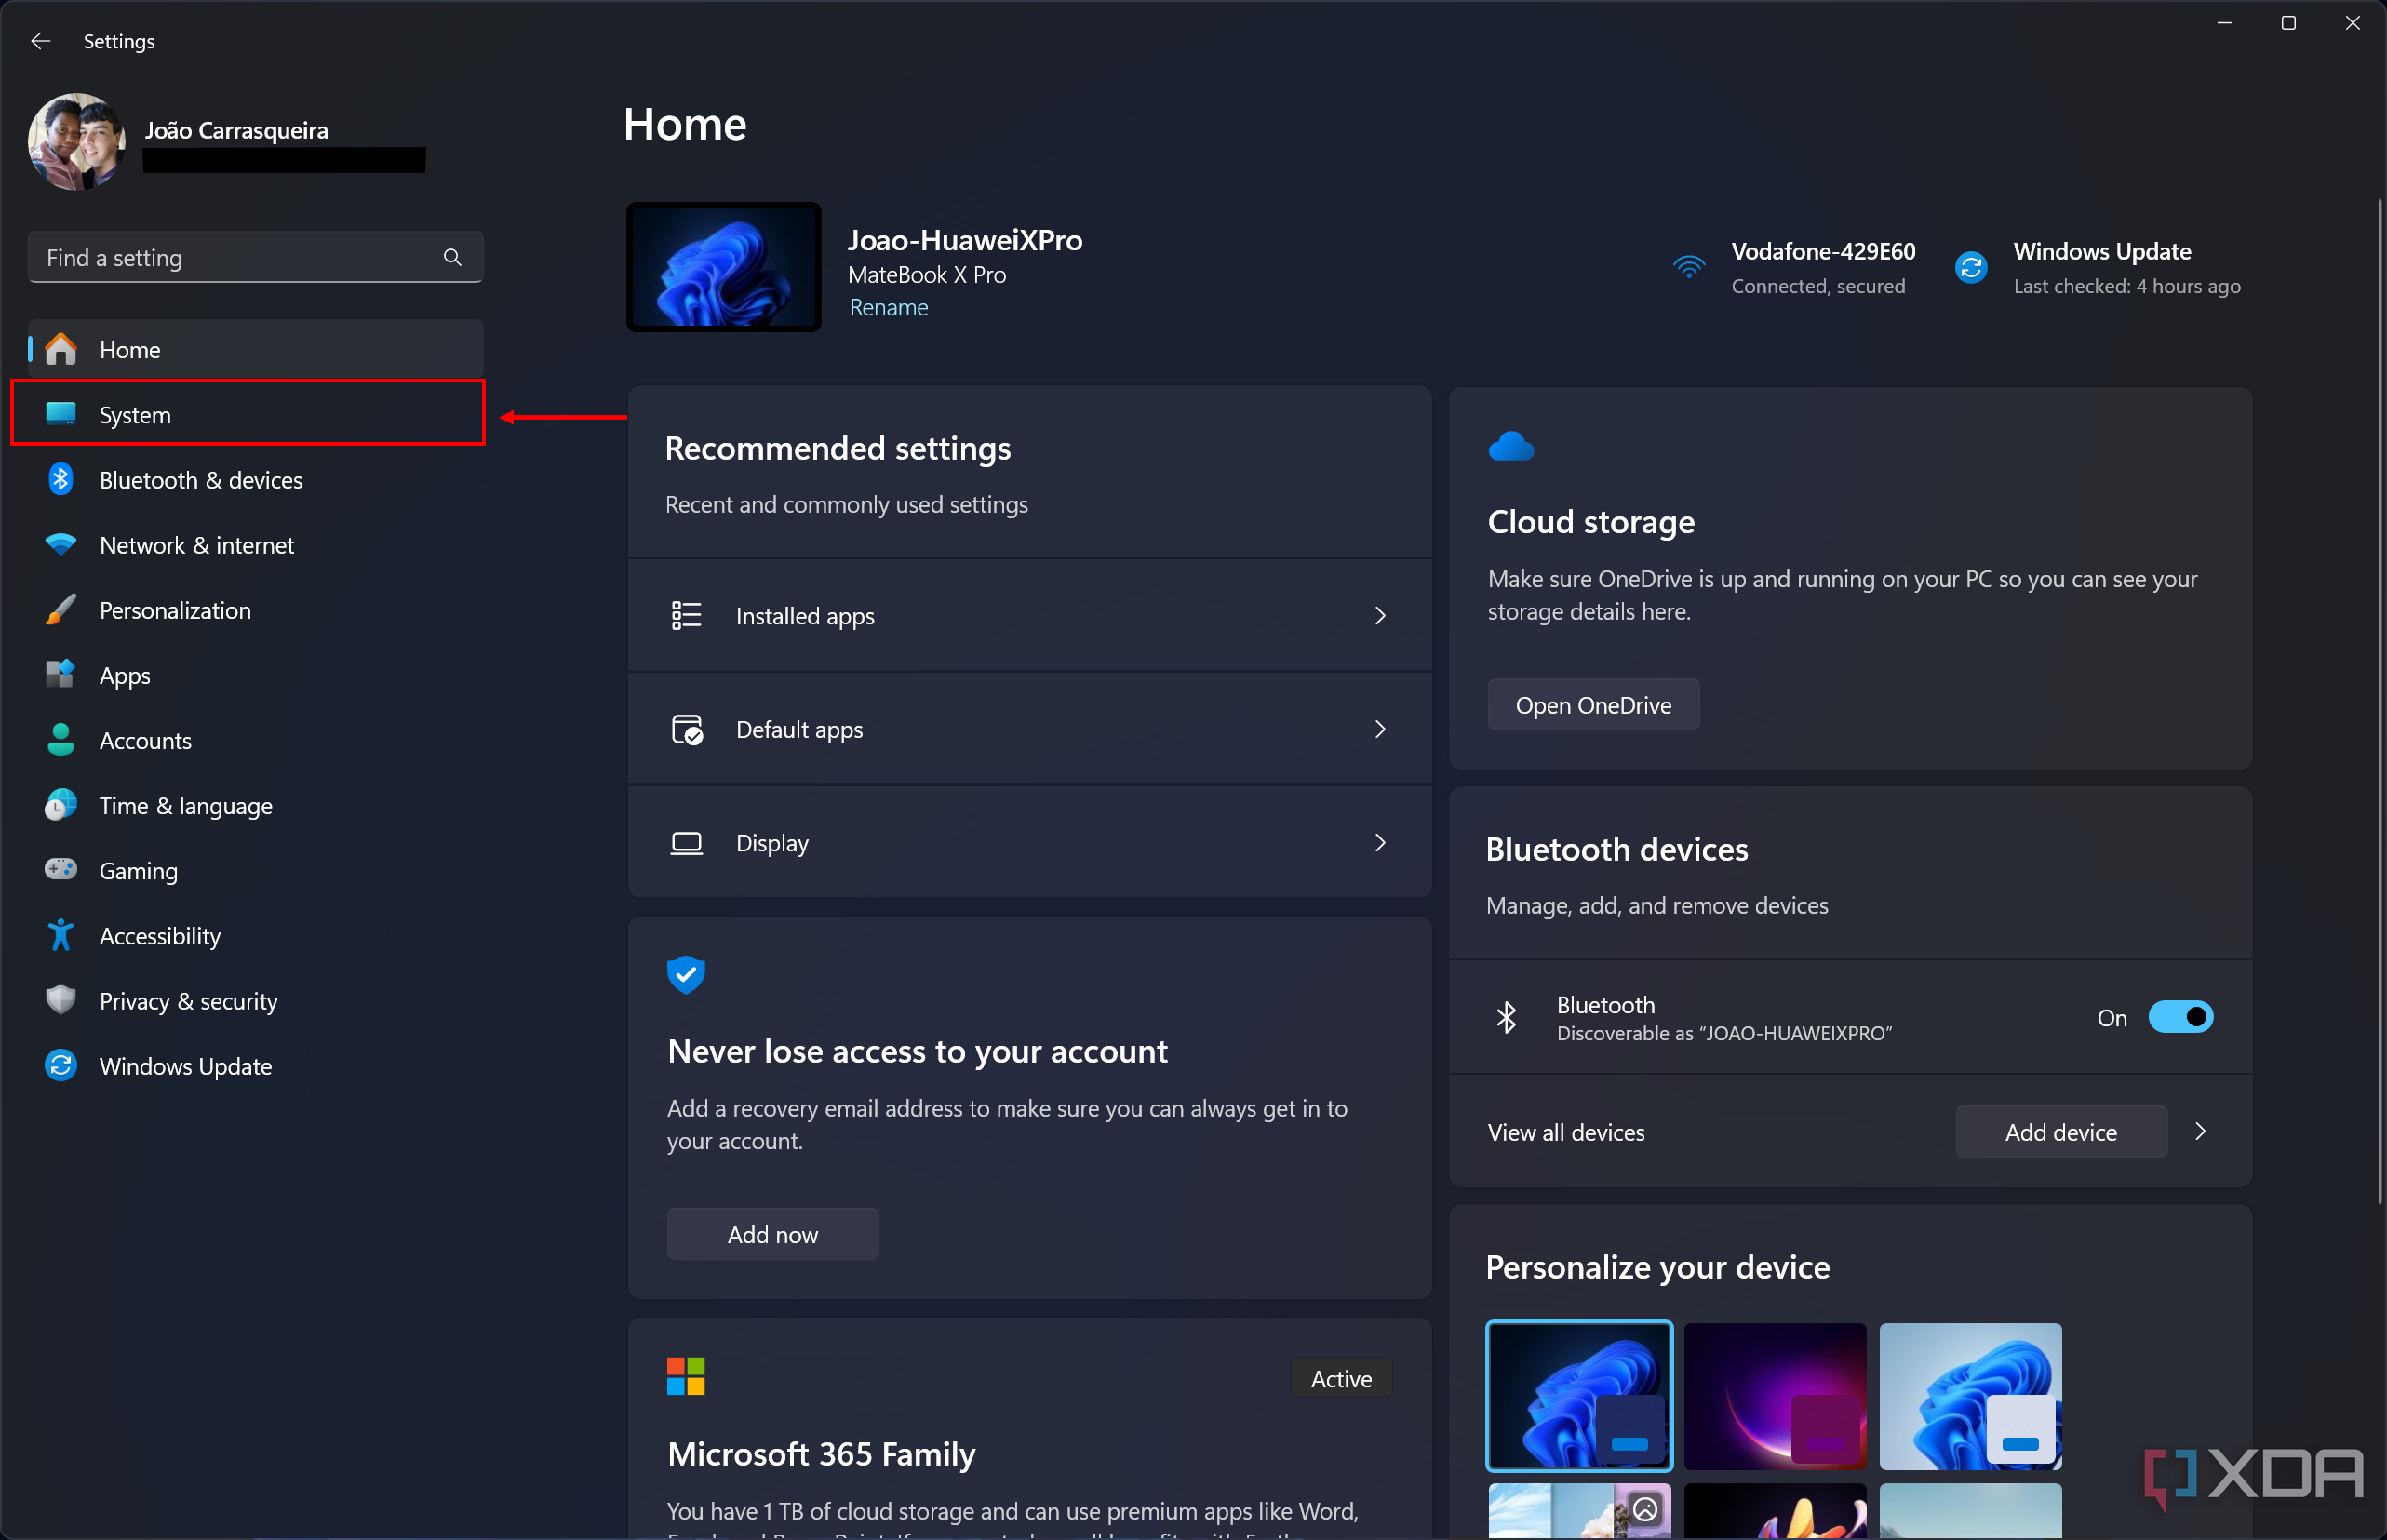
- Click Storage.
- Choose the Temporary files option to open the cleanup page.
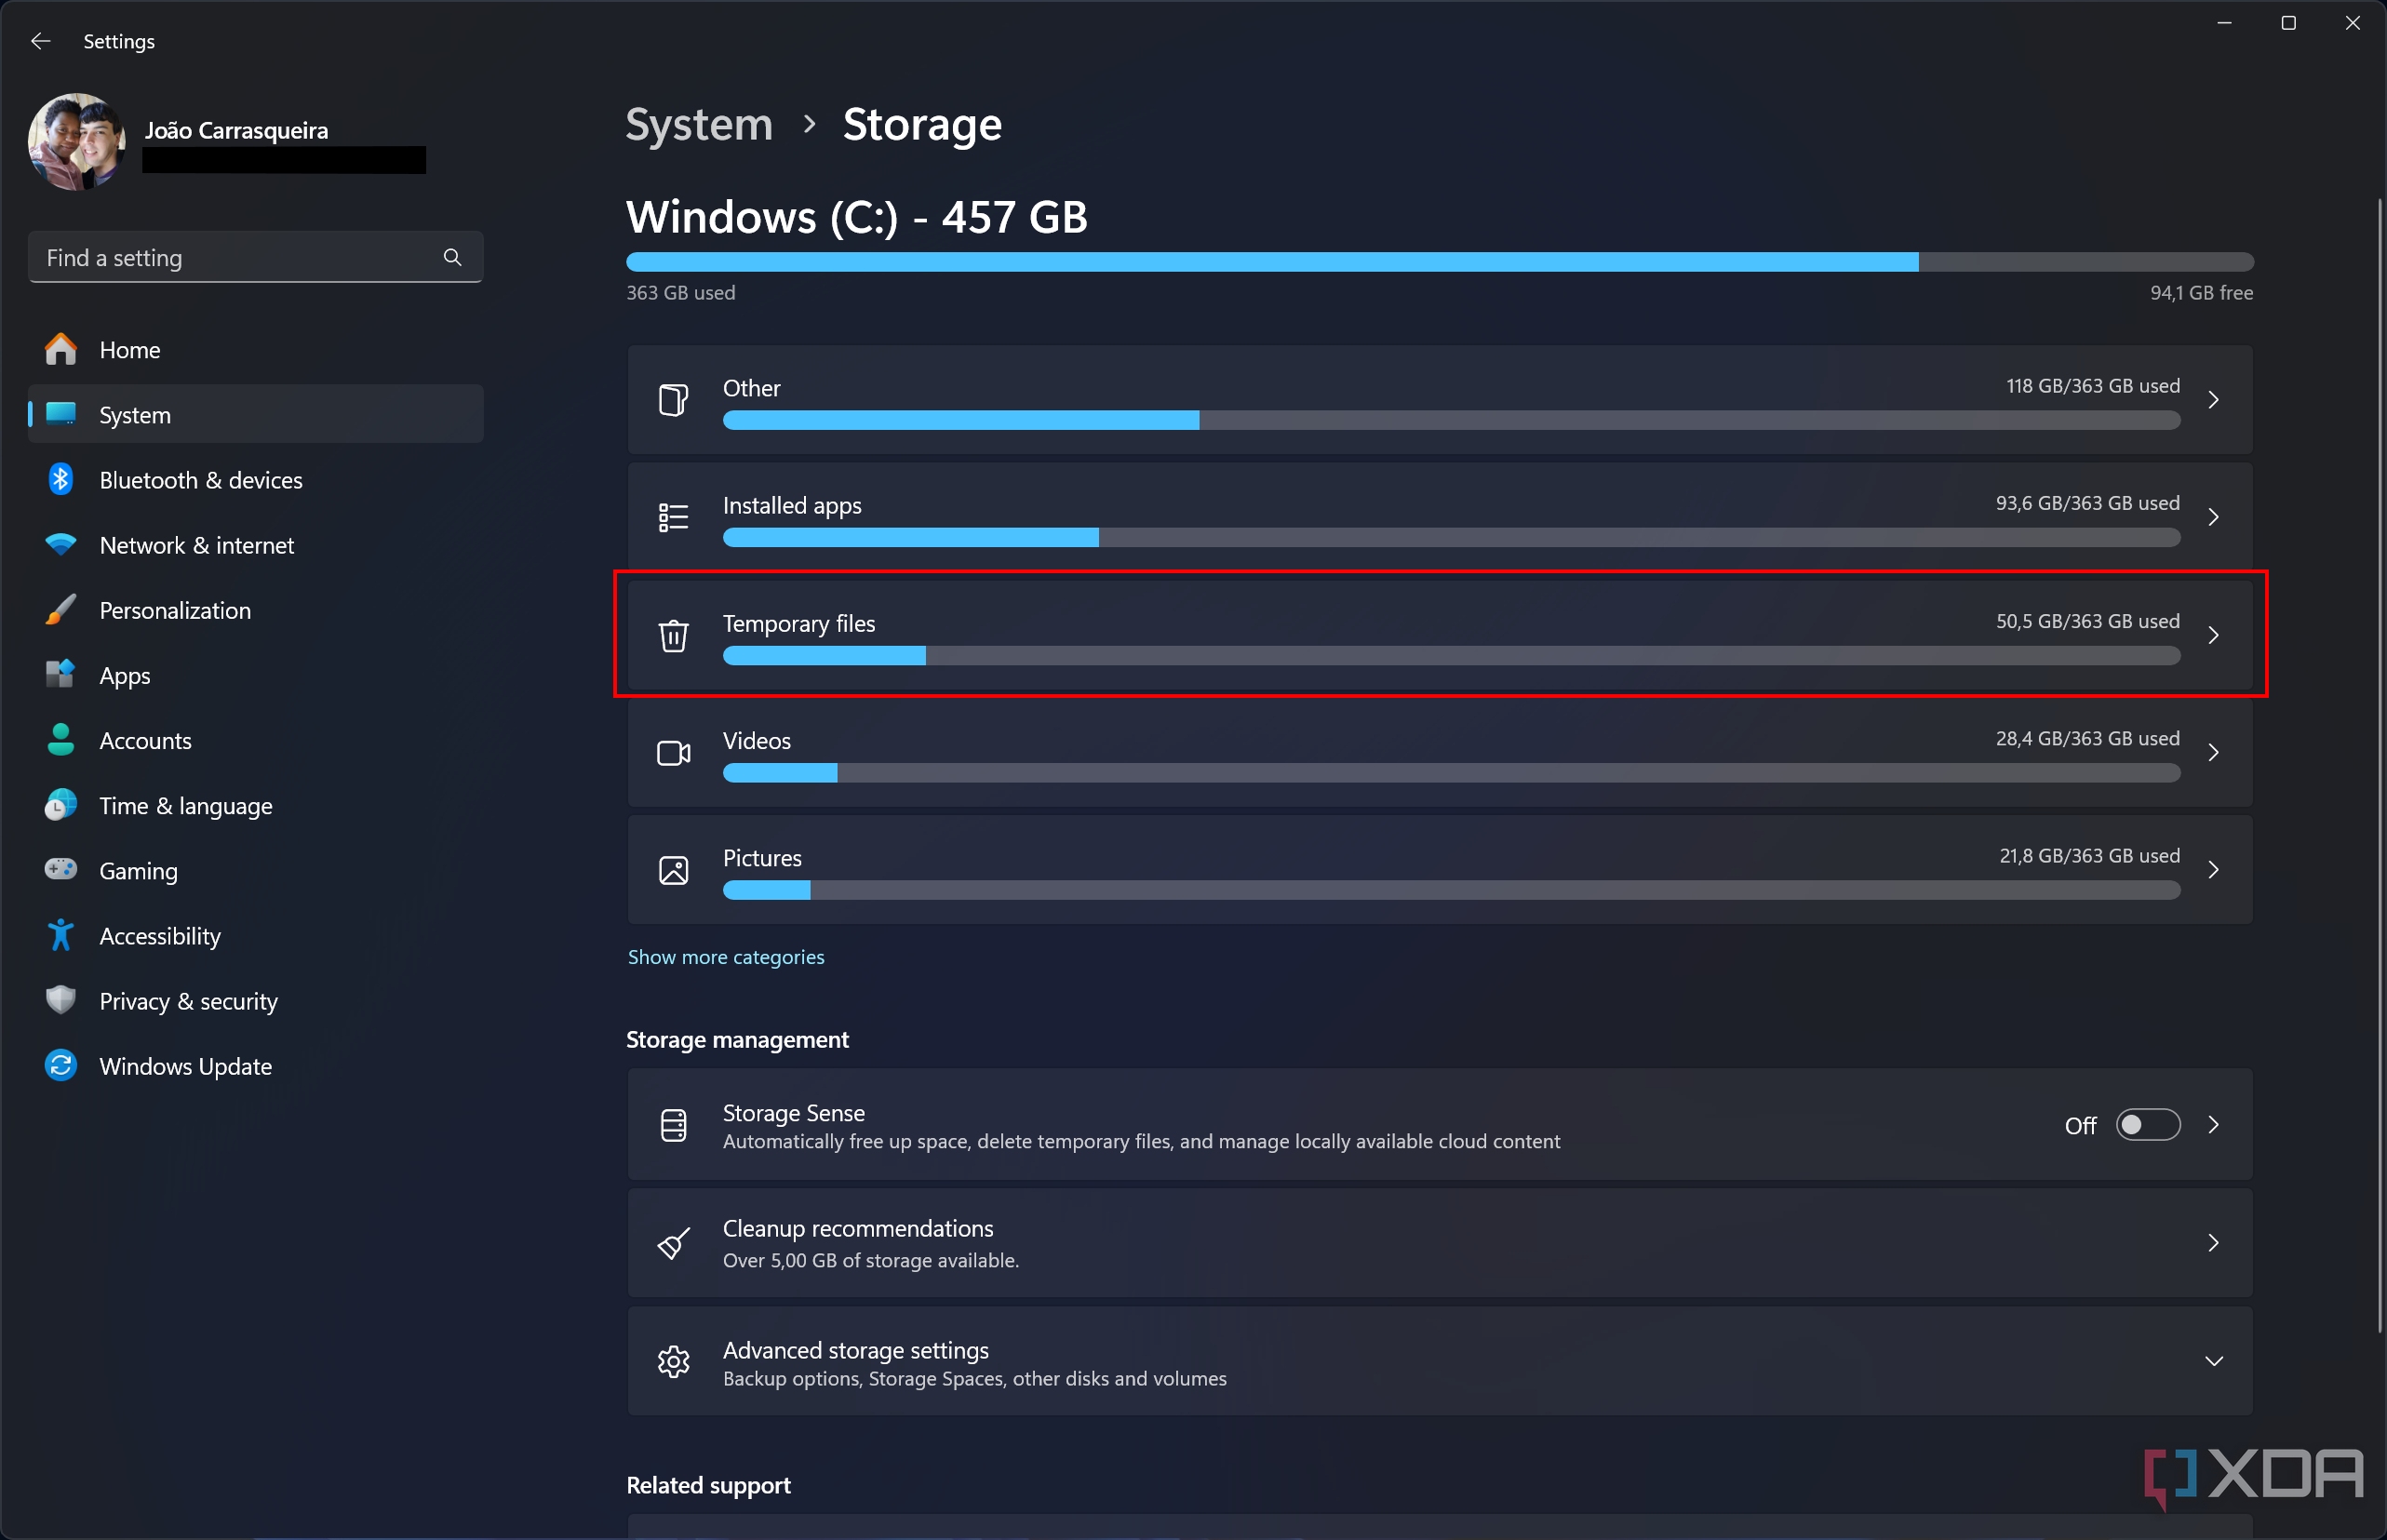
- Select the Temporary Windows installation files checkbox if it appears. You may also want to select Windows Update Cleanup and Delivery Optimization Files.
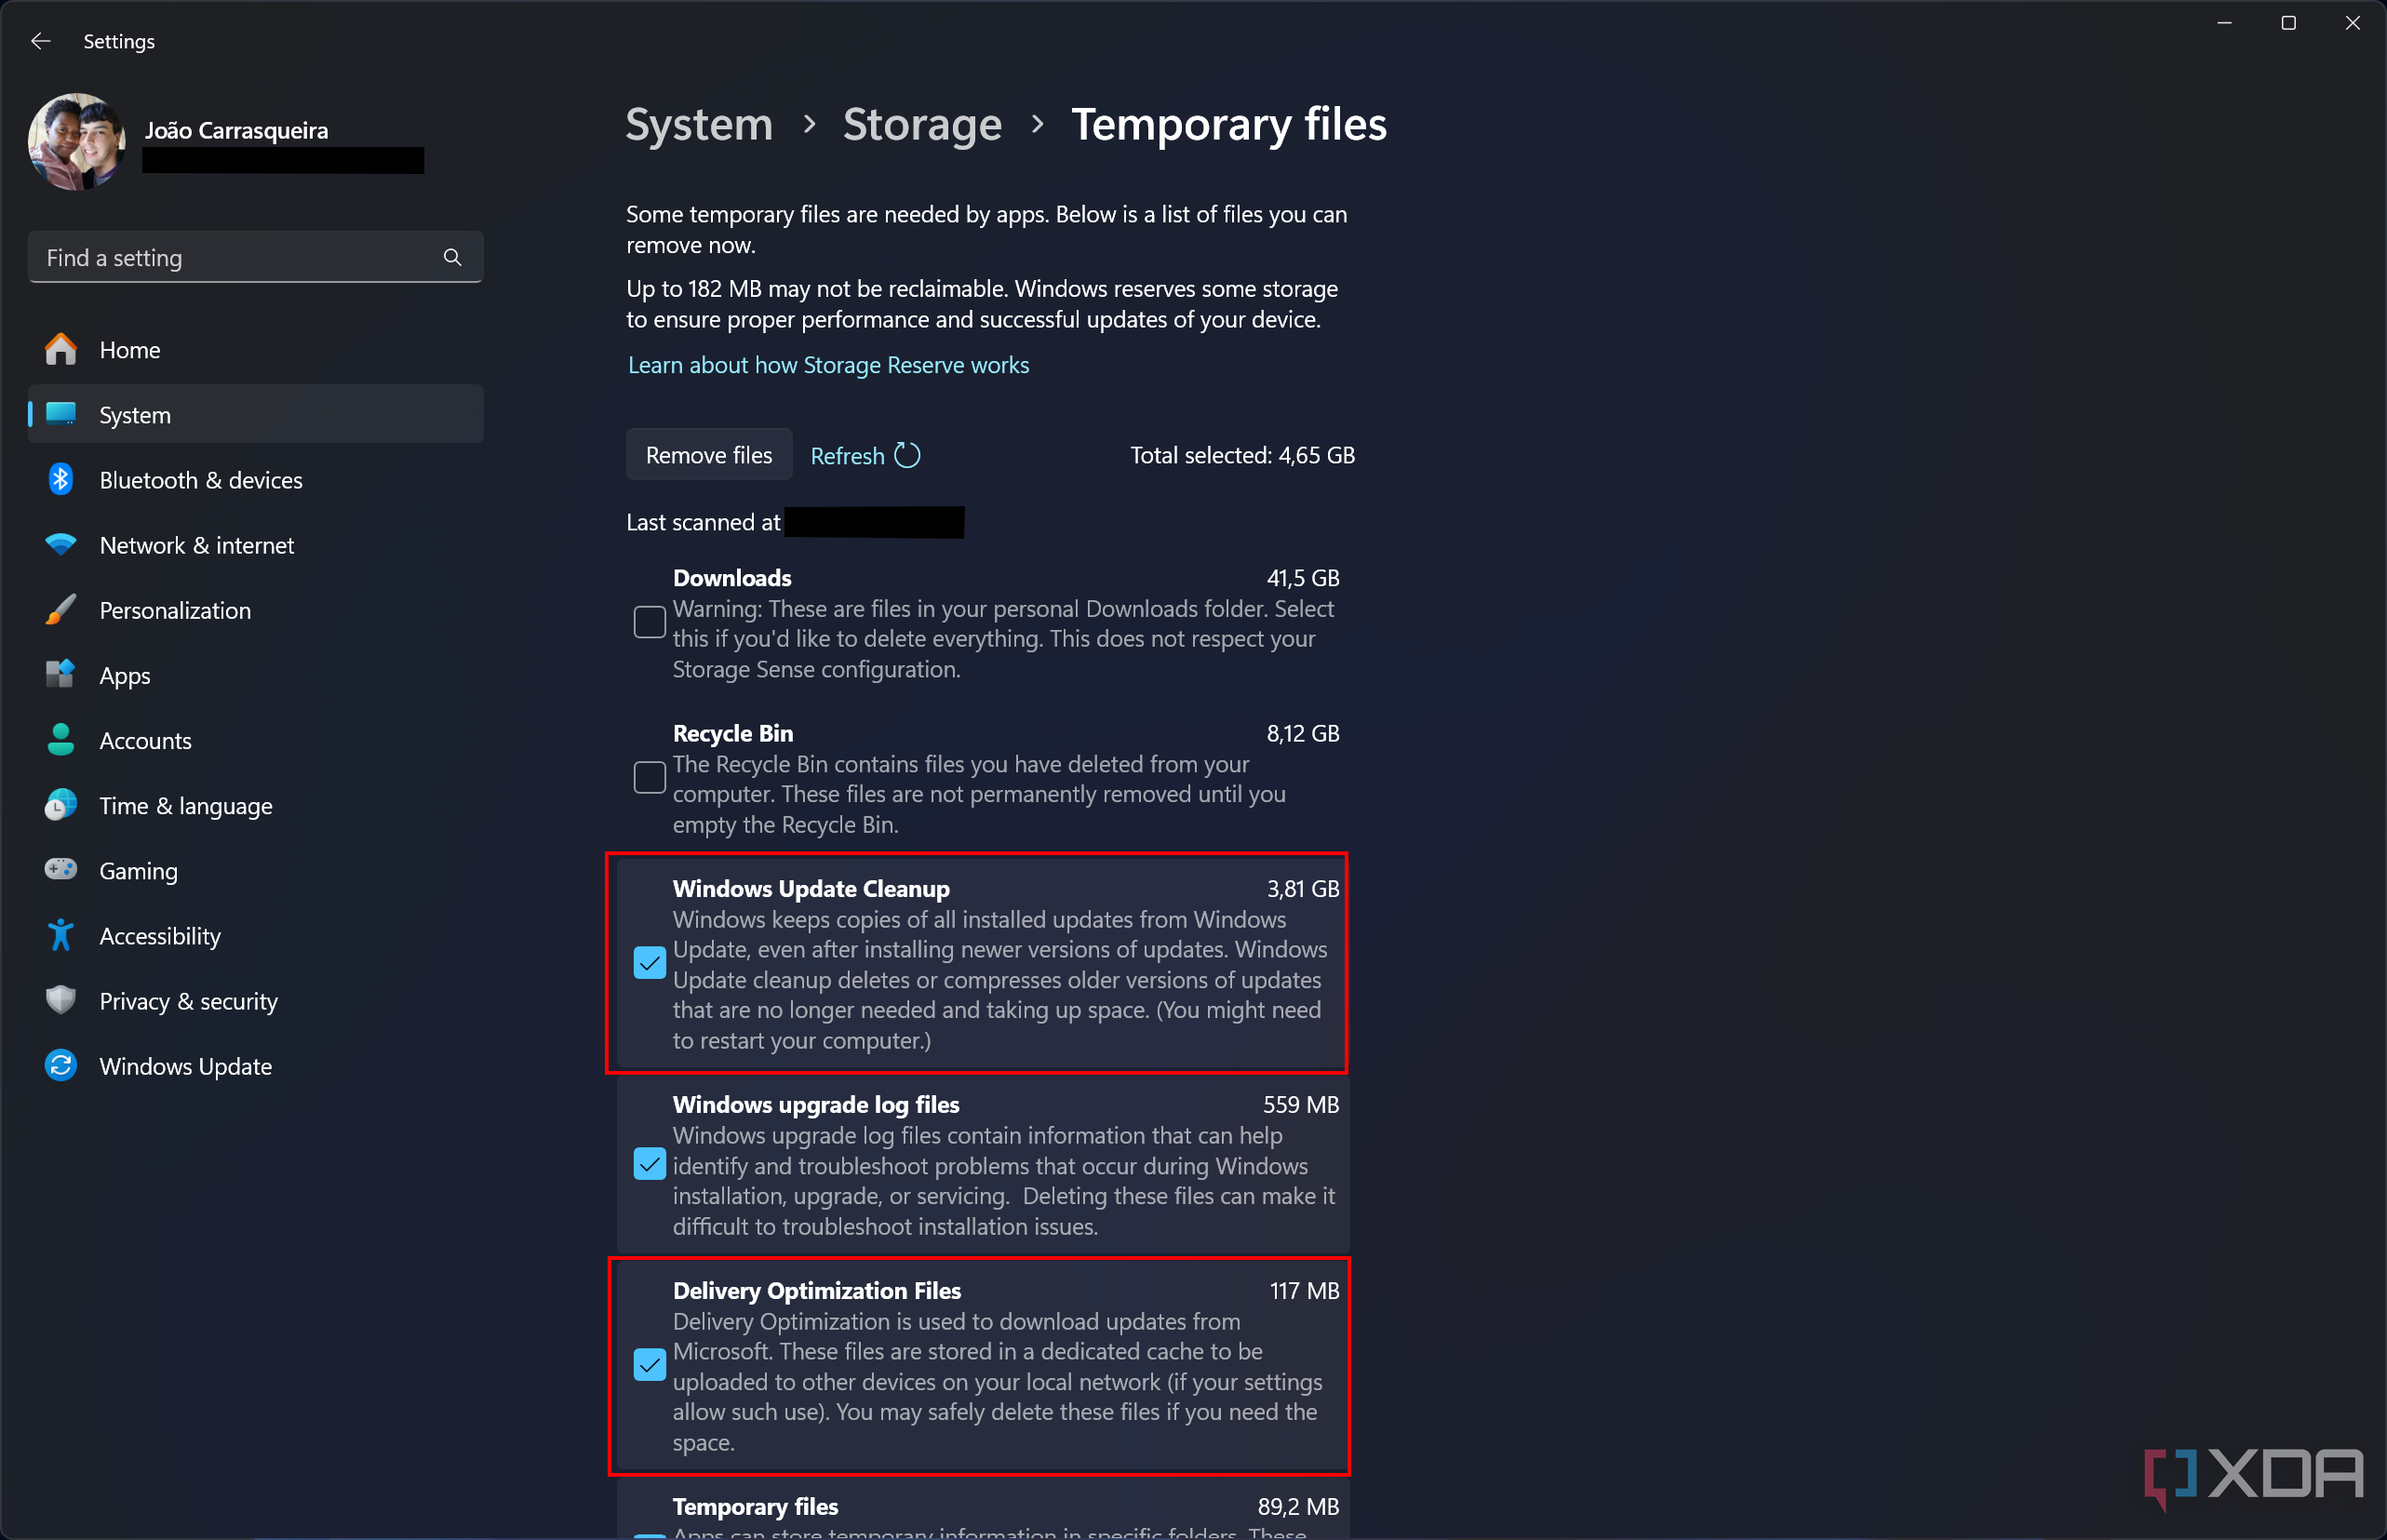
- Click Remove files at the top.


This will delete temporary Windows Update files, and it should fix issues with installing a new update. If not, you can go deeper by resetting the Windows Update components.

How to troubleshoot Windows updates stuck downloading
Having issues downloading a Windows update on your PC? These steps will help you fix it and get the latest goods.
Use the Windows 11 Installation Assistant
Another potential solution that may actually be easier is using the Windows 11 Installation Assistant to download the latest version of Windows 11 and upgrade to it without using Windows Update. This is a very simple tool, so all you need to do is go to the Windows 11 download page and click Download now under the Windows 11 Installation Assistant option. Just follow the steps to download and install the latest version.
Find more information with SetupDiag
If these steps haven’t worked, you can try using a tool called SetupDiag to diagnose any issues with the setup process. This tool can tell you what’s going wrong and provide guidance on how to fix it.
- Head to Microsoft’s SetupDiag page and download the latest version.
- In File Explorer, right-click the file you downloaded and choose Run as administrator.
- It will generate a SetupDiagResults.log file so you can open it. If there’s an error, the log file will tell you what it is and provide guidance on how to fix it. You can follow the steps mentioned or look up the error message to find help online.
Reinstall Windows
Push comes to shove, you may have to start fresh
If none of these solutions work for you, your last-resort option is to reinstall Windows. You can do these in a couple of ways or simply reset Windows, but we won’t dive into each solution since some of these are a bit convoluted. The easiest way to do this is to use the recovery options in the latest version of Windows 11. If you have an earlier version, we’ll have alternate methods linked below.

How to reset Windows 11 to its factory settings
Want to get your PC install back to a clean state? Here’s how you can reset Windows 11 to its factory settings to remove apps and files.
To reinstall a clean version of Windows 11, follow these steps:
- Open the Settings app.
- Click System in the menu on the left.
- Choose Recovery.
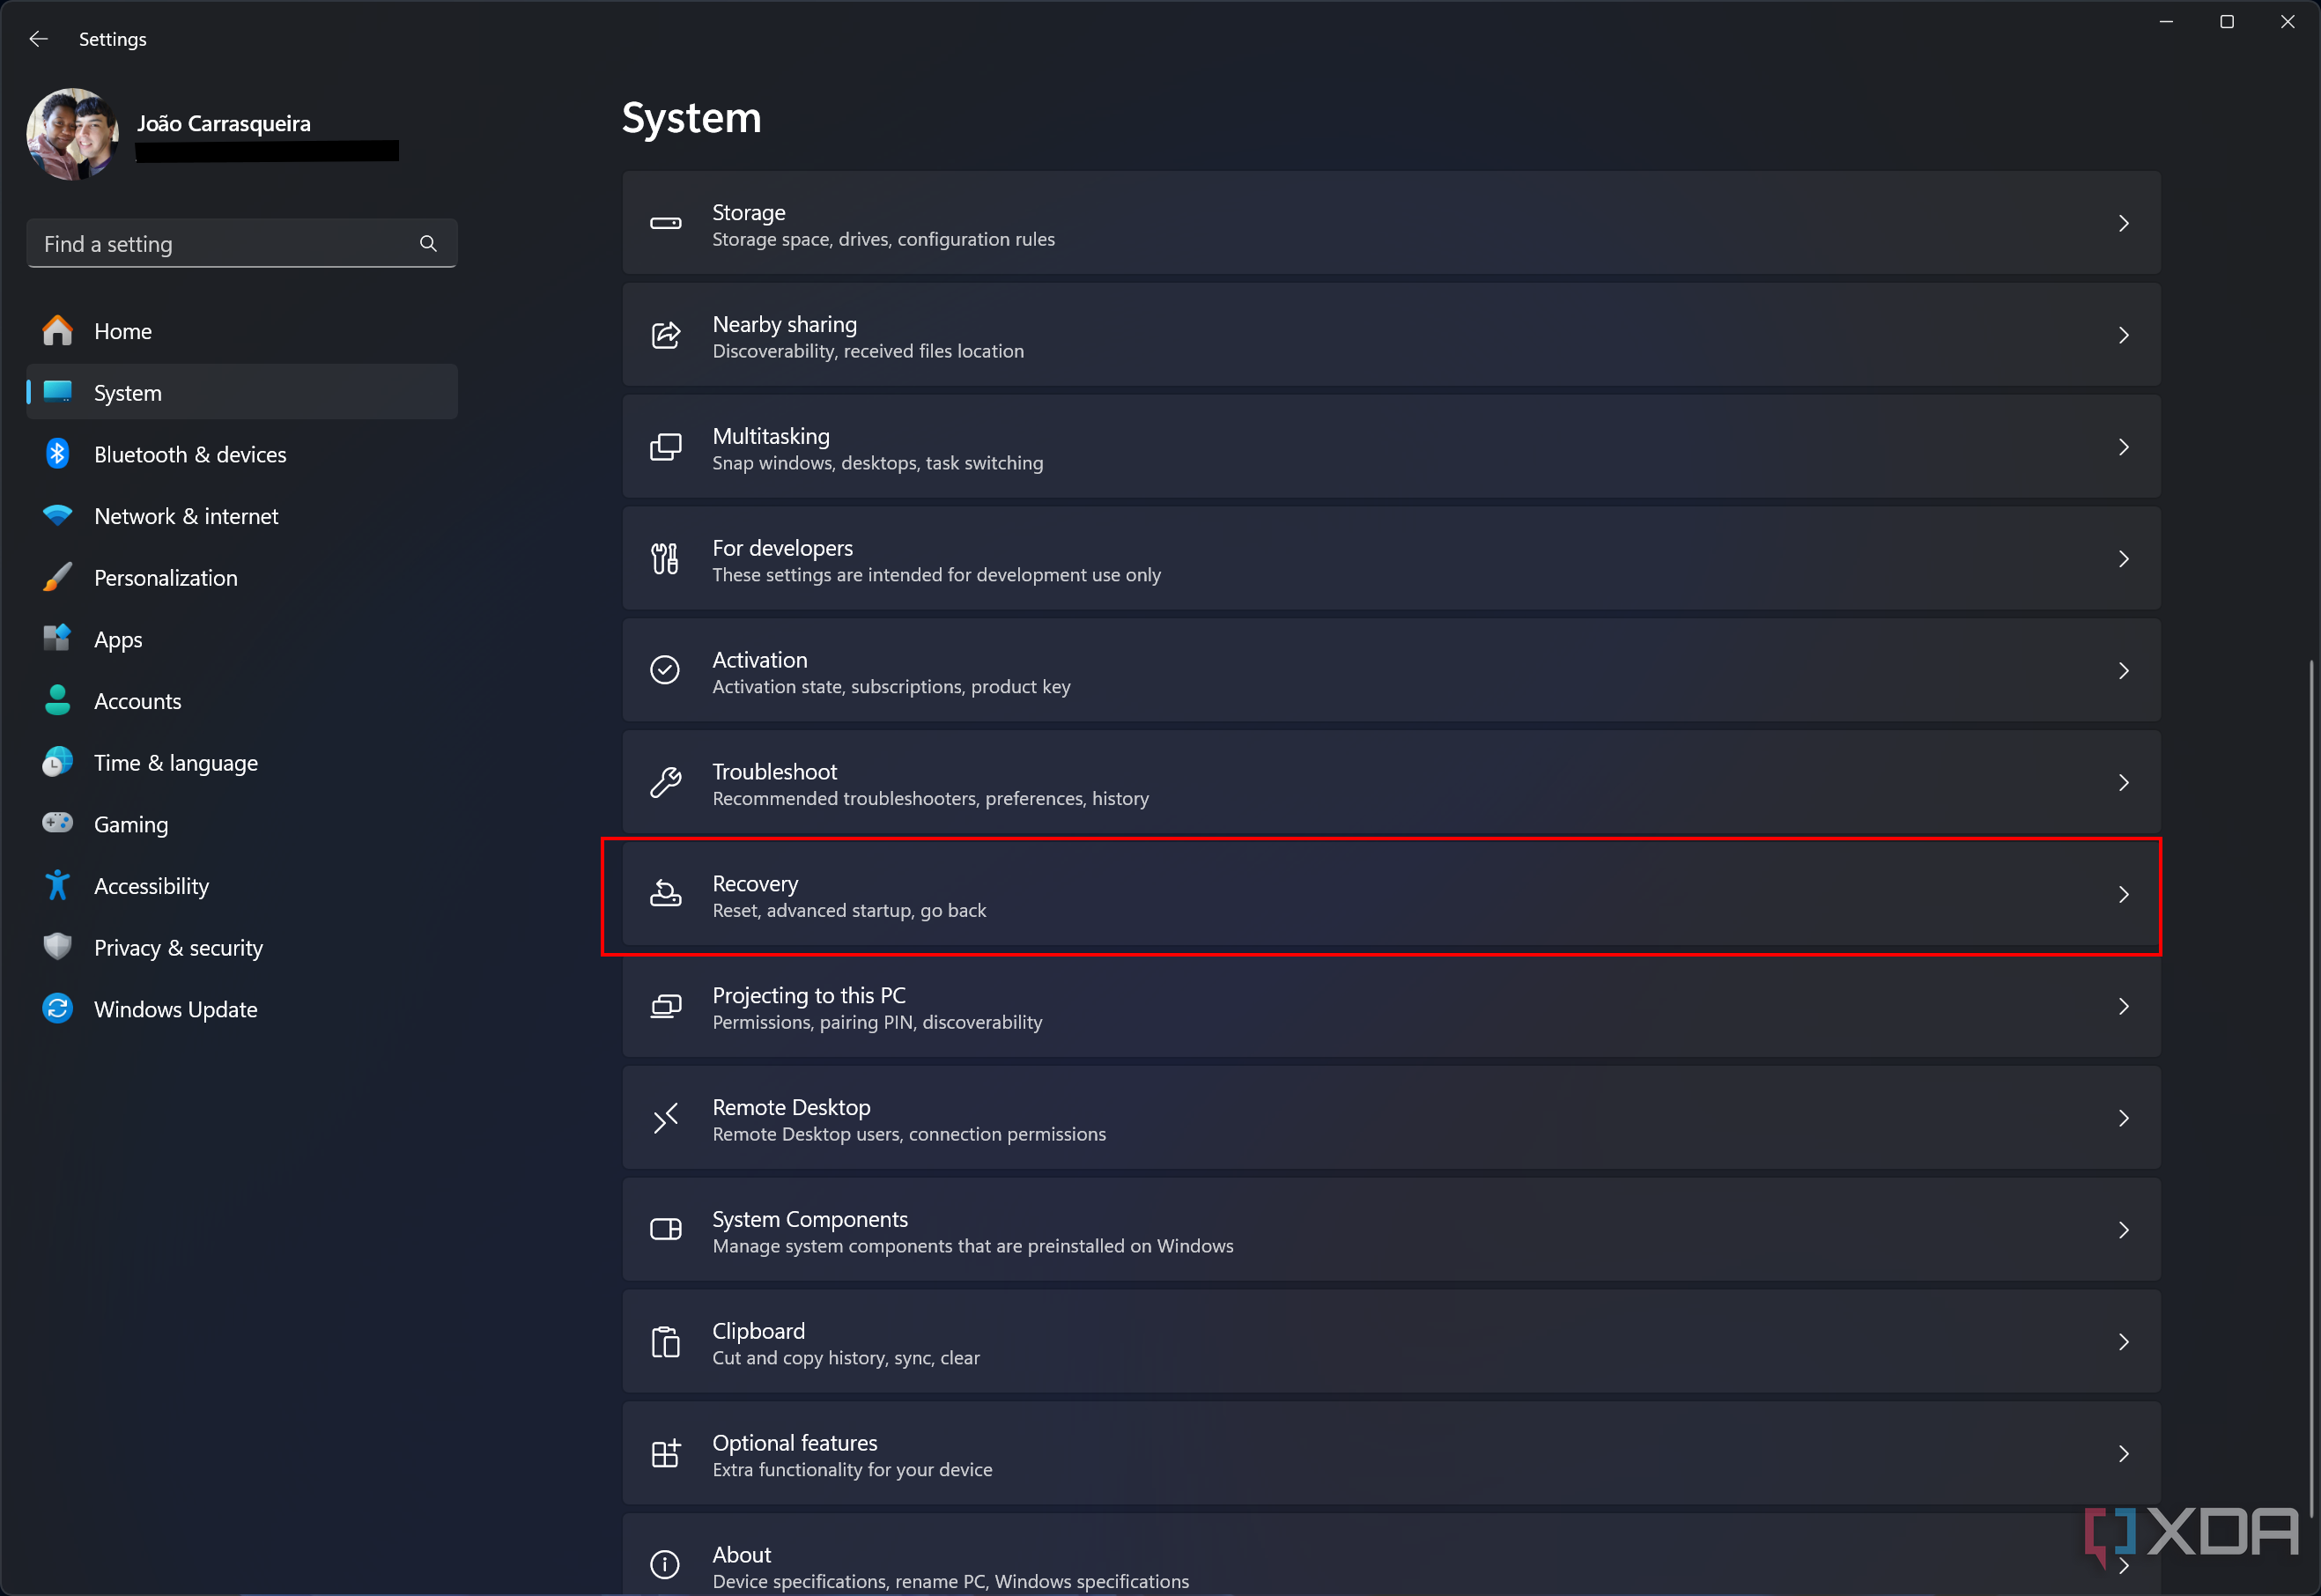
- Click Reinstall now next to Fix problems using Windows Update.
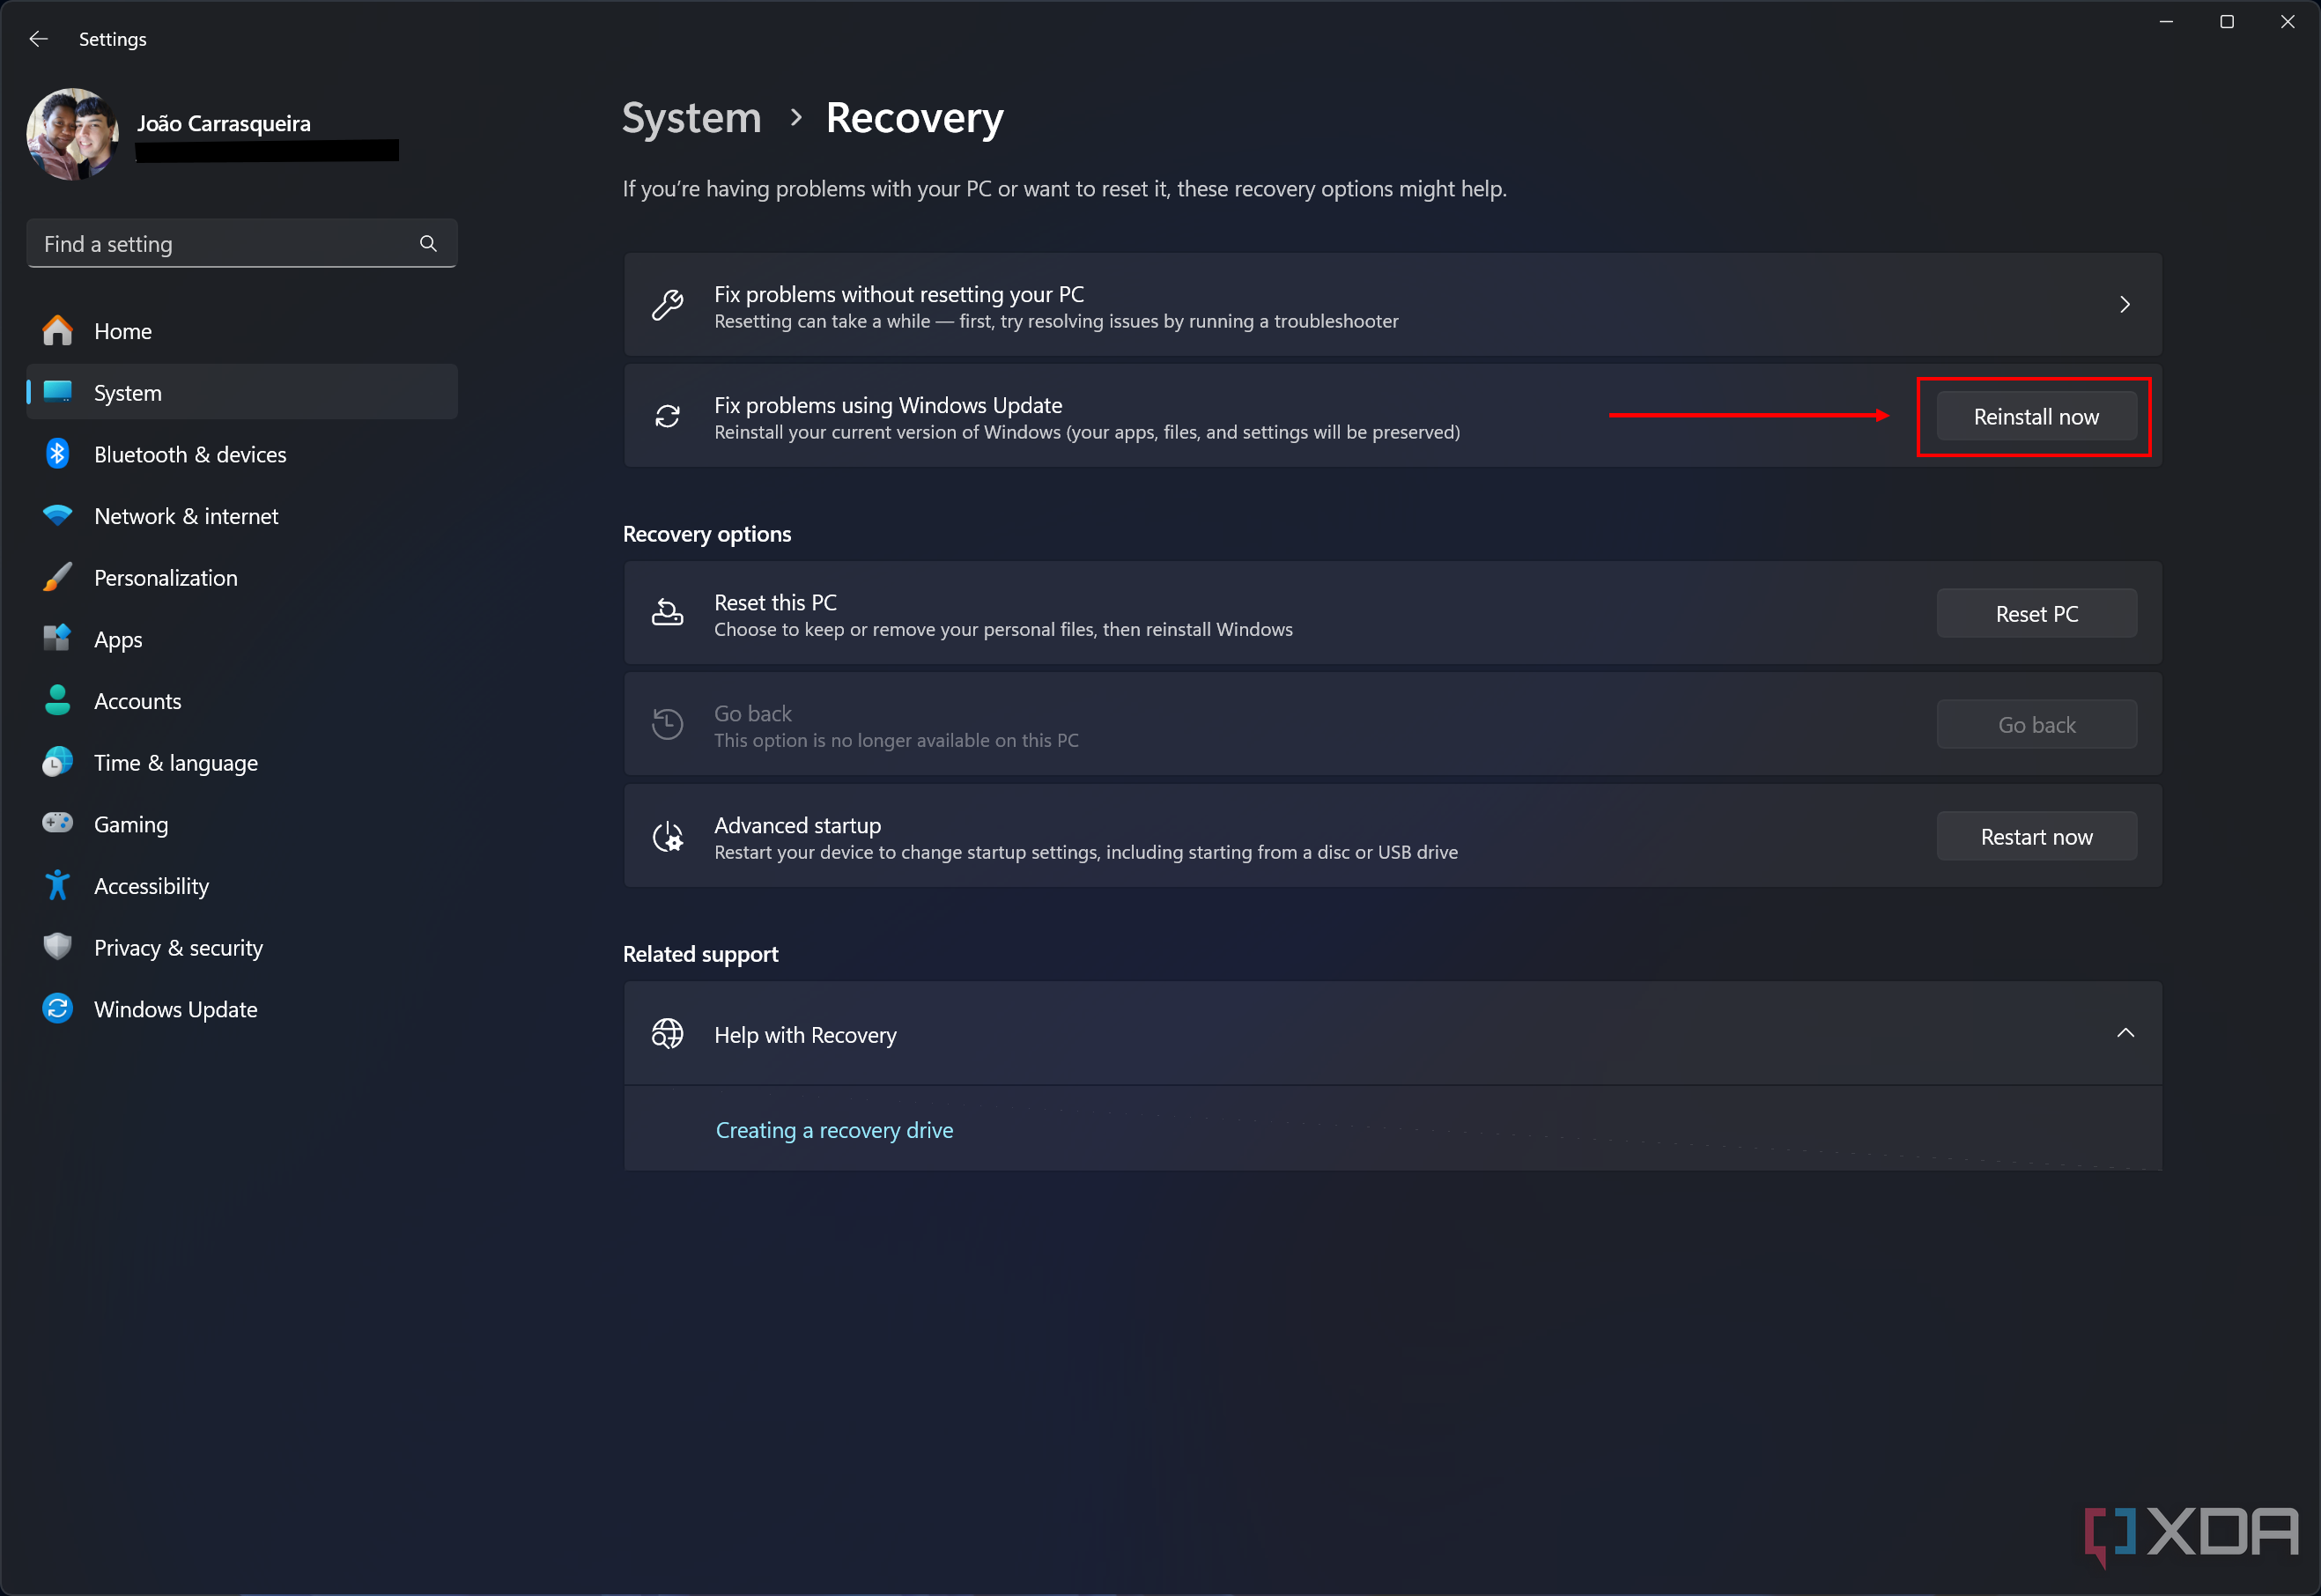
This option is only available in Windows 11 version 23H2 and newer. If you don’t have it, check the other options below.
- (Optional) Check the Automatically restart my PC 15 minutes after installation box.
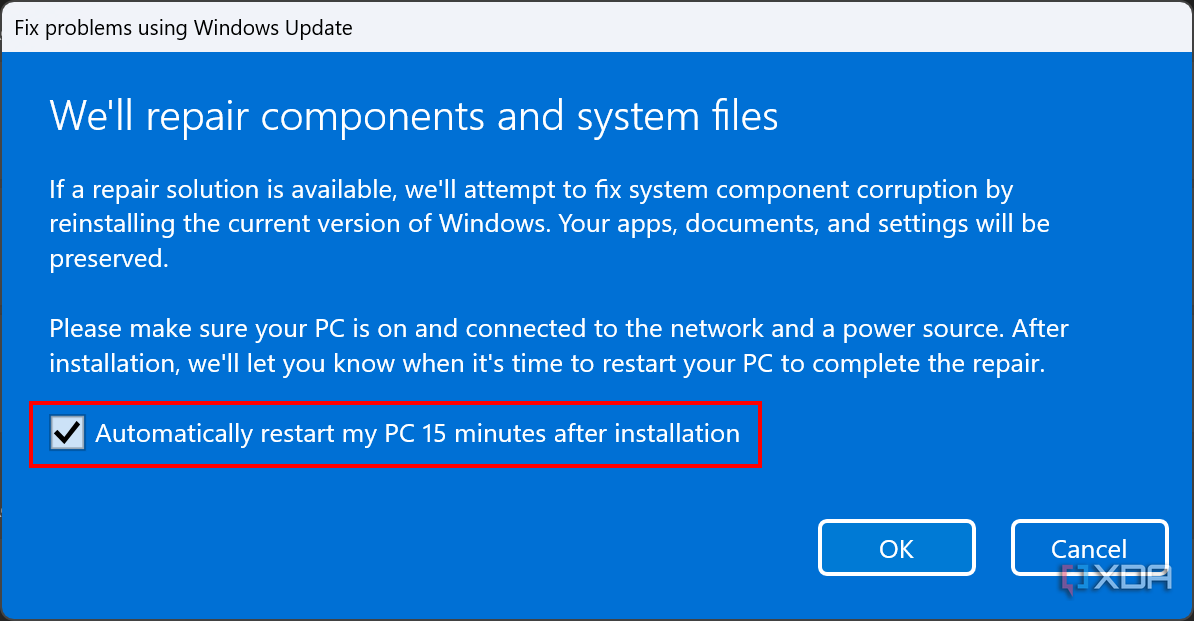
- Click OK, and your PC will download and install a new copy of Windows from Windows Update. If you don’t choose to do it automatically, you’ll have to restart your PC afterward.


After this, you’ll have a brand-new copy of Windows 11 that should fix any issues you’ve been having. Since this keeps your apps and files, it may not resolve driver-related issues, so you may need a true clean install.

How to download and install Windows 11
Curious to check out Microsoft’s new operating system? Here’s how you can download Windows 11 right now to try it for yourself.
BSODs aren’t super frequent
These days, Microsoft has made plenty of improvements to Windows 11 that make BSODs less common than they used to be, and only very specific issues usually cause them. These steps should address those issues, so you should be good to go. If the solutions here aren’t enough, you may need to look up the specific error causing the BSOD to find a possible solution. On custom PCs, a change in hardware may be causing problems, so you may need to fiddle with your components to make sure they are all installed correctly.
#fix #Windows #BSOD #complete #guide
source: https://www.xda-developers.com/windows-11-bsod-guide/

