

Chapter 5: The Holy City of Aratum in Doom: The Dark Ages introduces the first Dragon Mount sequence in the game. Riding atop the Dragon Mount, the Doom Slayer has plenty of hidden collectibles and secret areas to unlock in order to get 100% completion of this huge, sprawling level.
In order to get 100% completion of each level, make sure you complete the challenges for this level. Chapter 5’s challenges are dispatching 3 cultist circles, finding two secret landing zones, and chasing and destroying 3 Hell Fighter ships.
Related
DOOM: The Dark Ages — 100% Completion Guide, Chapter 4: Sentinel Barracks
Chapter 4 of Doom: The Dark Ages introduces challenges for the player if they want to 100% the level.
Chapter 5 of Doom: The Dark Ages gives us a taste of the skies
The dragon mount sections are downright cool, despite not feeling Doom-like
Chapter 5: The Holy City of Aratum gives the slayer a dragon to ride, as if he couldn’t get any more badass. Following the objectives in the chapter along with the instructions provided below, it won’t be long before you can claim that sweet 100% completion tag for the fifth level in Doom: The Dark Ages.
This guide covers each collectible required for 100% level completion in chronological order. It is recommended to follow this guide in the order stated.
First Hell Carrier and gold bars
Some pretty heavy air support from the Doom Slayer

After you’ve chased and destroyed the first Hell Fighter ship during the pseudo Dragon Mount tutorial, the map opens up to present the Holy City of Aratum.

Fly straight ahead to meet your first Hell Carrier head-on.

Dispatch its two turrets until the ship crashes, and make your landing.

Inside, it’s pretty much a straight affair, as you take down an Imp Stalker, a Mancubus, and other fodder demons until you reach a huge red gate to bash through.

Here, a Cyberdemon will greet the Slayer, but before you tackle it, look behind you to find a bunch of gold bars and a gold stack.
Second Hell Fighter for the challenges
They cannot escape Serrat’s wings… or his bullets

After you land on your mount outside again, there will be a Titan demon straight ahead. Take care of it and fly high up to get a dragon’s-eye view of the entire city.

Look down below, and you should almost immediately see a Hell Fighter ship zipping through the city in a fixed circular route, making green streams as it flies. Give chase, and take it down. There are 2 more of those to bring down.

Related
Exploring the gory brilliance of id Tech 8 in Doom: The Dark Ages
Doom: The Dark Ages and id Tech 8 are gorgeous is the most disgusting way possible.
Gold, a secret area, and Demon Cultists
Sending demonic cultists back to hell

After taking down the Hell Fighter, fly up to the skies again until you face the Holy City with the six statues acting as the gate straight ahead. From here, look to the right for the second Hell Carrier in the sky. Repeat what you did the last time and bring it down to board the ship.

This time, the Hell Carrier crashes into the city, giving you access to a small area inside the city on foot.

Go through the ship and exit into the city to then fight a horde of demons. After you’re done, you’ll see a Sentinel Shrine ahead, with a Life Sigil above it. To the right, you’ll see gold bars lined up on the ground.

After you’ve picked up the gold bars, spot the well right in front of you, and drop into it to see a deceased Sentinel Knight.

Follow the well further down below to see the first prayer-circle of demon cultists to take down.

With the cultists gone, look to the left for a small crevice in the left-hand-side wall.

There’s a small area here that’s got plenty of health and armor, but more importantly, more gold bars to collect.

Once done, go back to the cultists’ circle and drop into the water. Swim through the water to emerge in a new area with citizens and NPCs taking shelter.

There’s a gold crate here to break open, along with a gate with a heated metal cross to get you back to the town square.
Blue keycard, more gold, and a secret area

Another secret color-coded keycard — a blue keycard — can be found here. From the Sentinel Shrine, make your way to the objective until you are back inside the Hell Carrier ship. Take down the enemies inside, and the way forward will appear, with a huge green Shield Bash sign. Don’t go there. Look to the right to see a gap in the wall leading outside.

Go out and fight two Mancubii and other demons.

Once you’re done with the demons, look to the side to see a scramble wall.

Get to the top of the wall, and from there, go straight to find the Blue Keycard hologram calling out to you.

Once you’ve picked up the keycard, you should immediately see the color-coded gate below.

Drop down to it and open the gate, unlocking a new secret area with a stack of gold, and even the Life Sigil we saw before at the end of the walkway. Once you head back onto the ship and complete it, there’s an enhanced Hell Knight at the end, defeating whom increases your ammo capacity. Neat.
First secret Titan landing zone
The first Titan landing zone in the level

Fly back to the top of the city, once again facing the main gate with six statues. Now, to your left, you should see a Titan just waiting to be killed. Engage it and take it down.

Once it’s down, a secret landing zone opens up where he was standing.

Land, destroy the demonic structure, and prepare for battle as waves upon waves of demons charge at you.

As you fight the horde, the final enemy will be an enhanced Pinky Rider to take down at the end for a health upgrade.

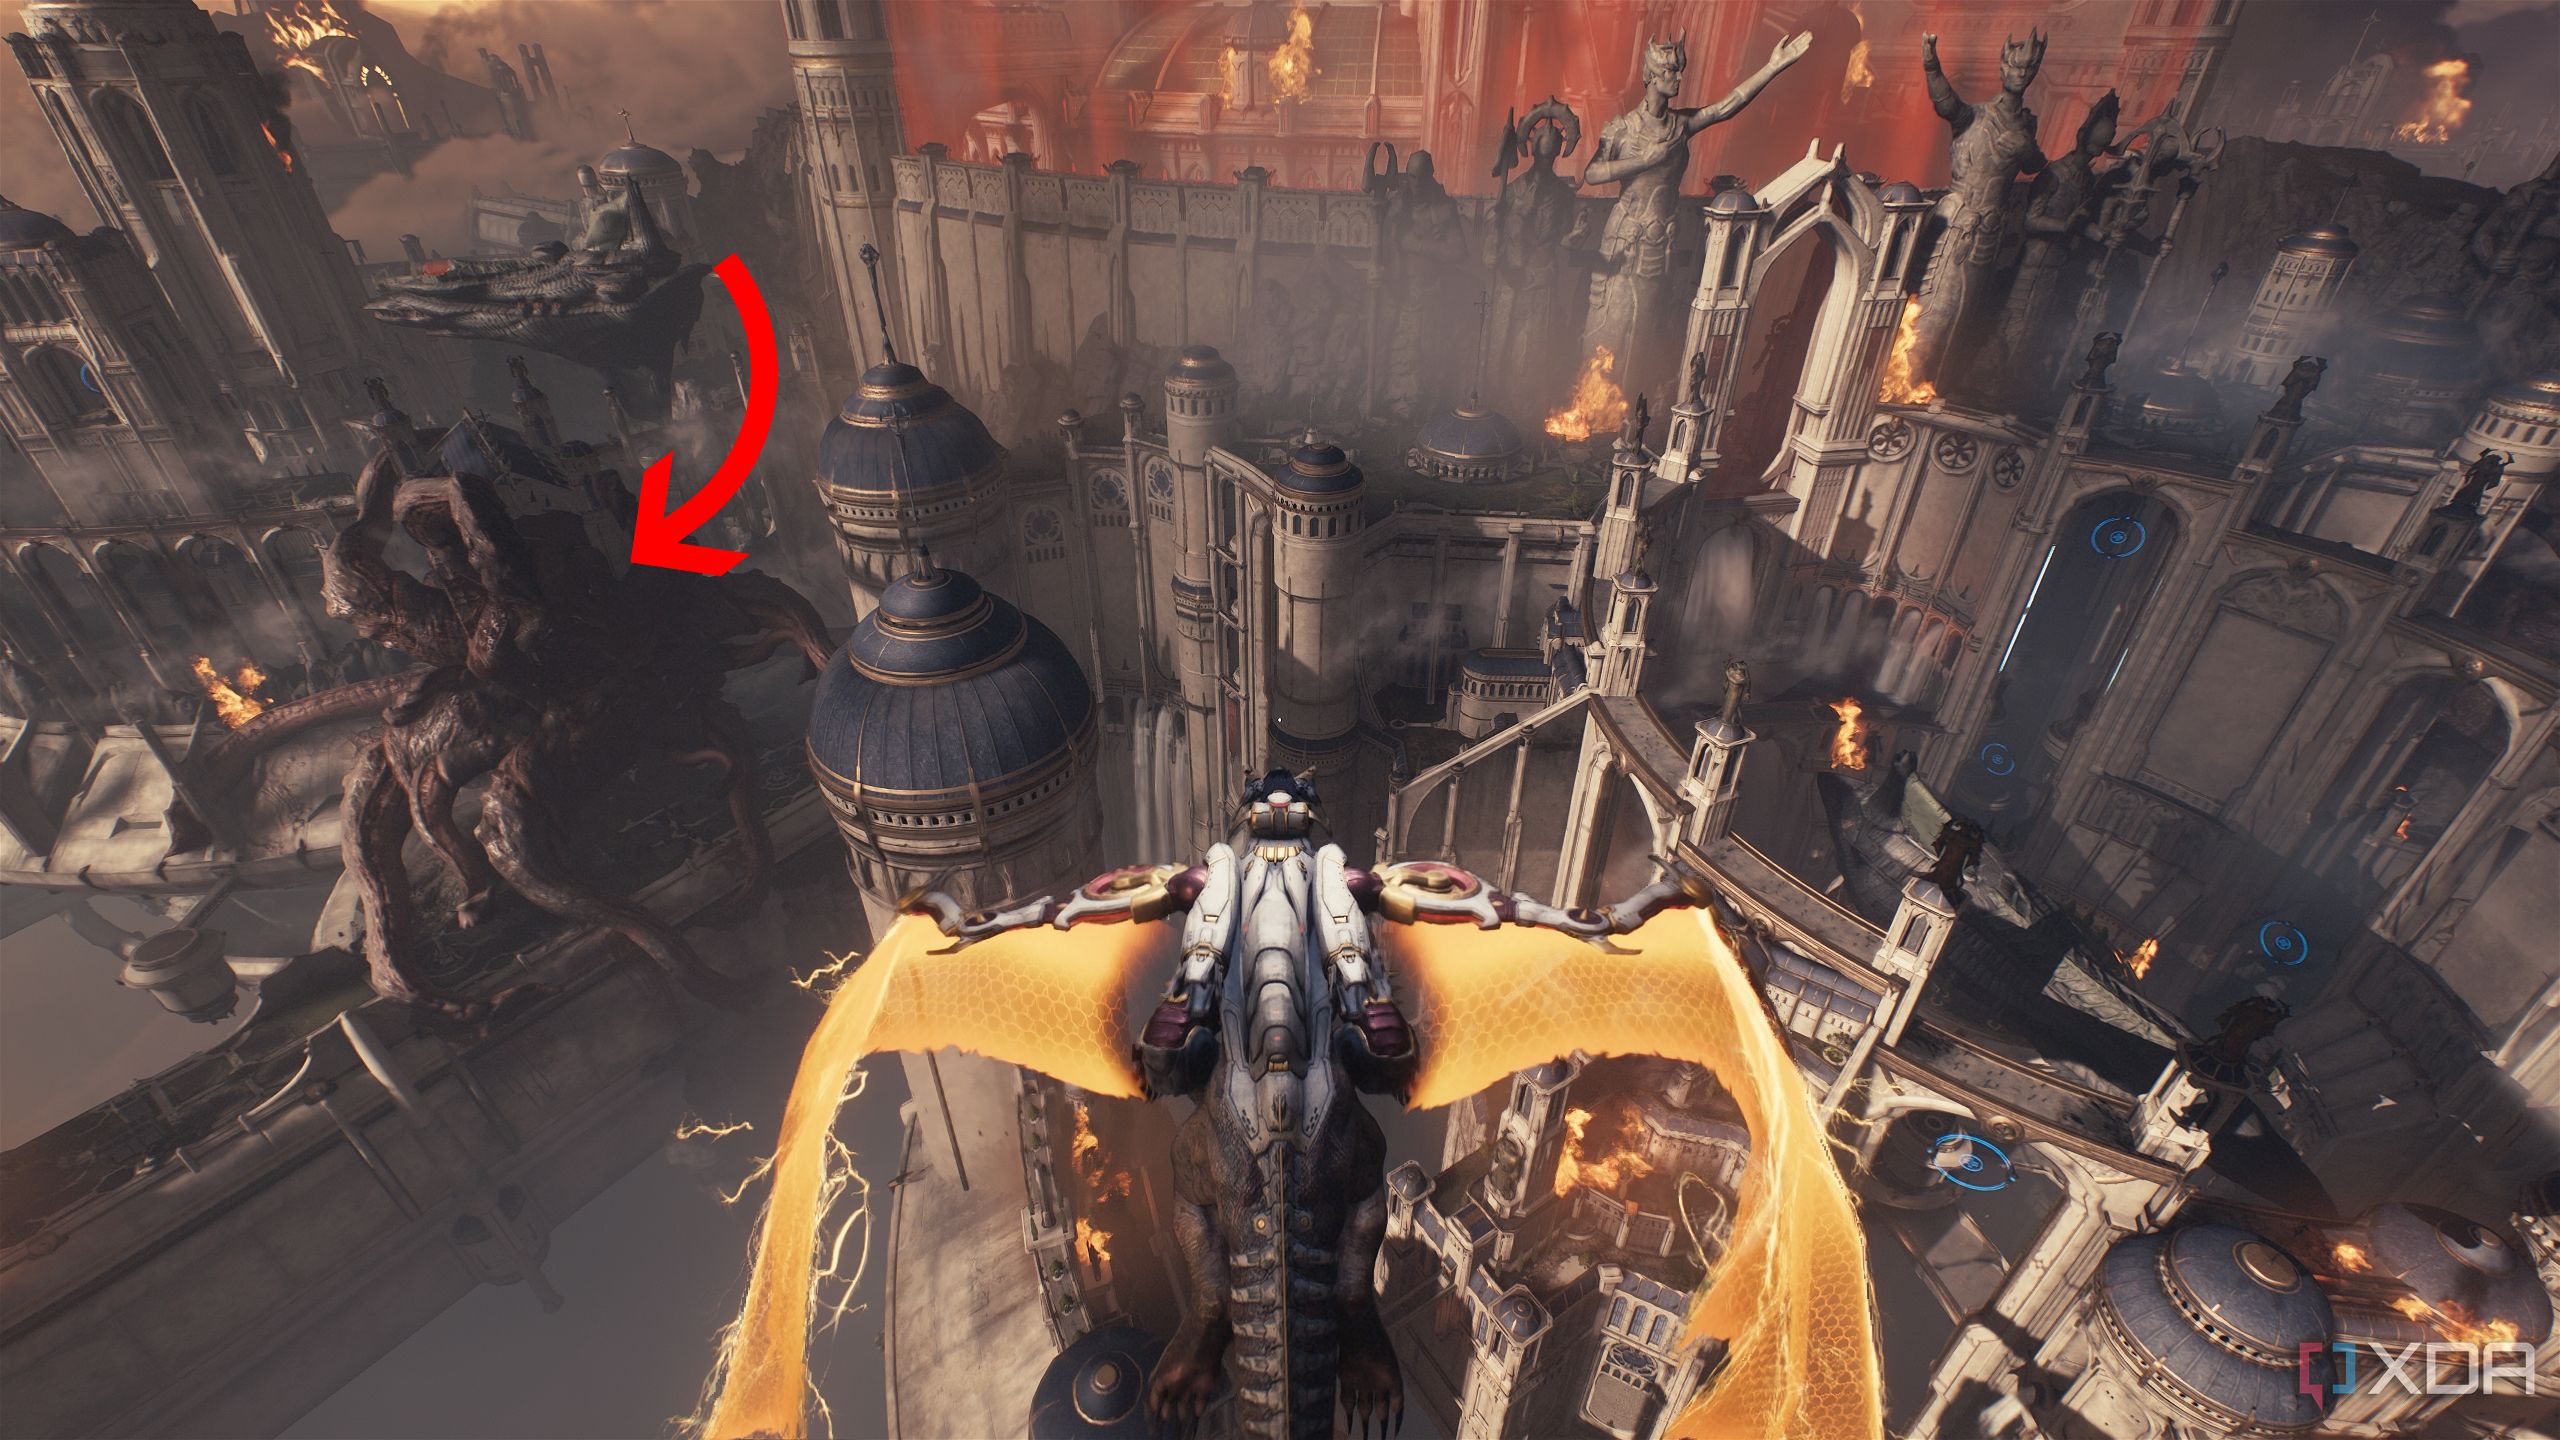
Once you’re done, your Dragon Mount will land, but do not climb it. Head to the location shown here.

By walking down some stairs, you can find a hidden gold crate and a secret area to unlock. Once that’s done, walk back up to get back onto your Dragon Mount.

Related
6 reasons I’m excited for DOOM: The Dark Ages
Six bloody good reasons DOOM: The Dark Ages could be the most fun FPS of the generation.
Third Hell Fighter and Hell Carrier, with a new Codex Page
Of course, there’s more gold here, too

It’s time to fly back once again to the main gate with the six statues, and spot a health ring to the right.

Fly through the ring and about a second later, you should be face-to-face with a huge Leviathan demon stuck to the city walls.

Engage it in combat and blast through its face to open a hole in the wall to fly through. Once you enter the newly-blasted hole, a Hell Fighter ship will immediately appear. Chase it down and destroy it to finish the Cat-and-Mouse challenge, and keep heading forward to enter a completely new section of the map, where the third Hell Carrier ship is also present.

Take it down, and it will crash into another ship, opening up a landing zone for the Slayer to land on.

Go through the objective area to get into your first encounter with demons. Once they’re taken care of, there should be a gold stack pick up on the right, underneath a computer screen with orange symbols.

Continue on to fight an armored Mancubus and more demons to then get the Cycler weapon. After you bash through the doors and land in the next and final section of this Hell Carrier, you’ll go through hordes of enemies to dispatch with your shiny new weapon. Once that’s done, and you’re facing the exit, turn around and pick up gold bars and a new Codex Page about Deag Loric.

Once you’re back on your dragon, look for a rectangular, green-lined hole in the wall, enter it, and travel through to get back to the main city.
The final Hell Fighter chase
One final fighter ship to bring down
Back in the main city, look for the six-statue gate again, and to your left, another demonic Leviathan should be visible.

Fight it to open a hole through its face, and as soon as you enter it, another Hell Fighter ship will fly by.

Chase it down if you haven’t yet completed the Cat-and-Mouse challenge, or just for the bragging rights.

Related
Watching a TXT file render Doom was not on the list of things I thought I’d see today
Rip.txt and Tear.txt.
The final Hell Carrier to take down
Hell Carrier number four marks the final carrier ship to bring down

Once through the entrance of the second demonic leviathan, you should see the fourth and final Hell Carrier ship.

Take it down to access a new landing zone.
Red Ruby and a Life Sigil
Some puzzles do require brute force

After you get the Super Shotgun, head inside the building to take down several Imp Stalkers. At the end of the corridor, you’ll see a green switch in the floor that opens up a gate ahead to a Red Ruby.

Getting off the switch, however, closes the gate.

Simply look up to find a heated metal cross hanging above the switch.

Cut it down with your shield, and it should fall on the switch, keeping it open as you grab the Red Ruby.

Head back to the switch and look behind it to find a huge, red-lit drop below.

Drop down to find plenty of armor, ammo, and a Life Sigil, before going back up the way you came.
Secret Area, collectible Serrat toy, and more gold
Who doesn’t like a toy of their pet?

To the left of the room you picked up the Red Ruby in, exiting the building should lead to a bridge lined with blue-flame torches.

Before getting on the bridge, simply go left and drop down to reveal a line of gold bars on the ground.

Keep following this path to reach wooden scaffoldings, and follow the path to unlock a new secret area. Be careful — two Imp Stalkers and a Mancubus will ambush you.

Once you’ve taken care of them, go inside the new area, and climb up a couple of scramble walls.

Now, you’ll see a collectible toy for Serrat, your dragon. Grab it and break the heated metal cross to get back on track.
Demon Cultists, a Codex Page, and more gold

From here, you should see a heated metal cross on the other side of a barricaded metal gate you cannot access.

Turn around to find a small opening in the corridor where you fought the Imp Stalkers.

Climb up the scaffolding and walk to the left to find NPCs and a metal cross.

Cut it down, and a bridge will drop, revealing a box you can Shield Bash.

After bashing it, the box travels across the bridge for you to climb.

Get on top of it, and climb further up to then drop down to the scaffolding.

You’ll then unlock a new secret area with more demon cultists to take down, and more gold.

Head to the room on the right to see a stack of gold.

The moment you collect them, the doors will lock, and you’ll be ambushed by hordes of Imps and a Mancubus. Rip and tear.

Before you exit the area, head down the central staircase to grab a floating Codex Page for the Holy City of Aratum.

Then, get back up the stairs and break the metal cross to make your way back towards the objective.
Gold Crate and a secret area

Once you’re back on track, you should enter a big ship with plenty of fodder demons waiting to be slain. When the first room is clear, do not head along to the main path. Instead, look up to the north-west corner of the room, where a wooden wall with a Shield Bash symbol awaits.

Bash through it to unlock a secret area and grab a gold crate. Now, prepare to fight as two enhanced Hell Knights ambush you. This is the last collectible on this Hell Carrier before you destroy it and get back on your dragon.
Second secret Titan landing zone
Visiting the underbelly of the city

Before you head to the heart of the city, head straight back to the central cathedral gate — the one with the six statues.

Facing them, fly down to the very bottom of the city.

At the bottom, you’ll see 2 Titan demons to fight. Once you’ve taken them both down, the second secret landing zone opens up for the Slayer to access.
Gold stacks, a secret area, and a weapon skin
Final batch of cultists

From here, look behind you to see an Imp Stalker standing next to some armor.

Take him down, and before you step on the big green switch on the ground, look below. There’s an area to drop down onto — do that.

Here, you’ll find gold pickups on the ground leading into two directions.

Grab the gold on the outside and head back to follow the gold bars inside, leading to a long, round corridor.

At the end of the corridor, you’ll find a Weapon Skin collectible with a heated metal cross to break and get through. Grab it, and break the heated metal cross, revealing a stairway heading up.

Get up those stairs and you’ll find the final circle of demon cultists to take down and complete the Countercult challenge.

Look ahead to find some more gold bars lined up on the ground to pick up, with a wall to climb up at the end.
A red keycard and more gold
Getting into deep waters now

Now, head to the big green switch on the floor where you saw the Imp Stalker. Refer to the location above.

Step on the big green plate in the ground.

Now, a heated metal cross should reveal itself in the center of the floor straight ahead. Hit it with your shield, and a huge hole in the ground appears.

Get to the new opening, and dive underwater.

Here, look around for a valve to turn — it should be marked with a green light.

Once the valve is turned and the water is drained, turn around to see a heated metal cross in the central structure.

Hit it with your shield, and enter through the gate to pick up a red keycard.

You should see another jump-pad here. Step on it to land straight onto some more gold bars.

Destroy the two crosses around you to get back on track, and head towards the color-coded gate that requires the red keycard you just picked up.

Open the gate, and a second Red Ruby along with the final bunch of gold should be accessible.
All collectibles in Chapter 5: The Holy City of Aratum in Doom: The Dark Ages
This marks the completion of all secrets and collectibles in Chapter 5: The Holy City of Aratum. With this, you can move towards the final objective and get the 100% completion tag all completionists desire for level 5 in Doom: The Dark Ages.

DOOM: The Dark Ages
- Released
-
May 15, 2025
- ESRB
-
m
- Developer(s)
-
id Software
- Publisher(s)
-
Bethesda Softworks
- Engine
-
id Tech
- Multiplayer
-
Online Multiplayer
- Franchise
-
DOOM
#collectibles #level #Doom #Dark #Ages
source: https://www.xda-developers.com/all-collectibles-in-doom-the-dark-ages-chapter-5/

