

I’ve mentioned this multiple times over the past few weeks, but my entire life I’ve been a Windows user, and only recently did I make the jump to macOS as part of my Mac Mini review. And while I’ve absolutely loved the hardware Apple has created here, macOS still requires a big adjustment period, and also a lot of changes.
A couple of weeks ago, I talked about five apps I installed to make the transition from Windows easier, but now, I want to highlight some of the settings I’ve changed on macOS itself to make it behave more like Windows 11. These don’t require installing anything, just changing the right settings on your computer, and combined with that previous list, you have a good handful of ways to feel at home on macOS.
Related
5 macOS apps I use to help me transition from Windows
Learning macOS can be a challenge, but this helps
This shouldn’t even be a problem
One of the most offensive things I noticed as soon as I started setting up my Mac Mini was that Apple sets the scrolling direction for the mouse wheel to be the opposite of how it is on Windows. It behaves more like a touchpad, where swiping down moves the page up, and vice versa. And it makes some sense because Apple’s own Magic Mouse uses a touchpad-like surface for scrolling.
But on a real mouse, this feels completely unnatural, so that was the first thing I had to change. To fix this, you can follow these steps:
- Click the Apple menu button on the top left corner of the screen and choose System settings.

- Scroll down the left-side pane of the settings window and open the Mouse section.
- Set the Natural scrolling toggle to Off.
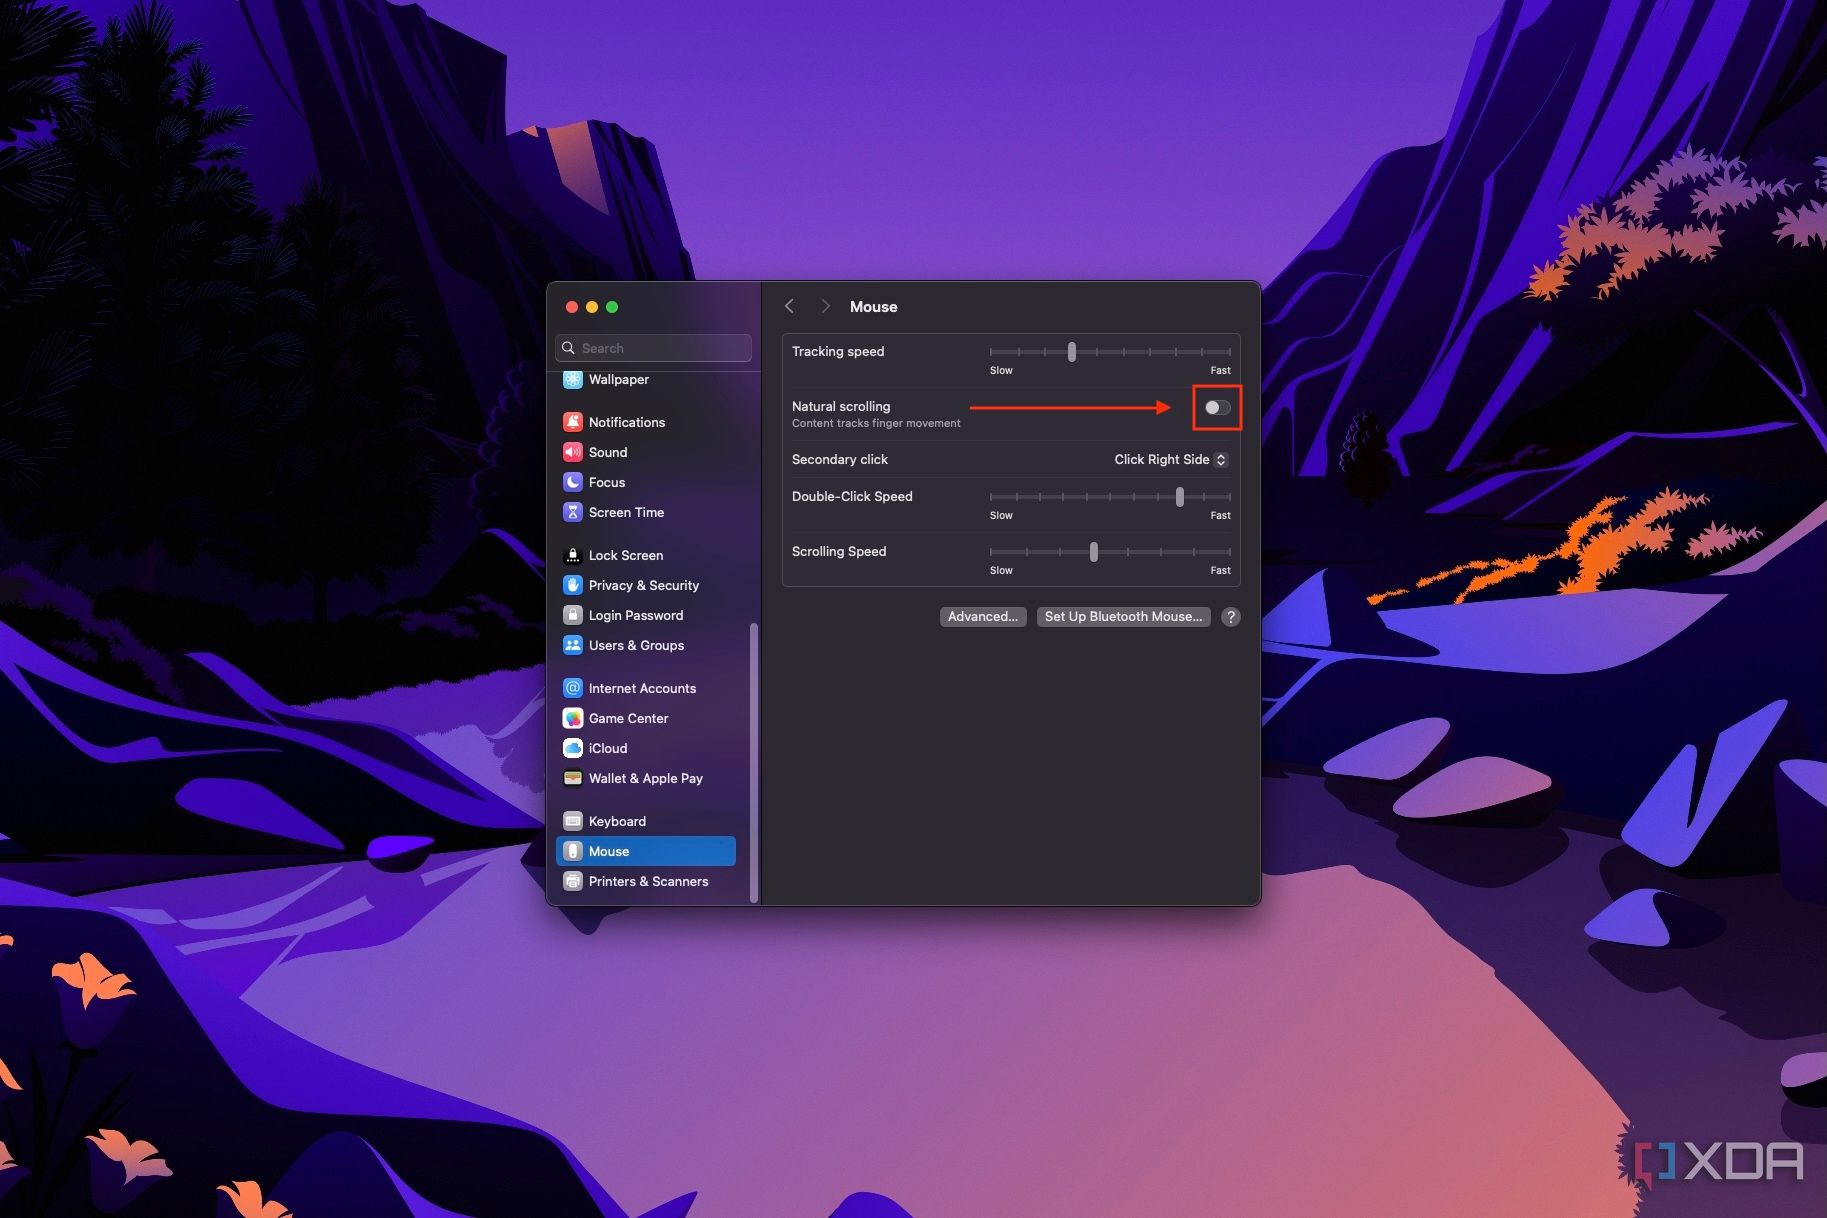


That’s all it takes, and changes are saved instantly, so you can safely close out of the window.

Activate the Launchpad shortcut
Quicker access to your apps
I’ll be completely honest, I ended up not relying on this one nearly as much as I thought I would, but that doesn’t mean it’s not useful. On Windows, opening the Start menu is very easy using just the Windows key on your keyboard, but macOS doesn’t really have an equivalent for its app launcher by default. The Launchpad, as it’s called, is only available through the dock.
Well, thankfully, that can be fixed quite easily. In the macOS settings, you can enable a keyboard shortcut for opening the launchpad, which isn’t quite the same, but goes a long way. Here’s how you enable it:
- Open the Apple menu and choose System settings.
- Scroll down the left-side pane and click Keyboard near the end of the list.
- On the main pane, click Keyboard shortcuts.
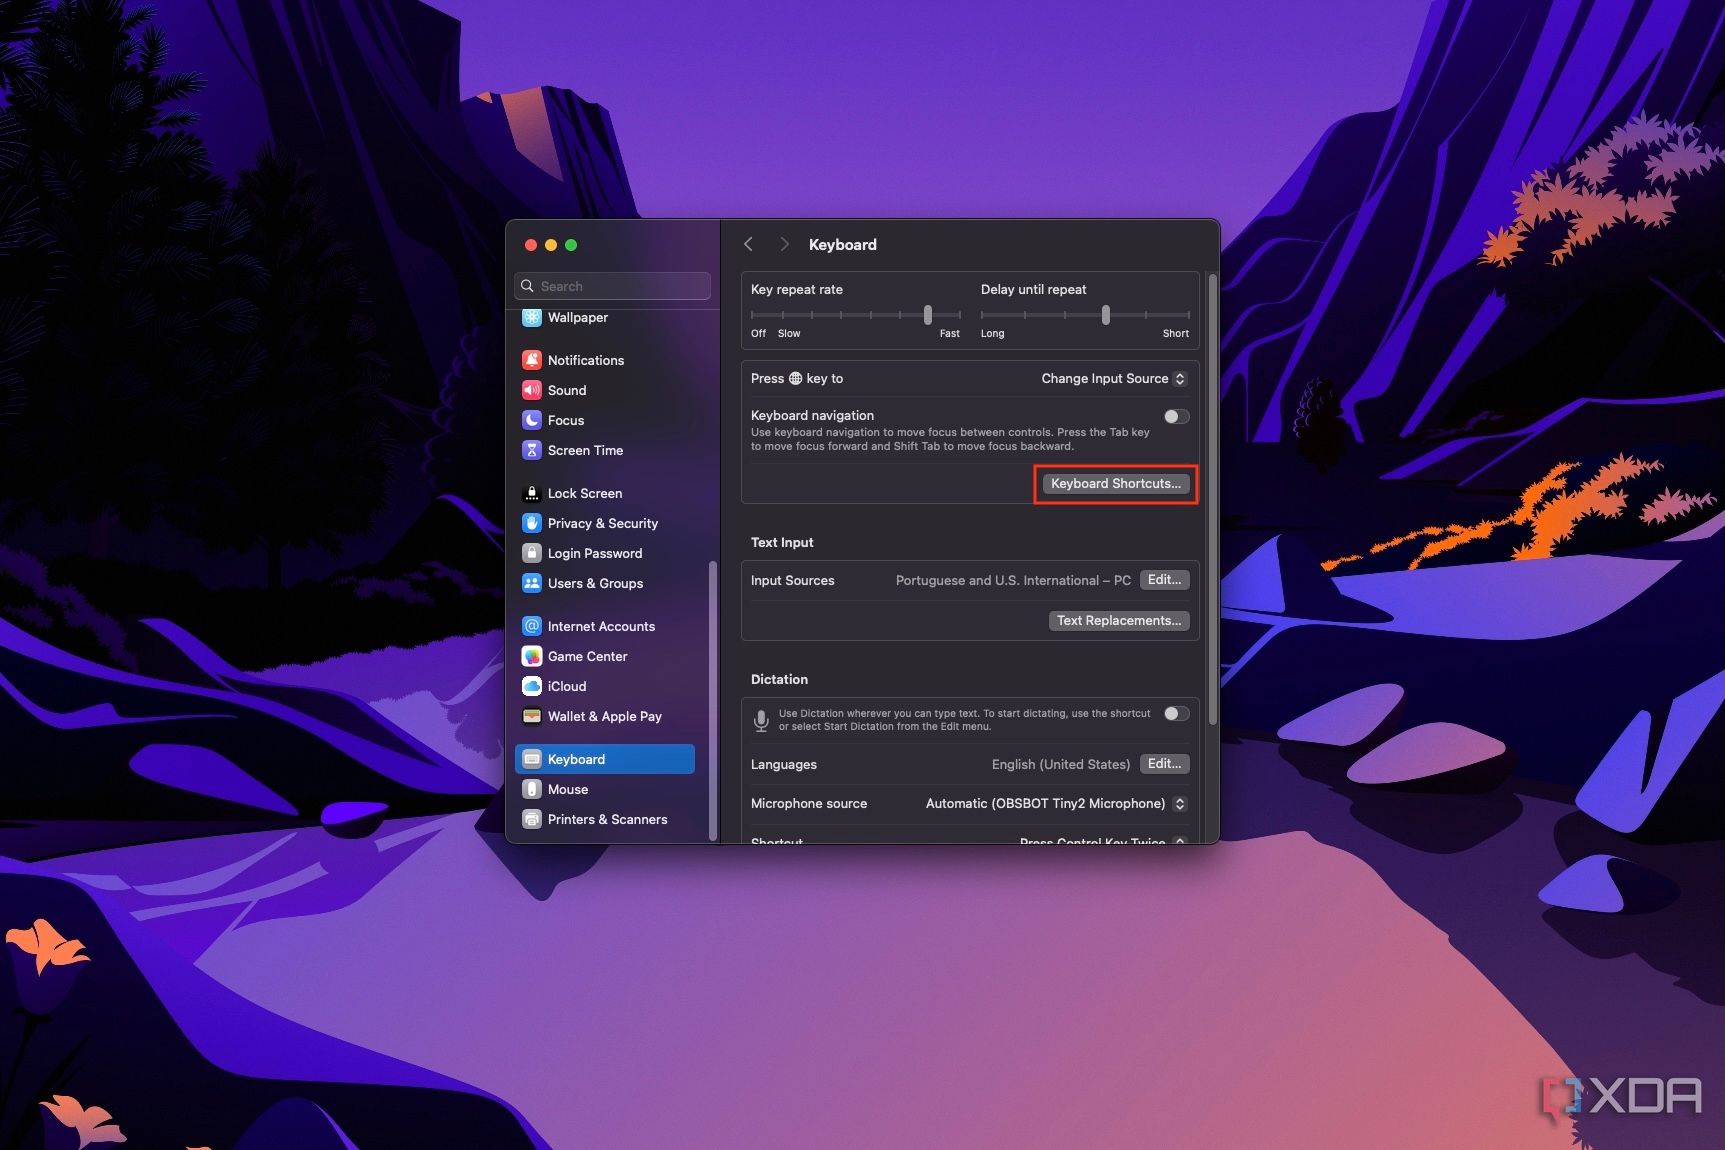
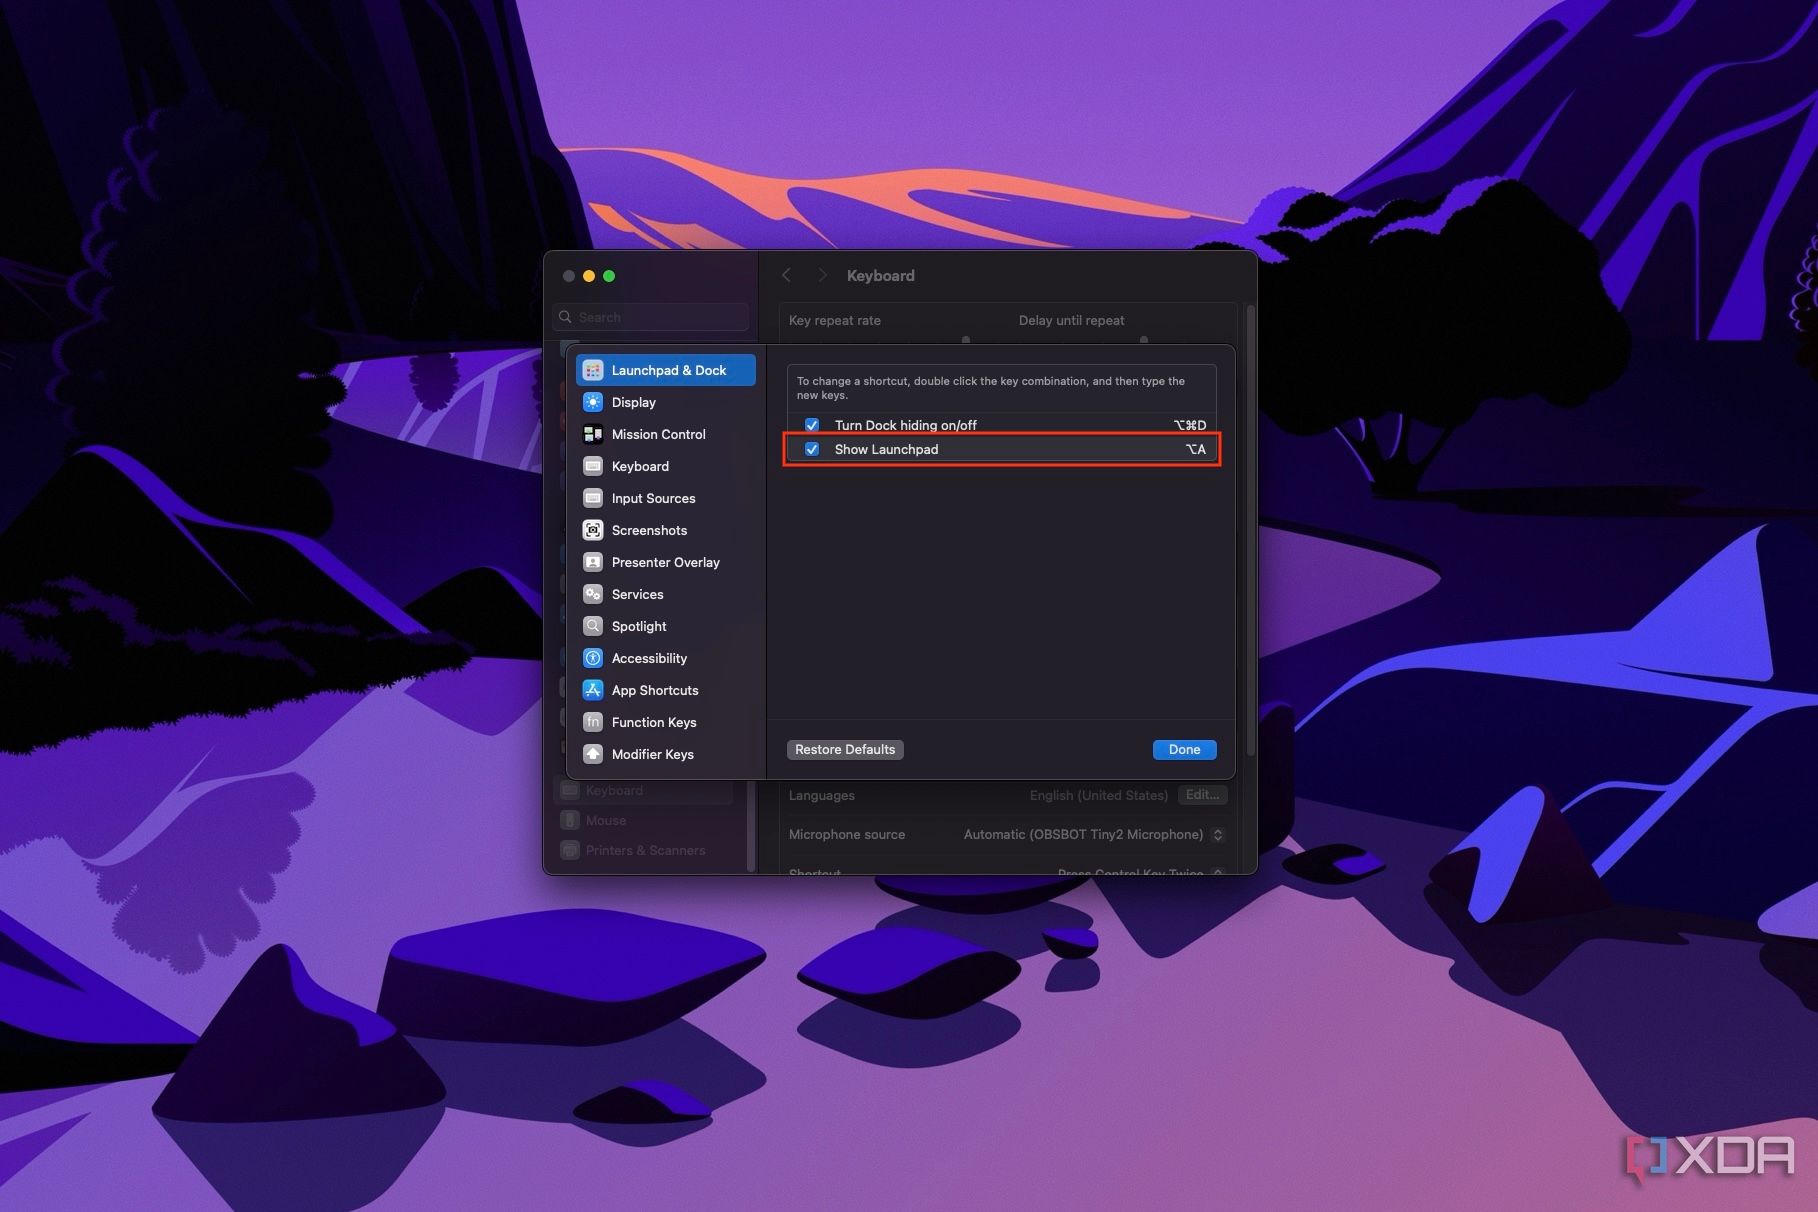
- Enable the Show Launchpad shortcut.
- Optionally, you can change the shortcut by double-clicking the key combination, then entering the keys you want to use.


That’s all there is to it. As to why I don’t actually use this that much — it’s mostly because I just use Spotlight search to launch anything I want. It’s my replacement for Flow Launcher on Windows, so I don’t have much of a need for the Launchpad.
Change the window minimize animation
The Genie effect is ridiculously slow
I legitimately don’t know how any modern operating system that’s supposed to help people work can exist with animations as slow as the default Genie animation on macOS. Minimizing and restoring apps with this animation feels incredibly tedious, and it’s not even a cool effect. It’s slow and doesn’t really feel all that natural or fun.
Thankfully, Apple almost realizes how bad it is, and there’s an option to easily fix it. Here’s how:
- Open the Apple menu and choose System settings.
- Go to the Desktop & Dock section on the left-side pane.
- Use the Minimize windows using option to change to the Scale effect.
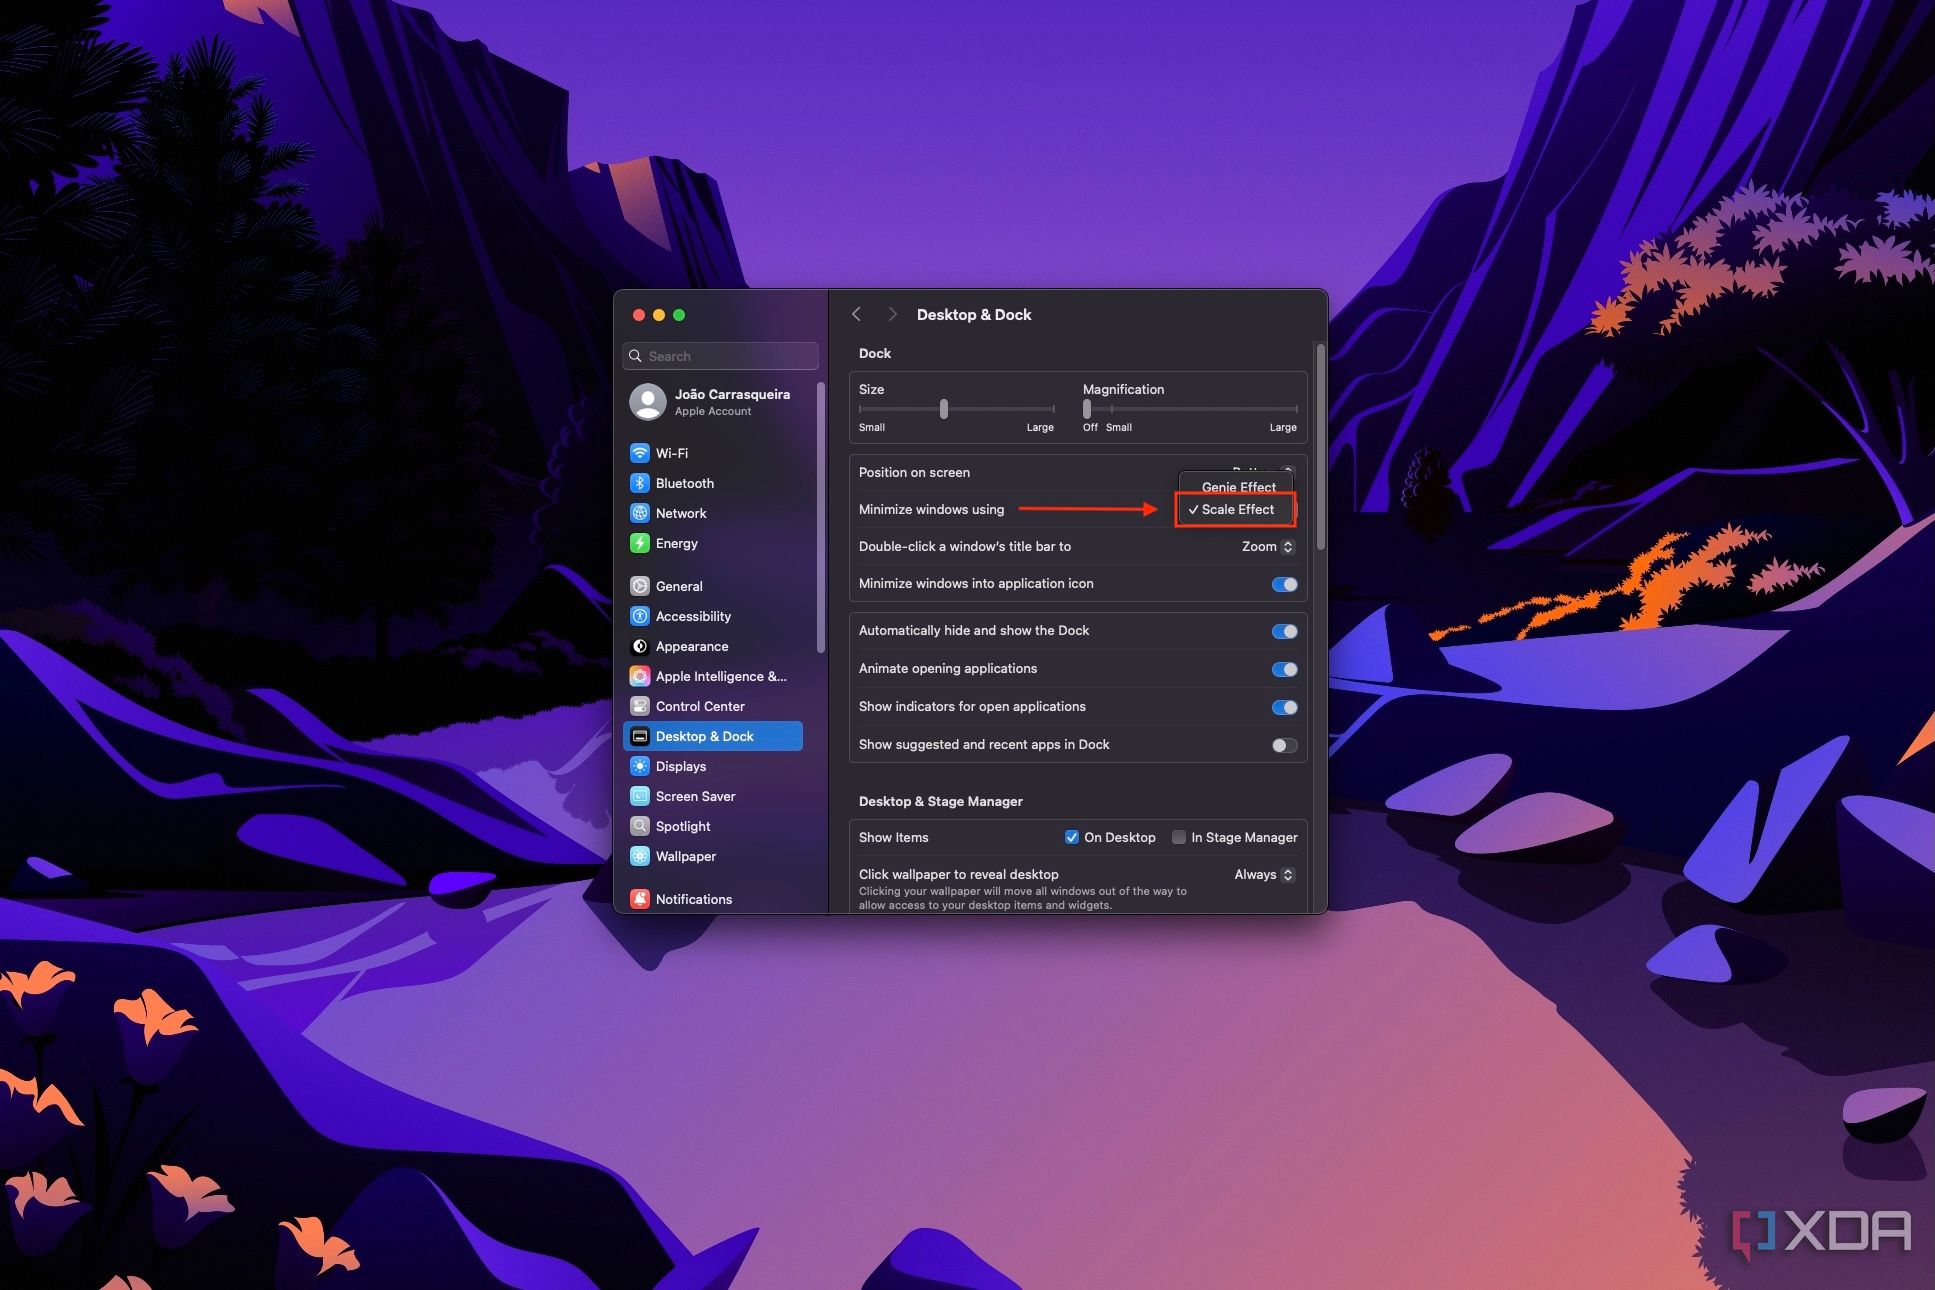

Minimizing your apps will now look a lot more like how it does on Windows 11, and it will be a lot faster too. This really should be the default behavior, or if Apple wants to be unique, it needs to craft an animation that doesn’t hinder users as much as this current one does.
Save screenshots where they belong
Why are these on the desktop?

Another one of the big complaints I had when I first wrote about the 10 things that drove me mad about macOS was the fact that screenshots are saved on the desktop by default. Now, someone pointed out to me at the time that if you browse to the desktop folder in Finder, screenshots are actually in their own folder, but that makes no difference if they’re still cluttering your screen by default.
Screenshots belong in their own folder more hidden away, simply because we take so many screenshots of little things to share here and there and a lot of them are kind of useless after that initial moment. Having them on the desktop makes no sense. If you want to change the default location for screenshots, you can do this:
- Press Command + Space on your keyboard to open Spotlight search
- Search for Screenshot and choose the default search result
Alternatively, you can open the screenshot tool with Command + Shift + 5.
- Click Options and under Save to, click Other location…
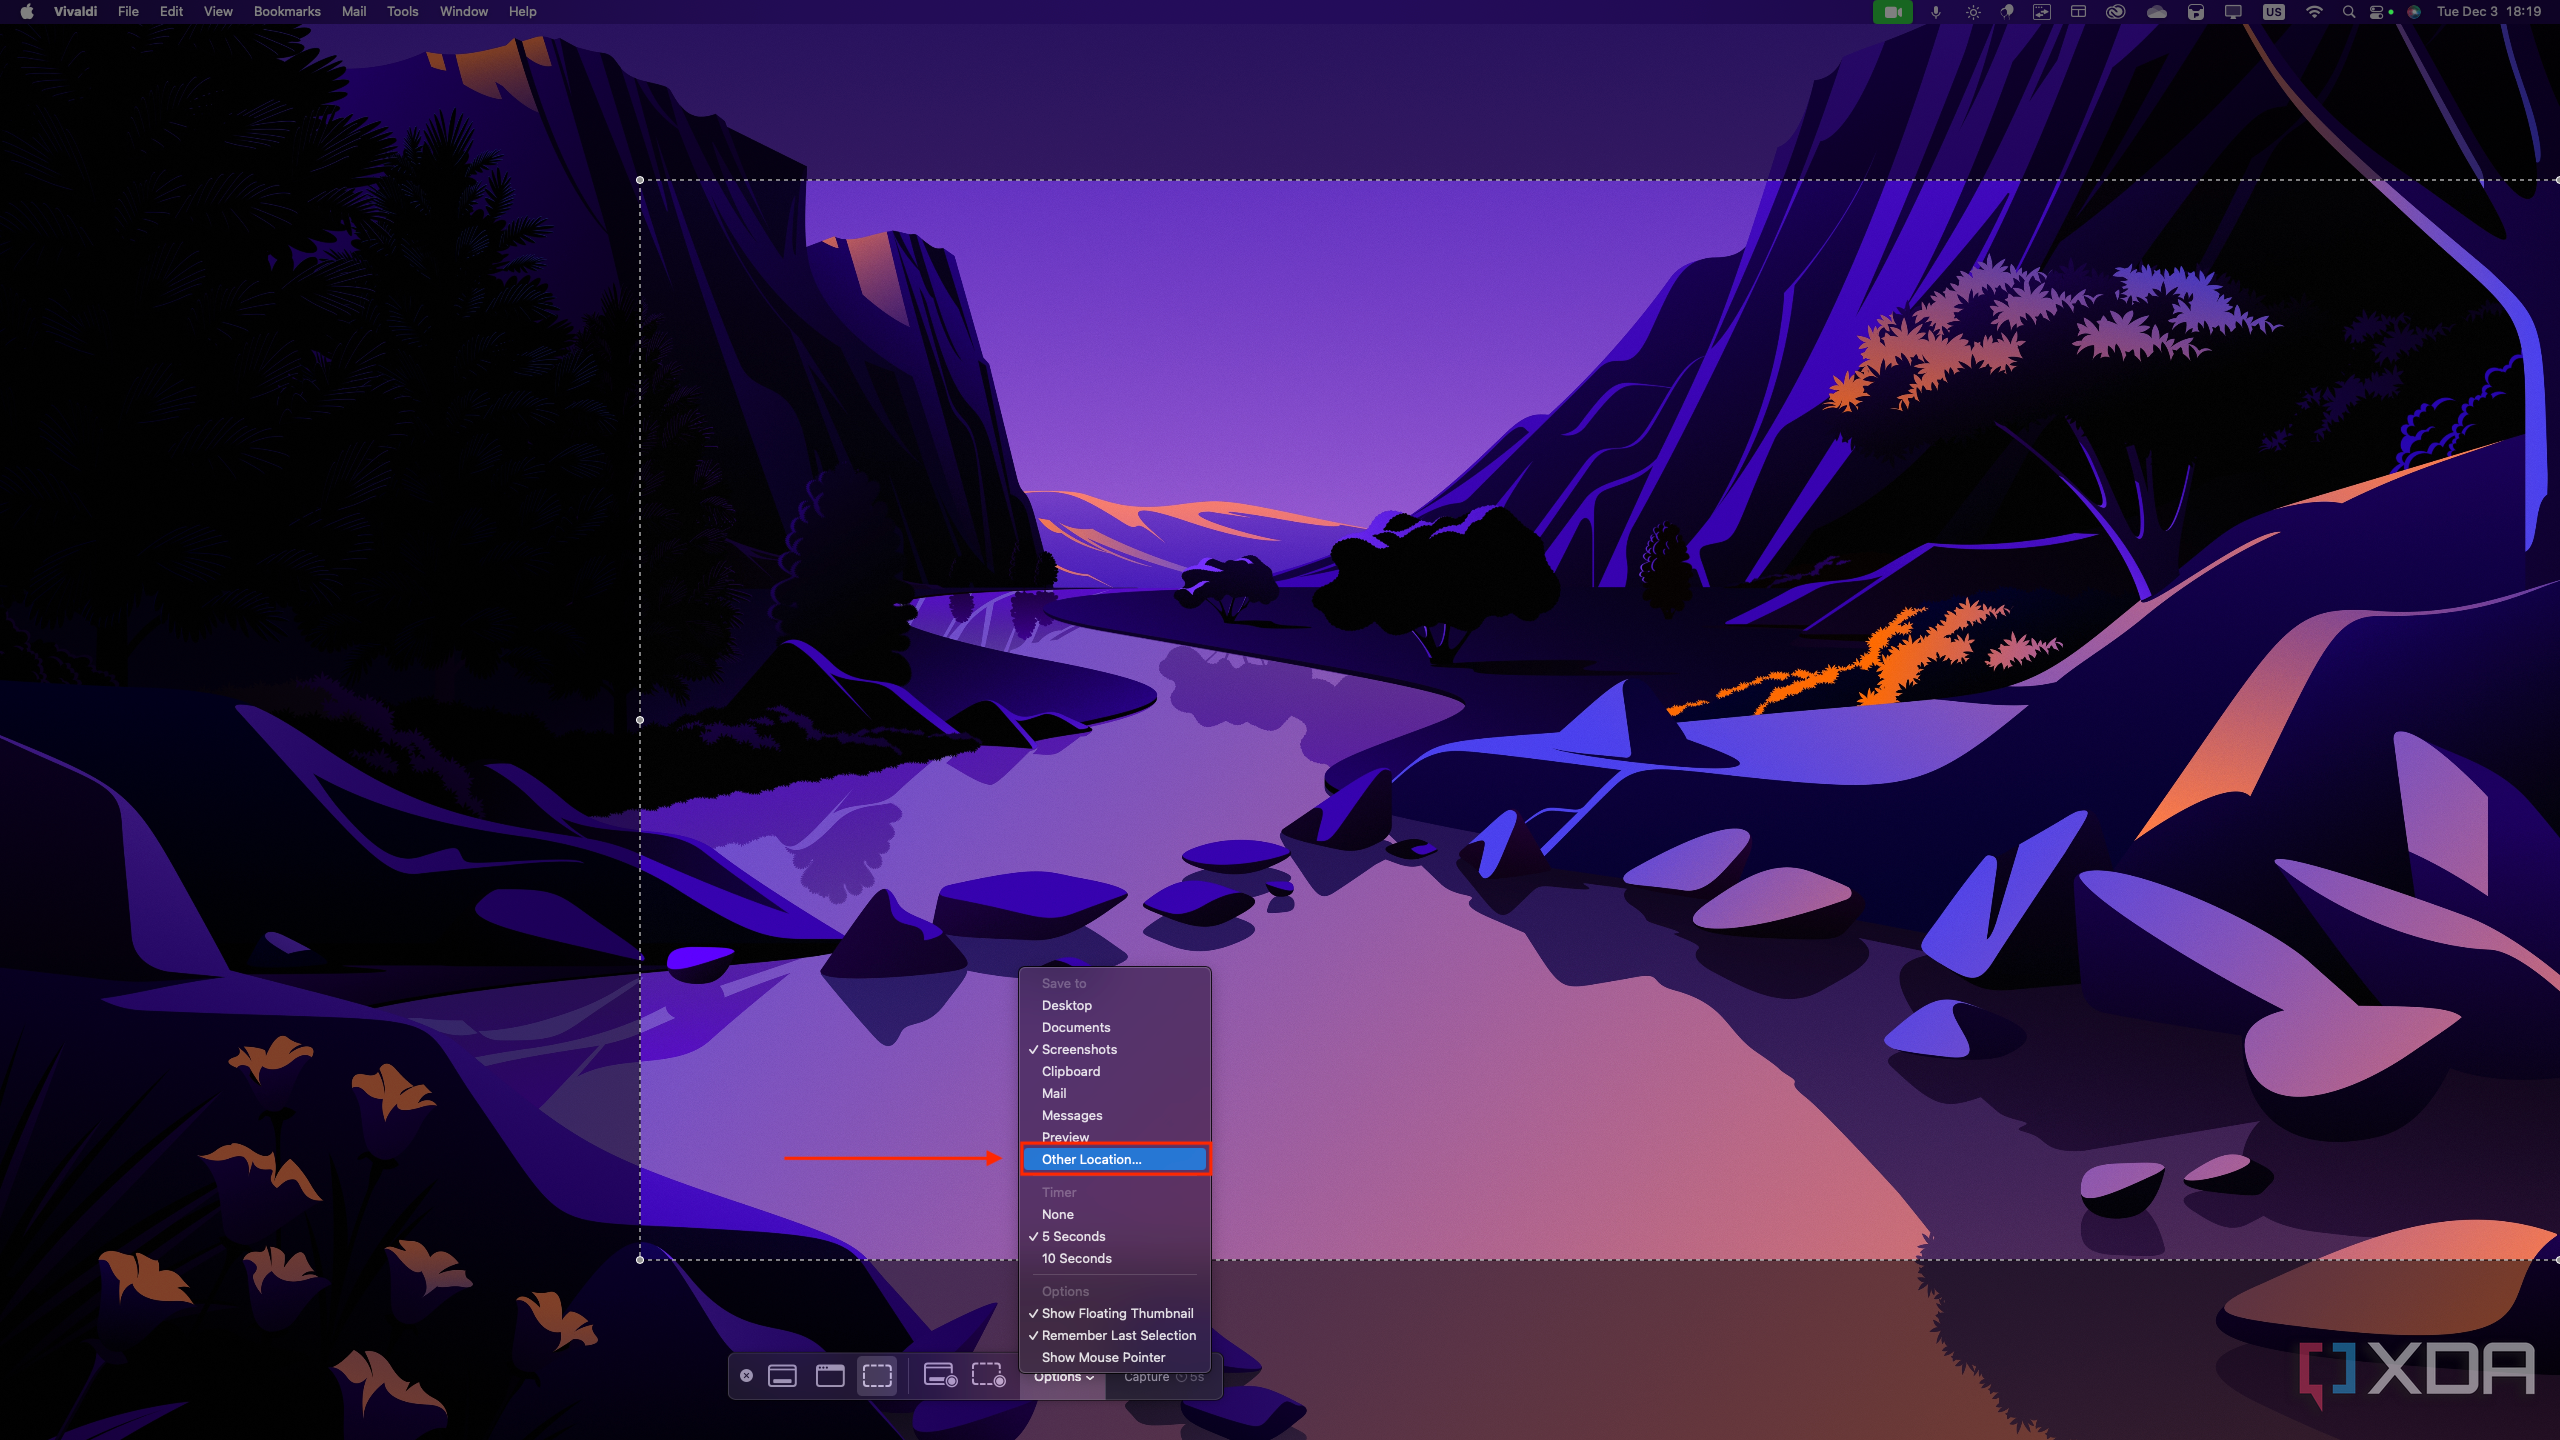
- Browse to the folder where you want screenshots to be saved and click Choose.

Screenshots will be stored in that new folder by default.

Related
5 reasons you should use the Windows Snipping Tool instead of third-party apps
It’s better than you think
Fix the Dock
As much as possible, at least
Finally, we have the macOS Dock, which is very confusing to get used to when you’re coming from Windows. There are multiple different sections and apps minimize to separate icons than their standard icons on the Dock, which makes no sense. Thankfully, you can make things behave a bit more like Windows 11 with two major tweaks. Namely, you can make it so that windows minimize into their respective app icon, and then you can also disable suggested and recent apps on the Dock.
Both of these settings are in the same place, so here’s how you do it:
- Open the Apple menu and choose System settings.
- Choose Desktop & Dock from the pane on the left side.
- Set the Minimize windows into application icon toggle to the On position.
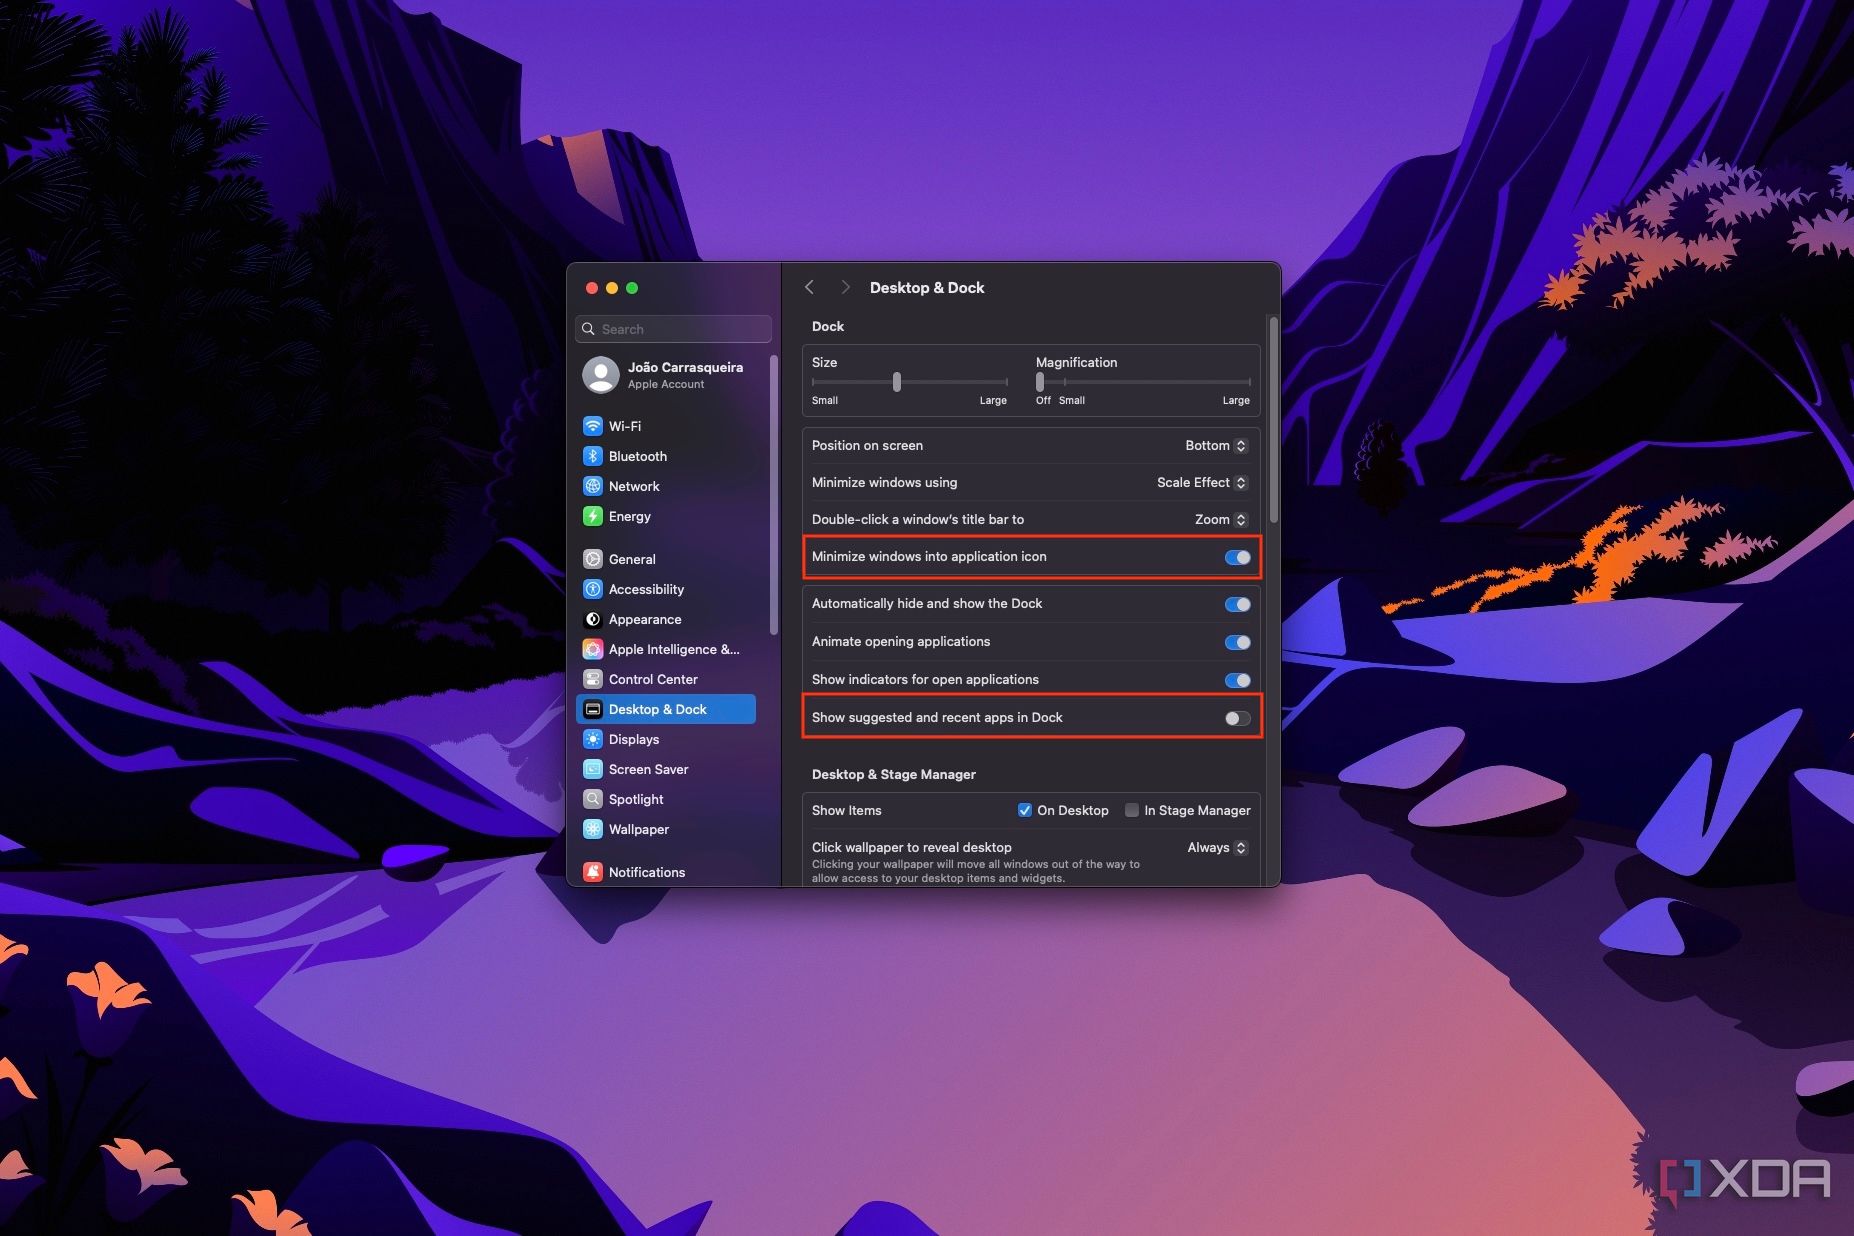
- On the flip side, set the Show suggested and recent apps in Dock toggle to Off.

Changes are saved instantly, so you can close the Settings app. Unfortunately, the dock still won’t fully match the behavior of Windows 11 because you can’t mouse over an application icon to see its open window as you would on Windows. However, you can right-click an app icon to see them. Alternatively, an app like AltTab may help you get a similar behavior to Windows in terms of window management.
macOS isn’t so bad
If you’ve made it this far, you’ve probably noticed a pretty big omission — changing the web browser. I could have definitely included that because I did change my browser to Vivaldi, but I also have to do that on Windows, so it’s not really far to claim that’s a macOS issue.
Transitioning from Windows to macOS can feel like a daunting process, but between the apps I’ve highlighted in the past and these settings, I have to say moving over to macOS has been way easier than I would have expected. Sure, some of the things Apple does by default shocked me, but once I changed those behaviors, it was smooth sailing.
If you’re someone who’s been afraid to switch from Windows to macOS, all I can say is there’s nothing to fear. You can definitely adjust to this new way of doing things.
#decades #Windows #change #macOS #settings #immediately
source: https://www.xda-developers.com/macos-settings-changed-immediately-bearable-windows-user/

