

Running AI apps locally used to mean needing some familiarity with some Python, GitHub, and use of a terminal. Pinokio is a program that’s meant to simplify finding, installing, and running AI apps, making them more accessible to users without technical knowledge. The virtual machine manages each app’s virtual environment and python dependences for you, and is available for macOS, Windows, and Linux.
Popular apps used for AI image generation, like Automatic1111 and ComfyUI, are available as “1-click” installations. An alarming number of subscription-based AI platforms are built on open source projects. You can easily get started generating images with Stable Diffusion models, separate audio stems, clone your own voice for text-to-speech, and more without needing to buy a subscription.
You don’t always need a powerful desktop or laptop with a great GPU to run AI software, either. You can generate images with as low as 4GB of VRAM. Pinokio lowers the barrier of entry for beginners, and it also has some benefits for advanced users.
Related
How to install Python on Windows, Linux, and macOS
If you want to install Python and get started with development, we have a handy quick-start guide to run you through the basics.
Pinokio is a virtual computer for AI apps
And it takes care of the hard stuff
Pinokio is an open source project, released under an MIT license, by the developer cocktailpeanut. It has an active Discord server, with community members contributing scripts and offering support to new users. You don’t have to build the Pinokio app from source code on GitHub. You can download the pre-compiled binaries from their releases page, browse the available AI apps, and there is thorough documentation if you want to learn more granular details.
Most open-source AI apps are built primarily with Python. They rely heavily on Python scripting and backend logic, while integrating machine learning frameworks like PyTorch and TensorFlow. Installing something like the highly popular ComfyUI node-based interface requires managing a lot of dependencies, and other AI apps may conflict. Virtual environments are a necessity if you’re using multiple AI apps.
Putting Pinokio to the test
Hardware and what was tested

One of the most attractive aspects of Pinokio is that it handles the installation of an app from start to finish, manages all virtual environments and dependencies, and aims to eliminate a lot of headaches for inexperienced Python users. I’m an advocate for helping everyone get access to powerful AI tools, and wanted to know if Pinokio works like it says it does. I’ve been using local AI apps like ComfyUI for about 2 years now, and while putting Pinokio to the test, I found experienced users might also like it.
I used a MacBook Pro M2 Max and MSI Windows 11 laptop, comparing my experience installing and using AI apps with and without Pinokio. I tested the installation process and basic usage of five apps; ComfyUI, OpenVoice2, Bark, XTTS, FaceFusion, and RC Stable Audio Tools. I compared model load times, generation time, folder structures, features, and overall performance.
Many open source AI apps use Gradio, which allows developers to create web-based GUIs that you can interact with in a standard web browser. After installation, Pinokio is just launching them in its own in-app browser, instead of your default one. You don’t need to have an internet connection while running the apps, unless stated by the original app developer’s or cocktailpeanut. All local apps used Google Chrome, but have been tested on Firefox and Safari in the past with no issues.
I quickly realized that Pinokio isn’t always as simple as a single click, but it does have a lot of potential. I’ve simplified some of Pinokio’s instructions below, and described some of the problems and solutions I encountered. You can skip ahead to the testing results if you don’t need installation instructions. While not flawless, the process is easy, but some steps might be confusing.
Installing Pinokio
Installing Pinokio on Windows is as simple as downloading and running the installer like any other app. Installing Pinokio on macOS requires one extra step. You need to run a patch.command before opening the app. The Pinokio instructions could be clearer for someone who has never done this before.
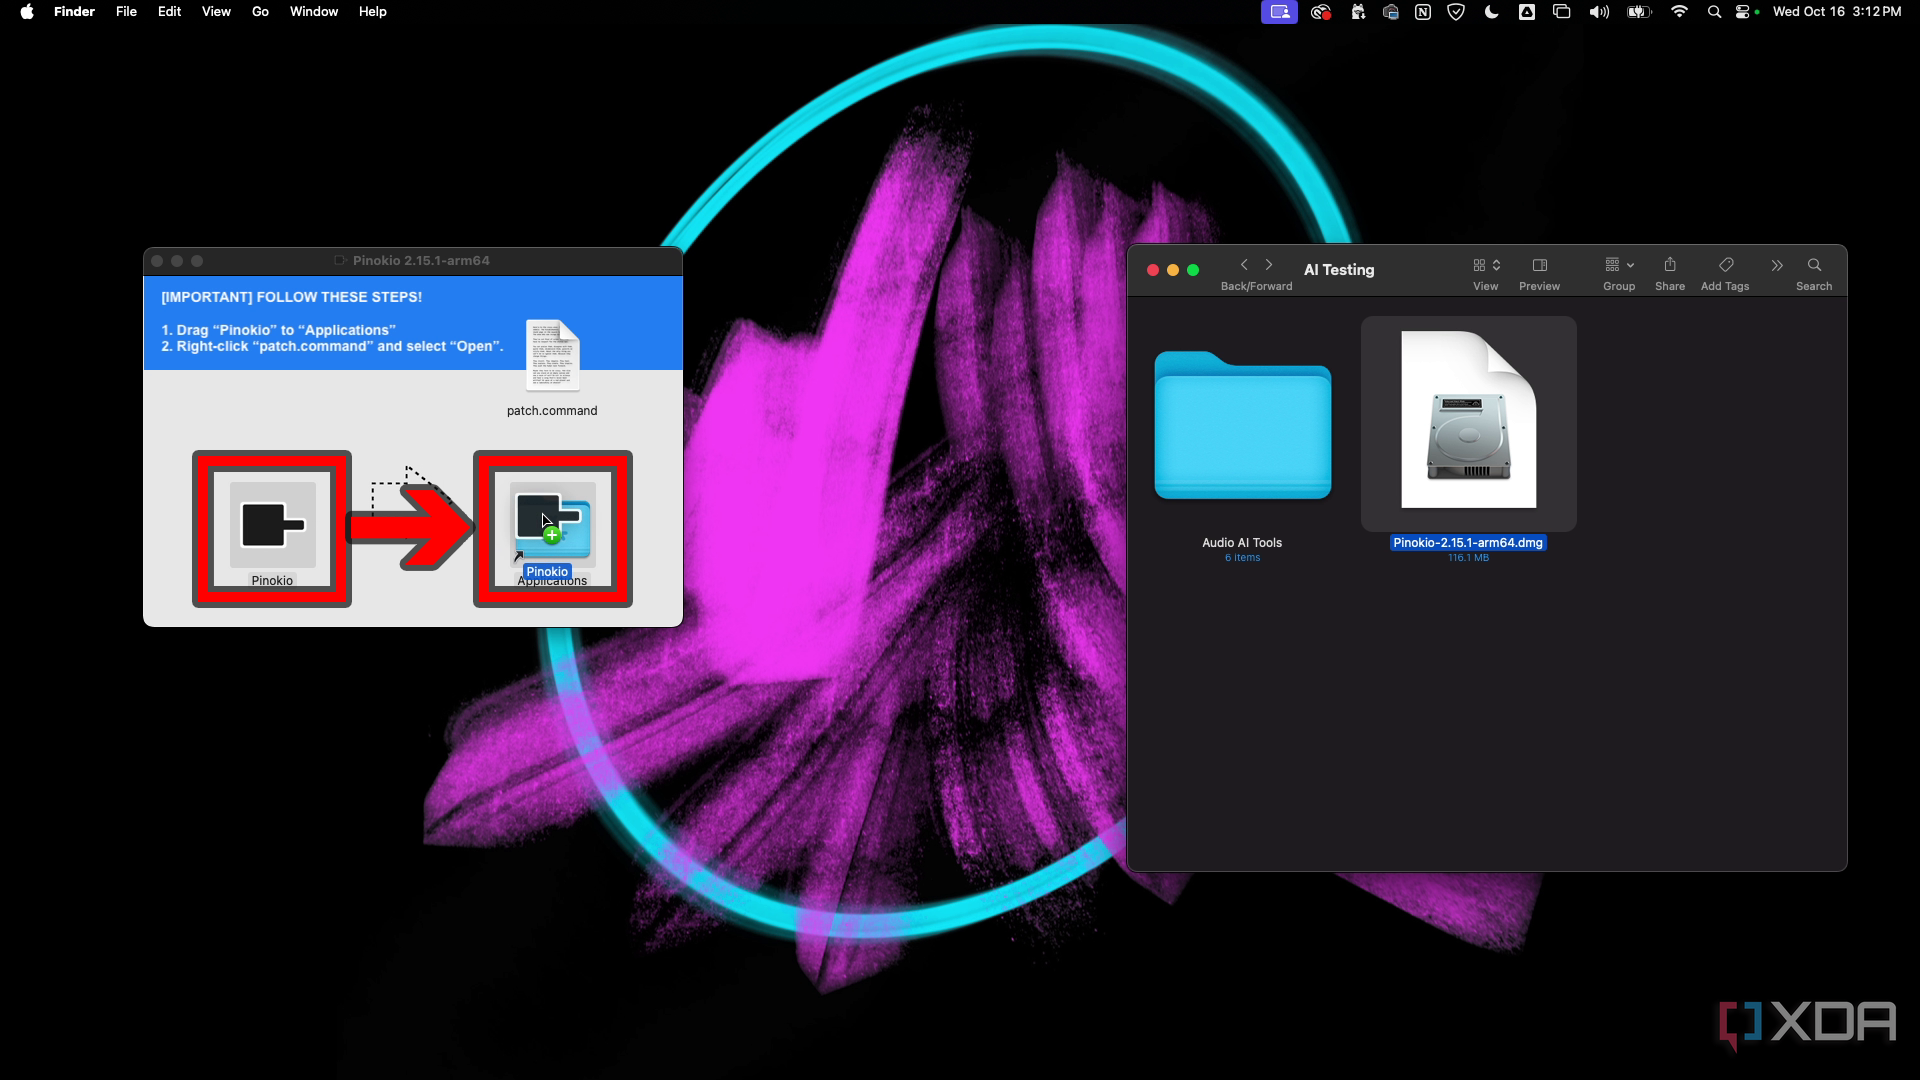
- Download the installer from the website and double-click the installer to mount it.
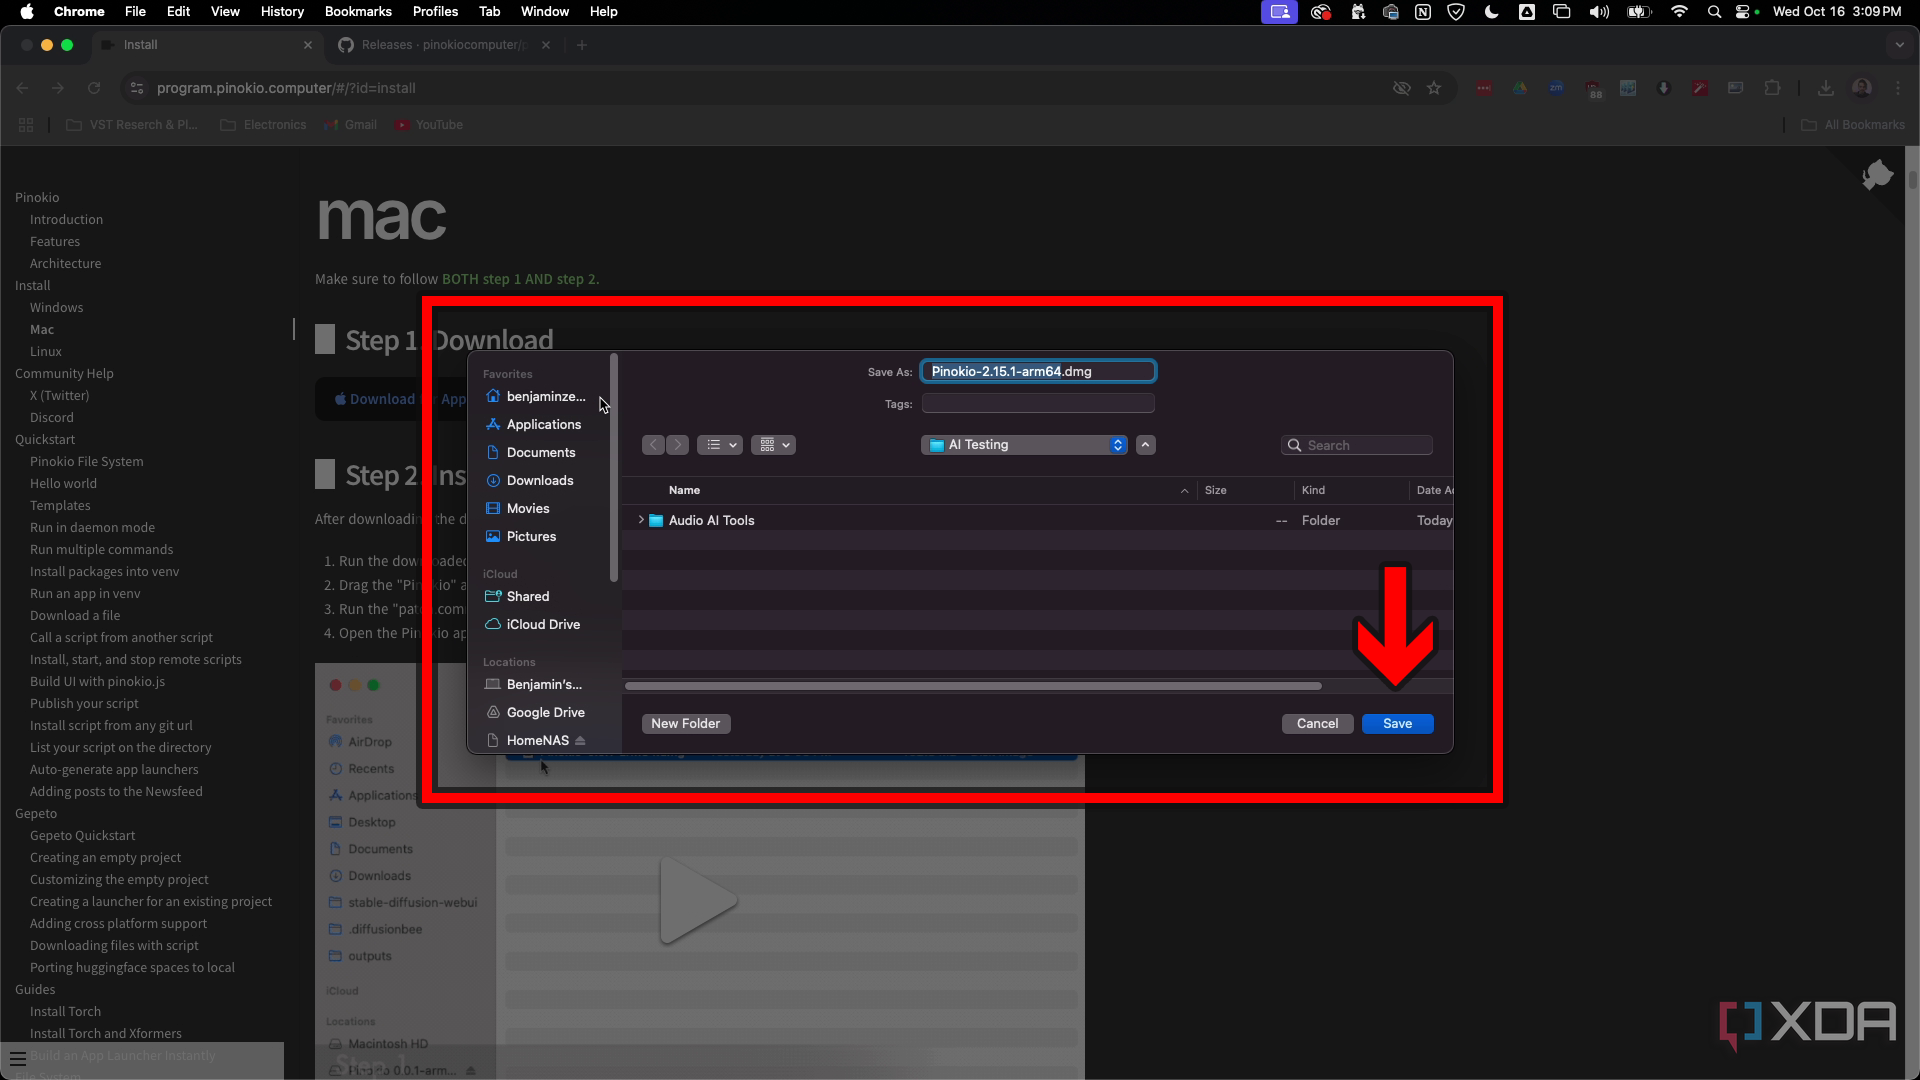
- Drag the Pinokio app to your Applications folder.
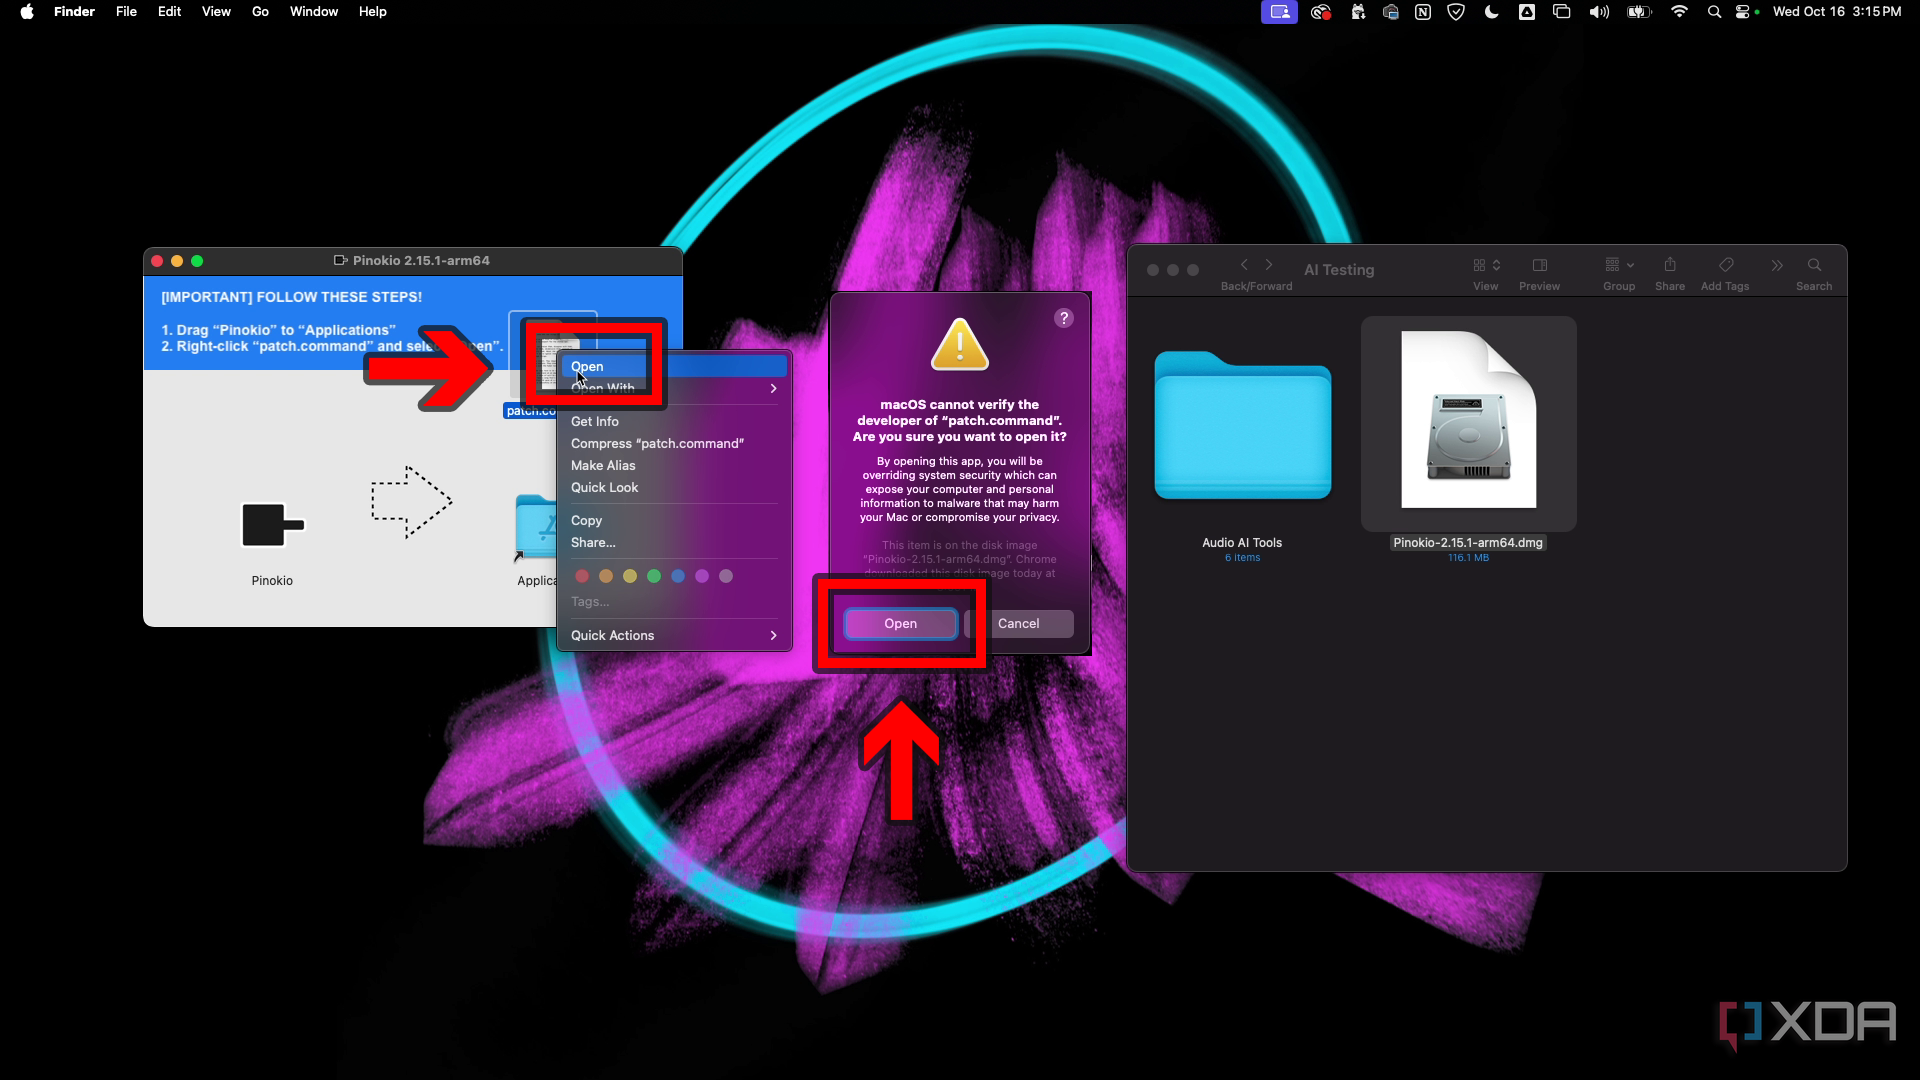
- Right-click the patch file and then choose Open. Then click open to dismiss the warning.
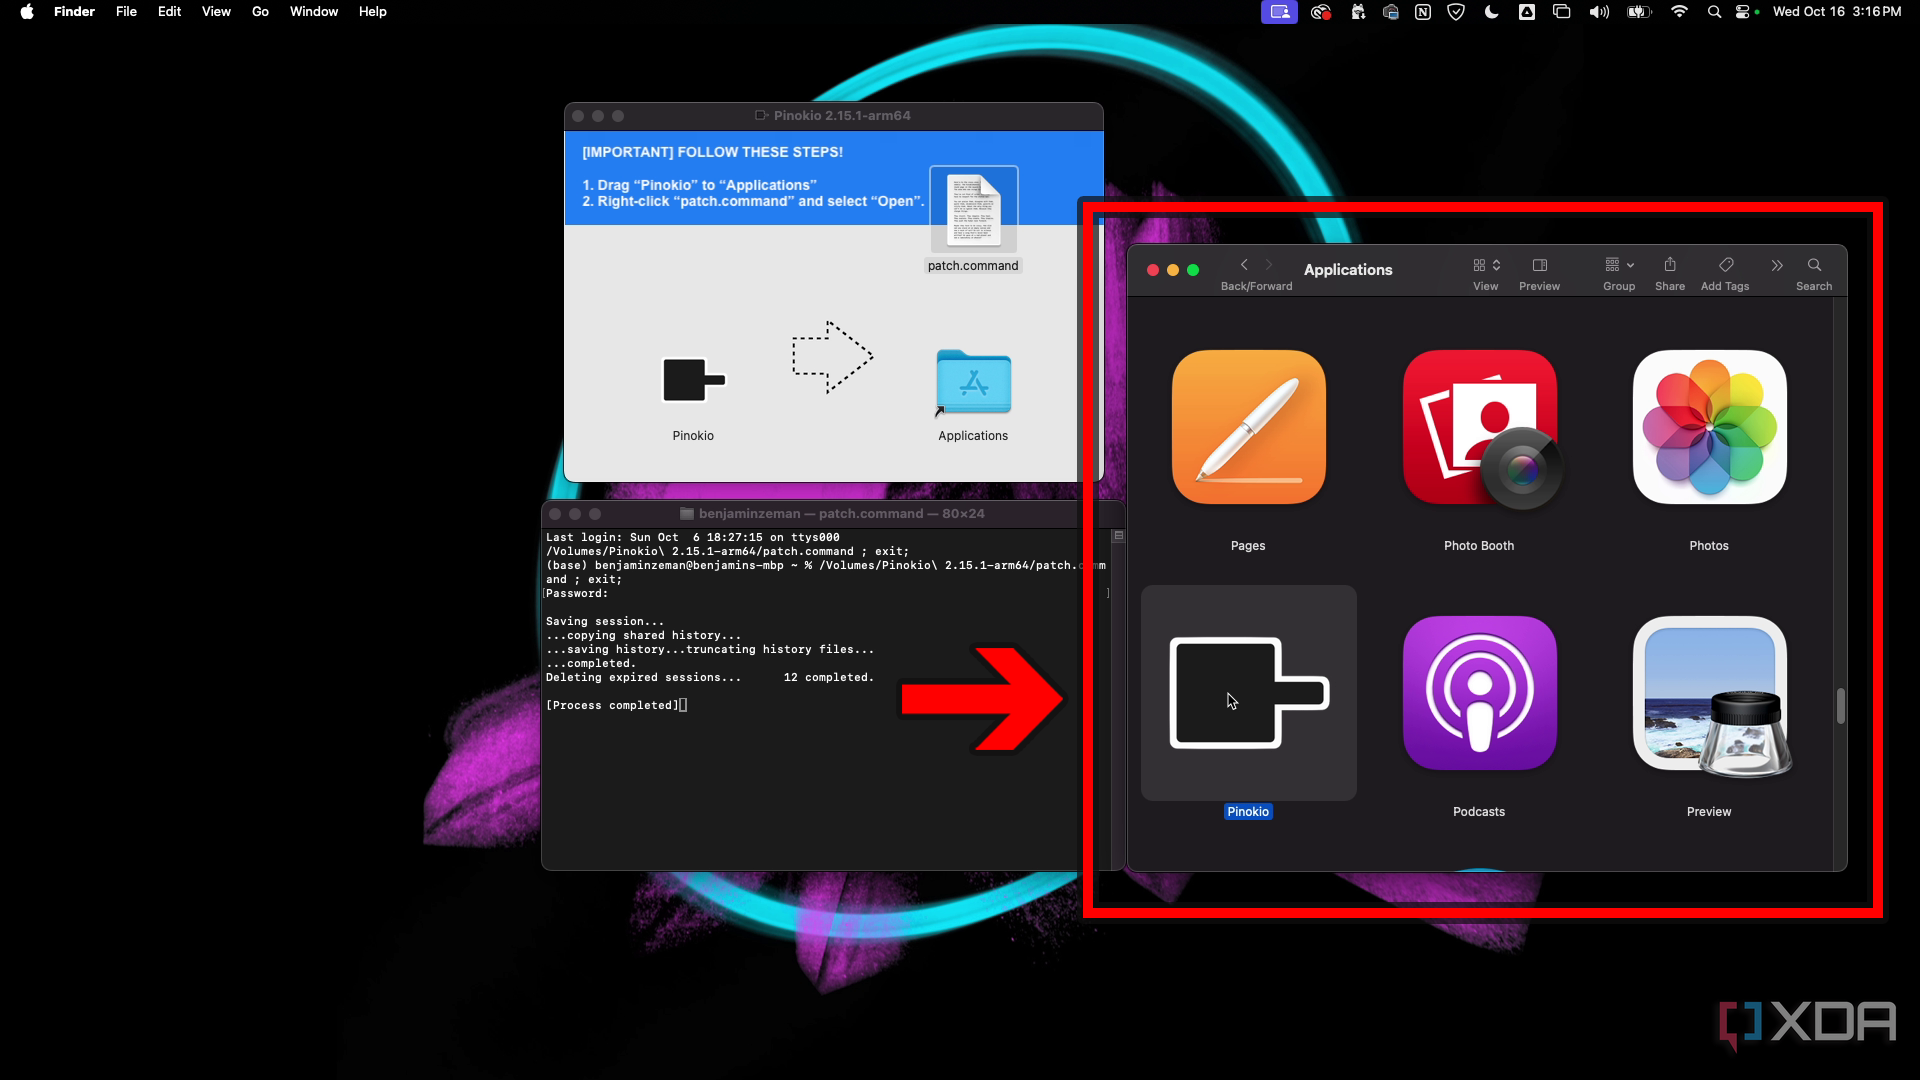
- Type your password in the terminal window that has opened.
- Go to your Applications folder and open Pinokio.
- Choose the folder location for the AI apps that will be installed by Pinokio and save your settings.


Installing apps in Pinokio
Apps are installed through JSON scripts provided by the developer or community members. Nearly all verified scripts have a Newsfeed from cocktailpeanut’s X account, displaying information about the app and its script. It should contain info about what operating systems are supported and any additional requirements. If you have questions about safety, I address this in the last section. Here’s the general process for getting an app installed:
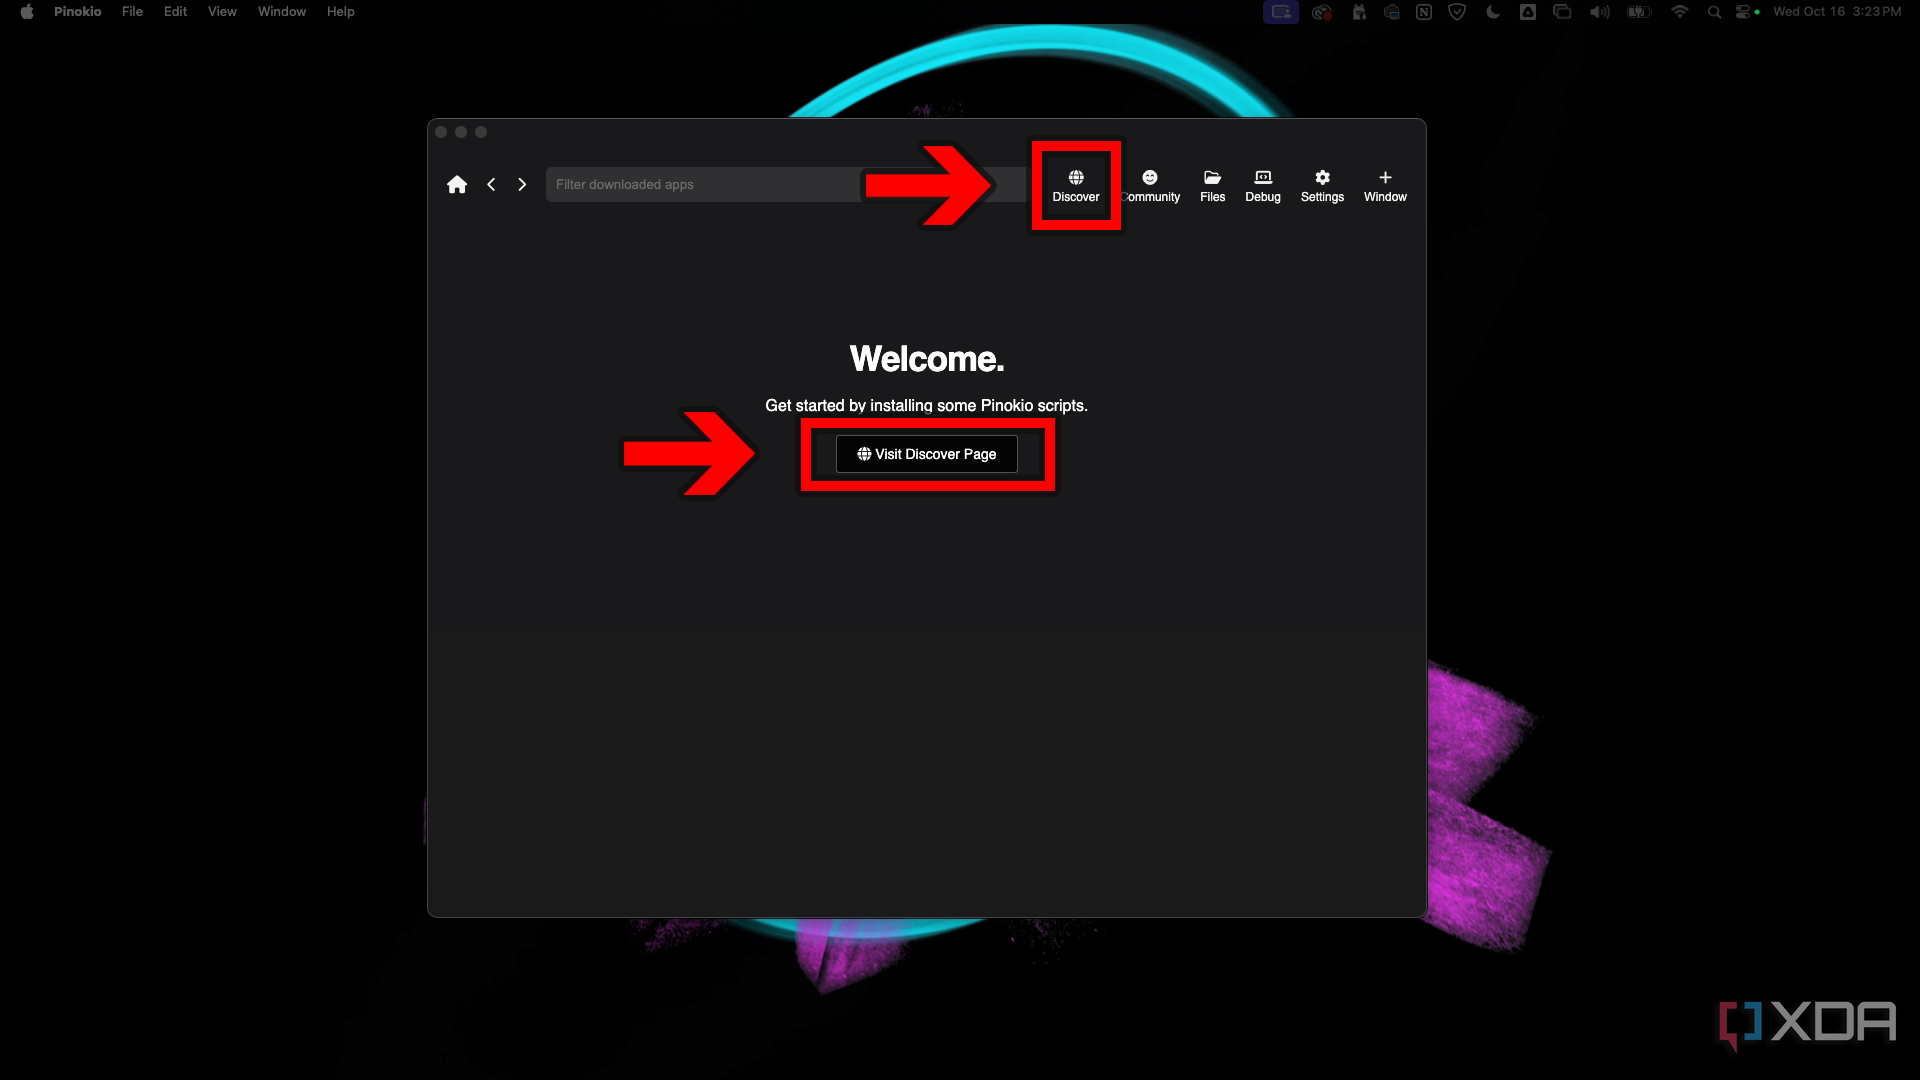
- Click Visit Discover Page on the welcome screen. If you’ve already left the welcome screen, click the Discover icon in the upper right corner.
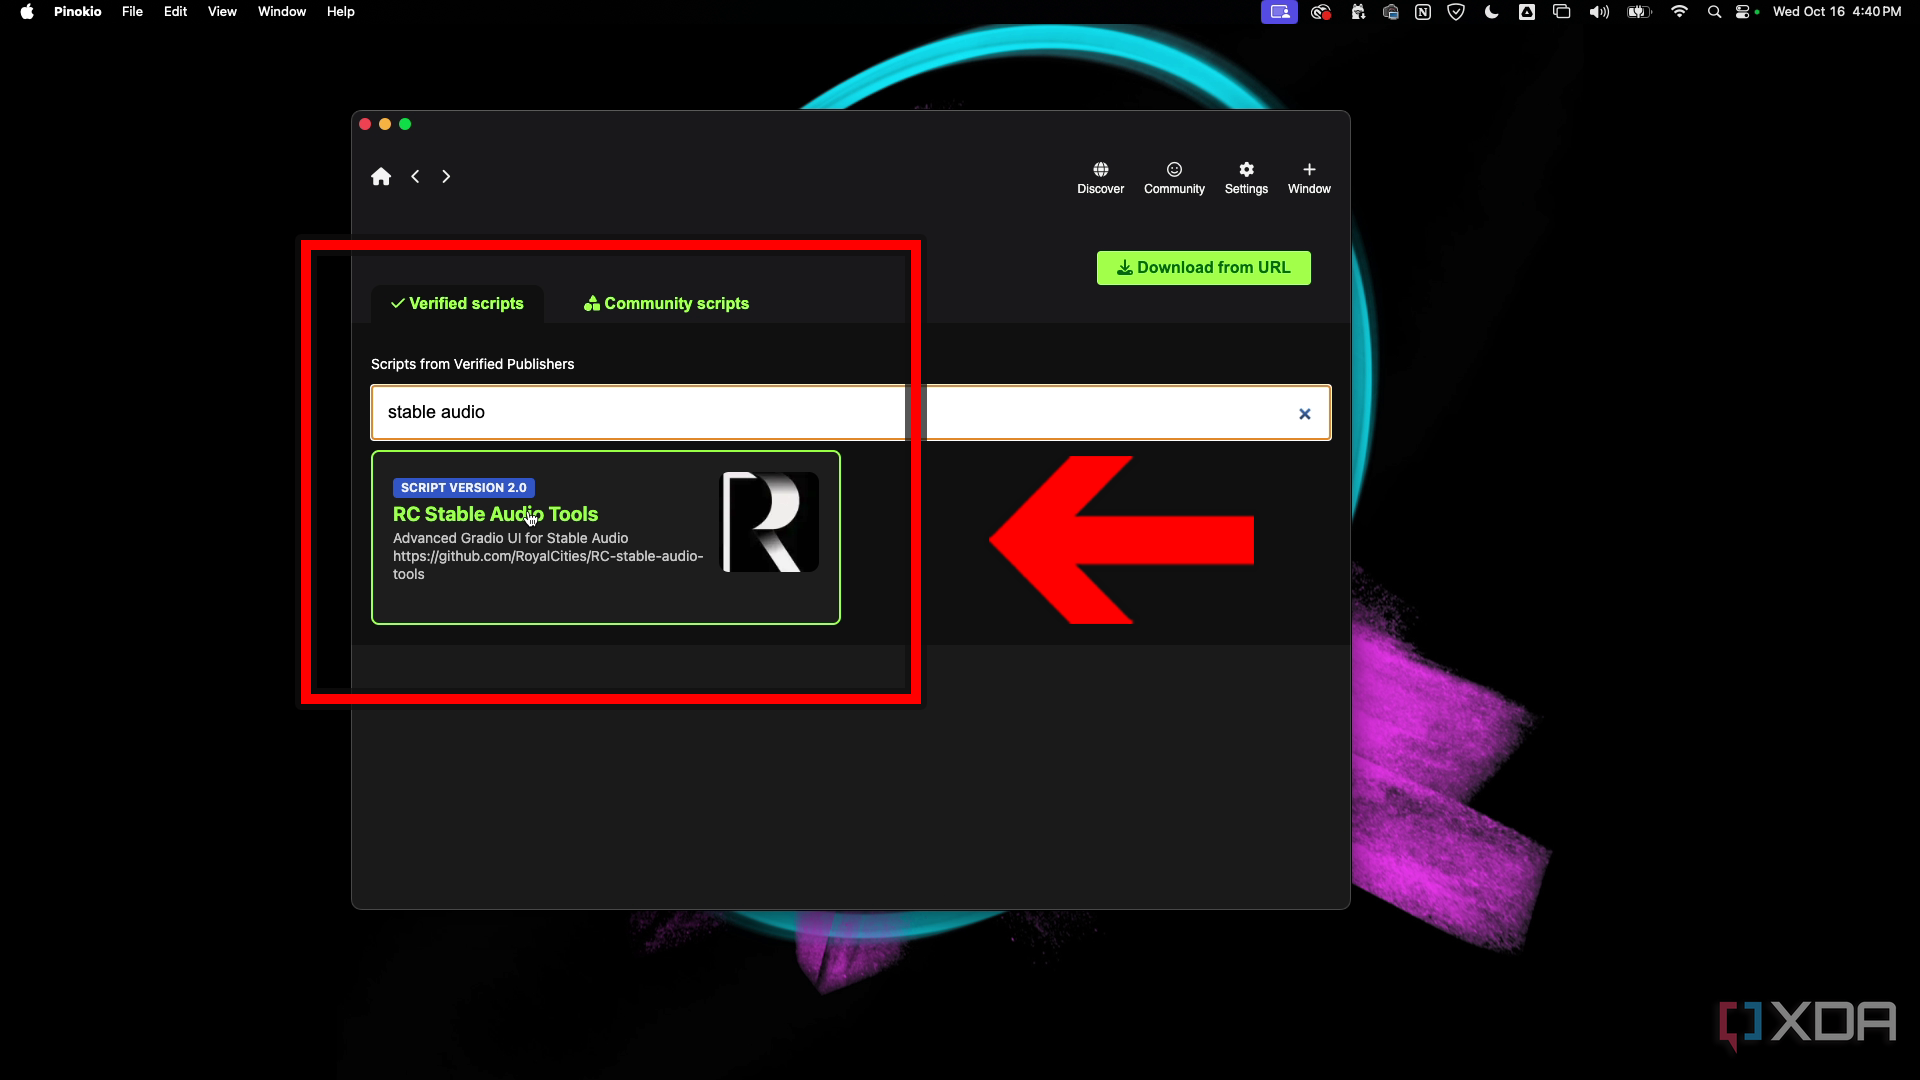
- There are tabs for Verified scripts and Community scripts. In the Verified scripts tab, search for the app you want to install, and click on the app to open its page in Pinokio.
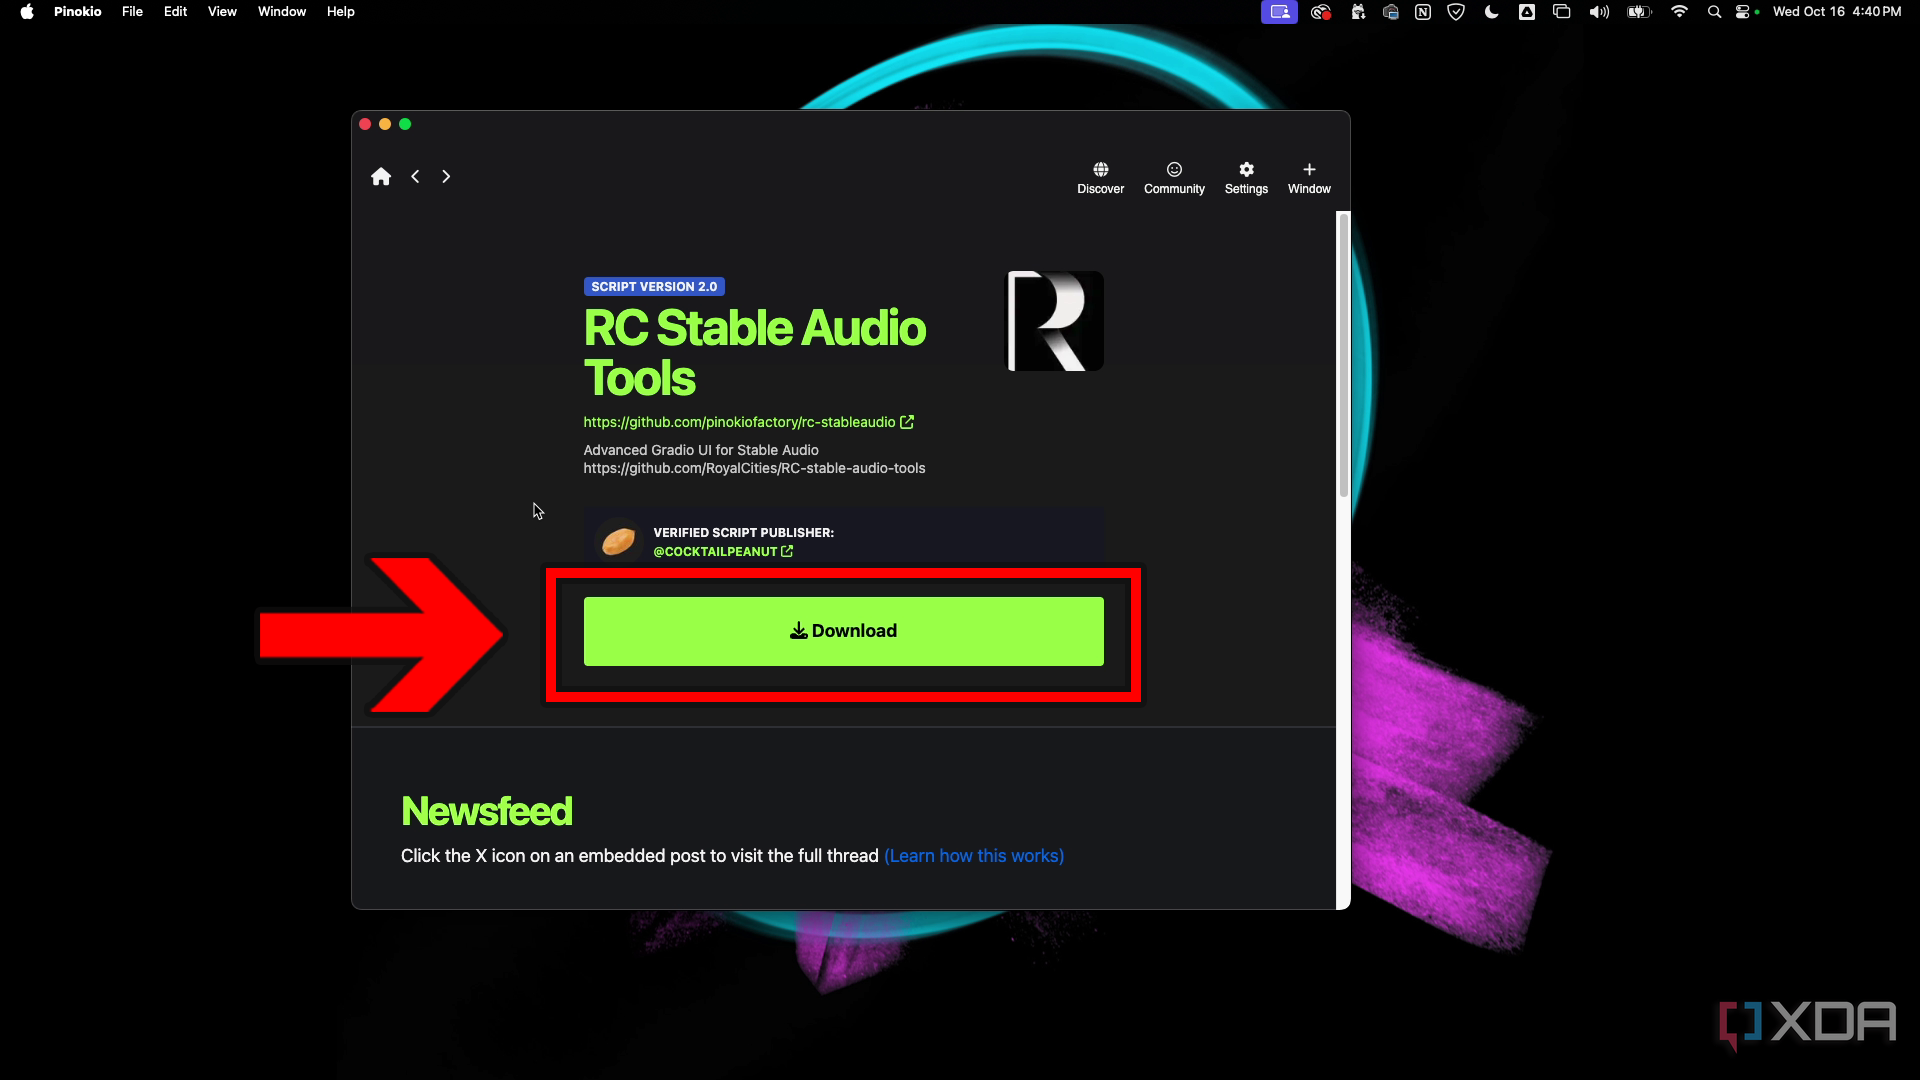
- Click Download and a new window will open in Pinokio.
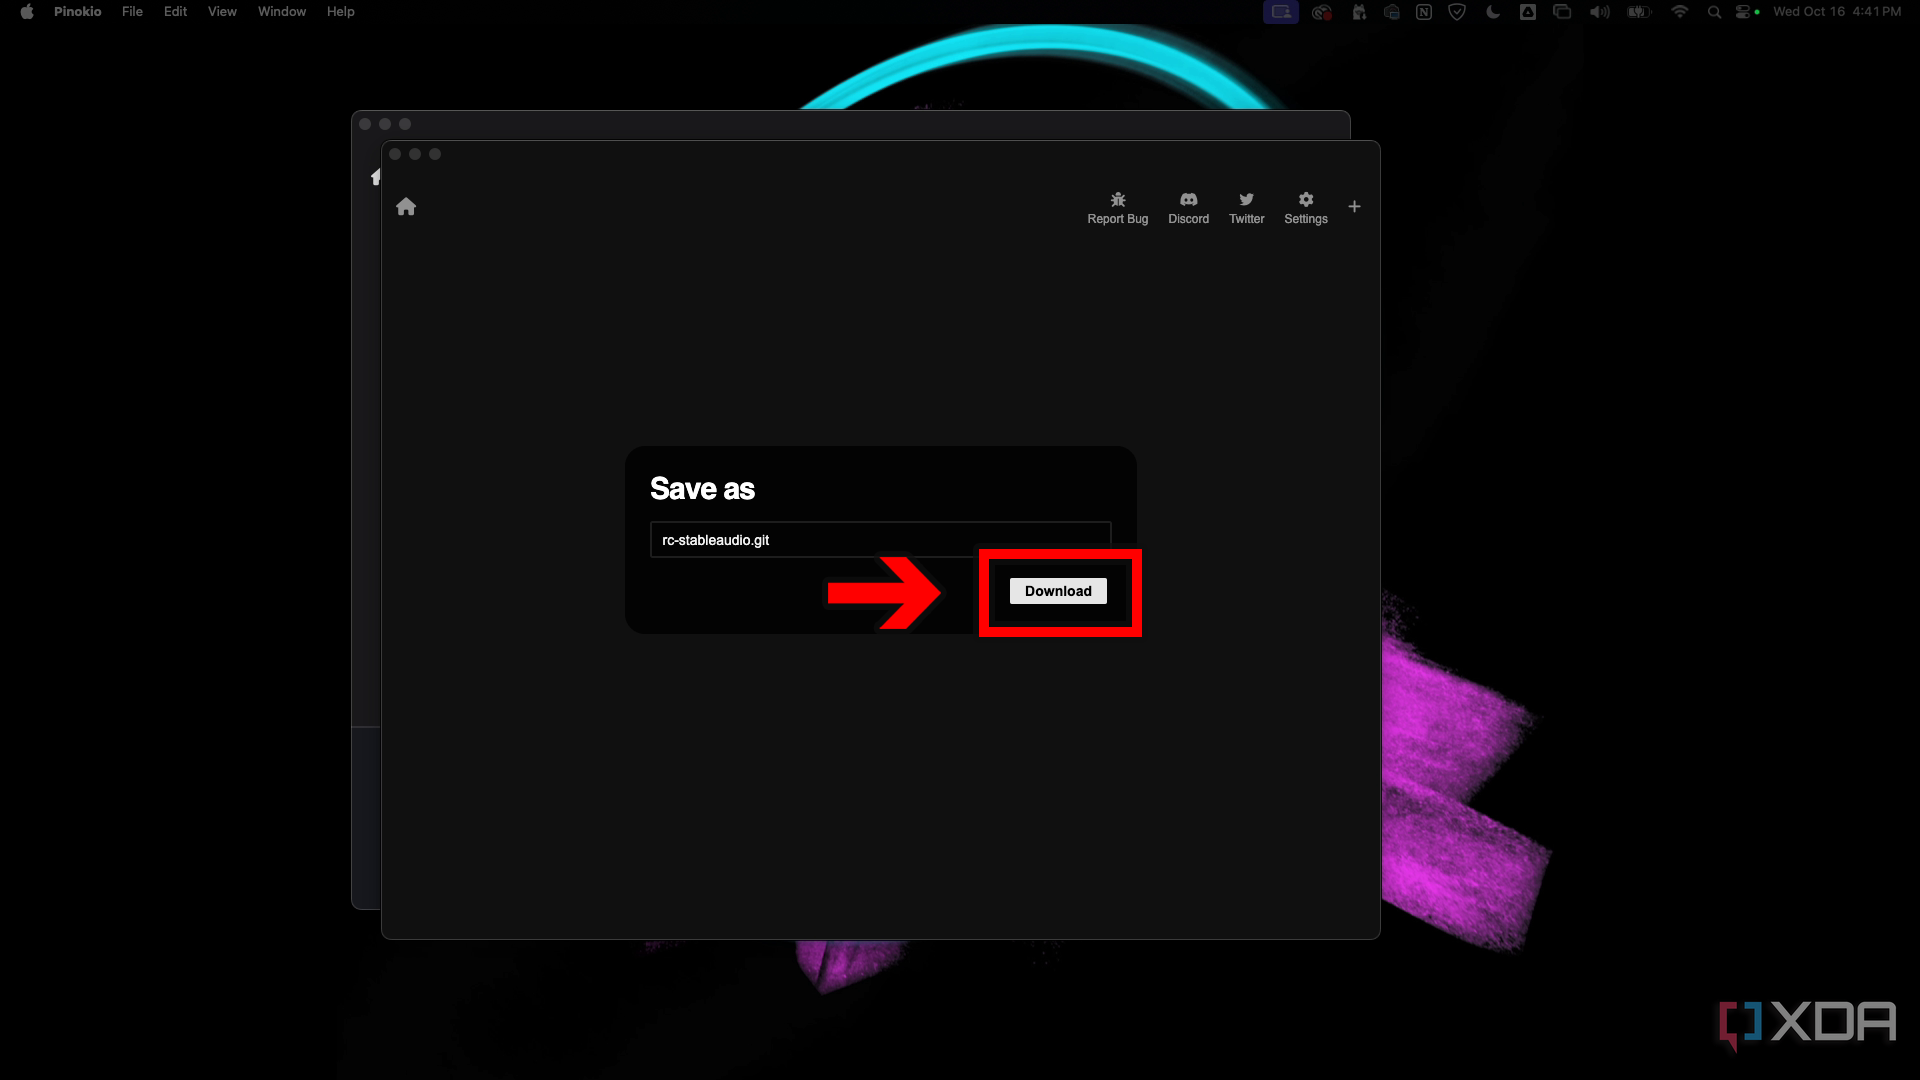
- Leave the [app-name-here].git that’s already filled in and click download to continue.
- Click the blue install button to begin installation.
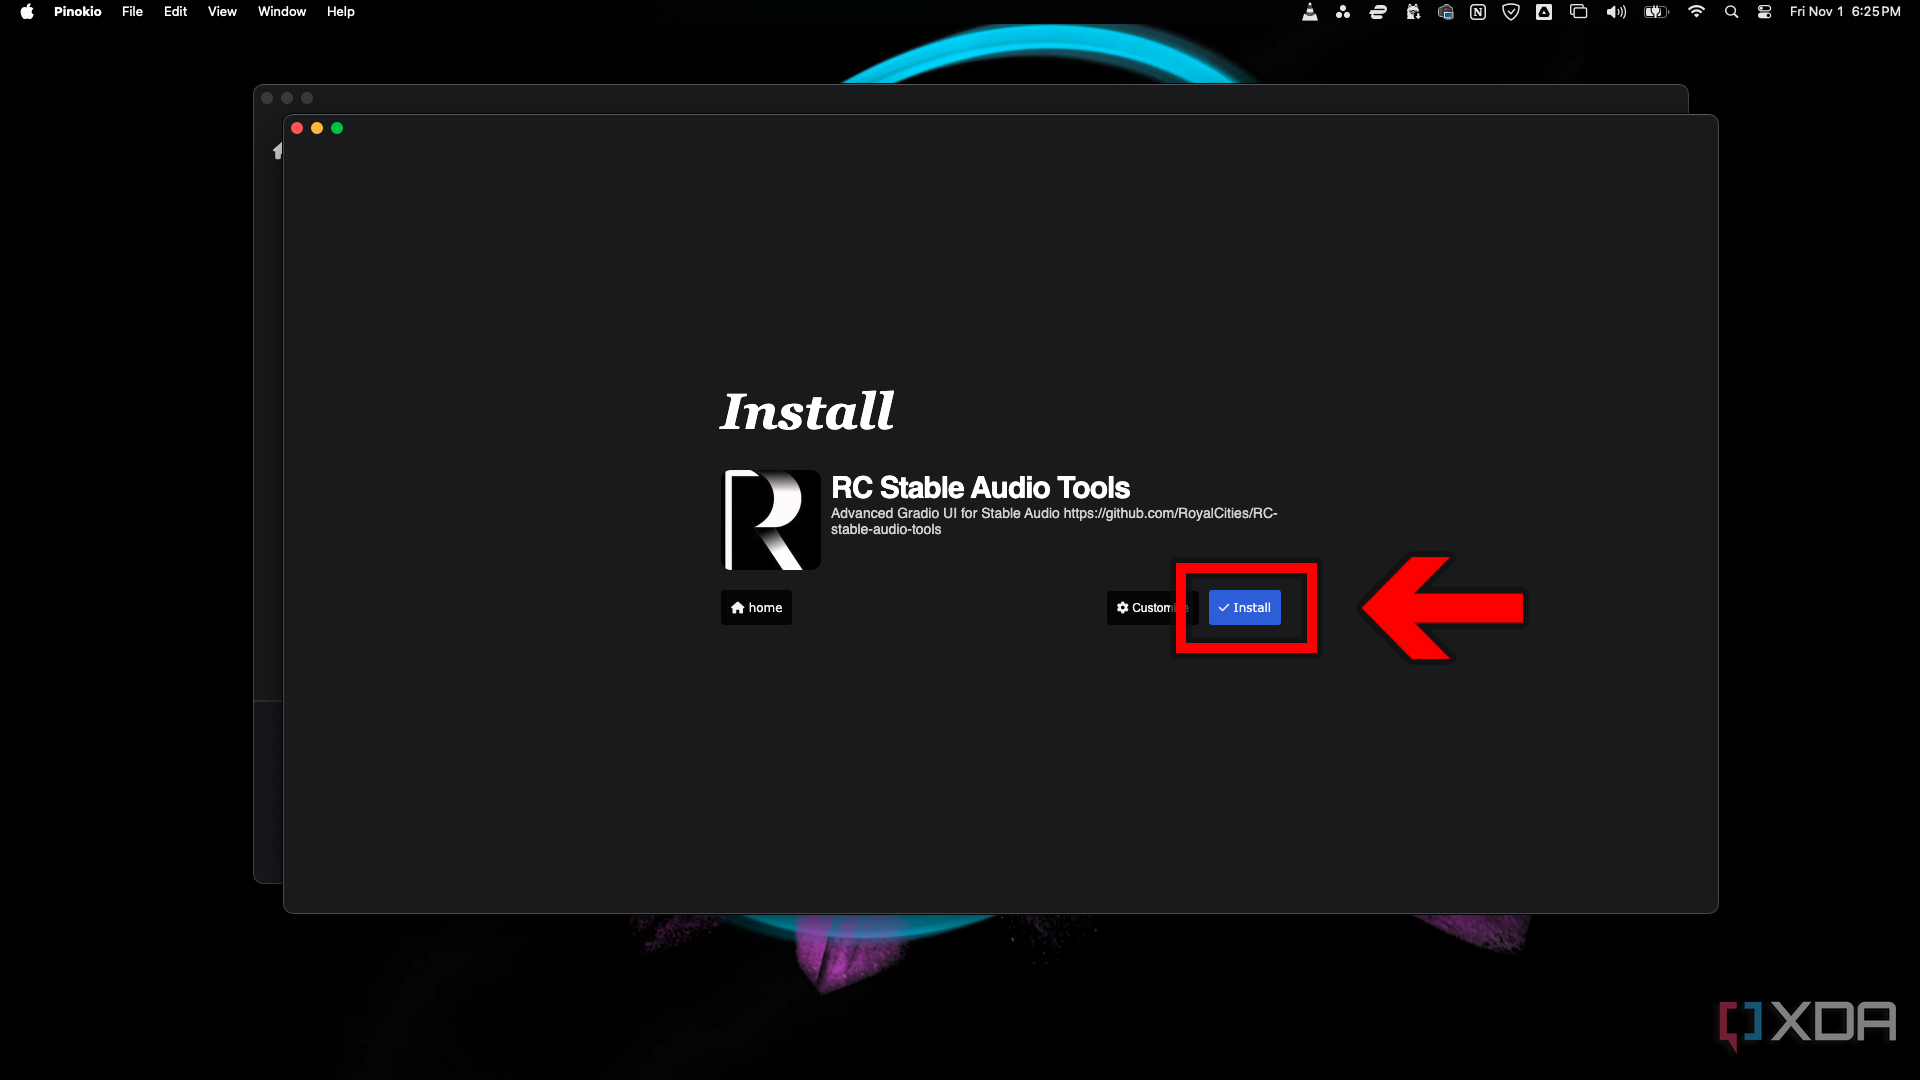
- You might need to click Install again in the left sidebar if the installation doesn’t start automatically. Wait for a pop-up notice that the installation was successful before continuing.
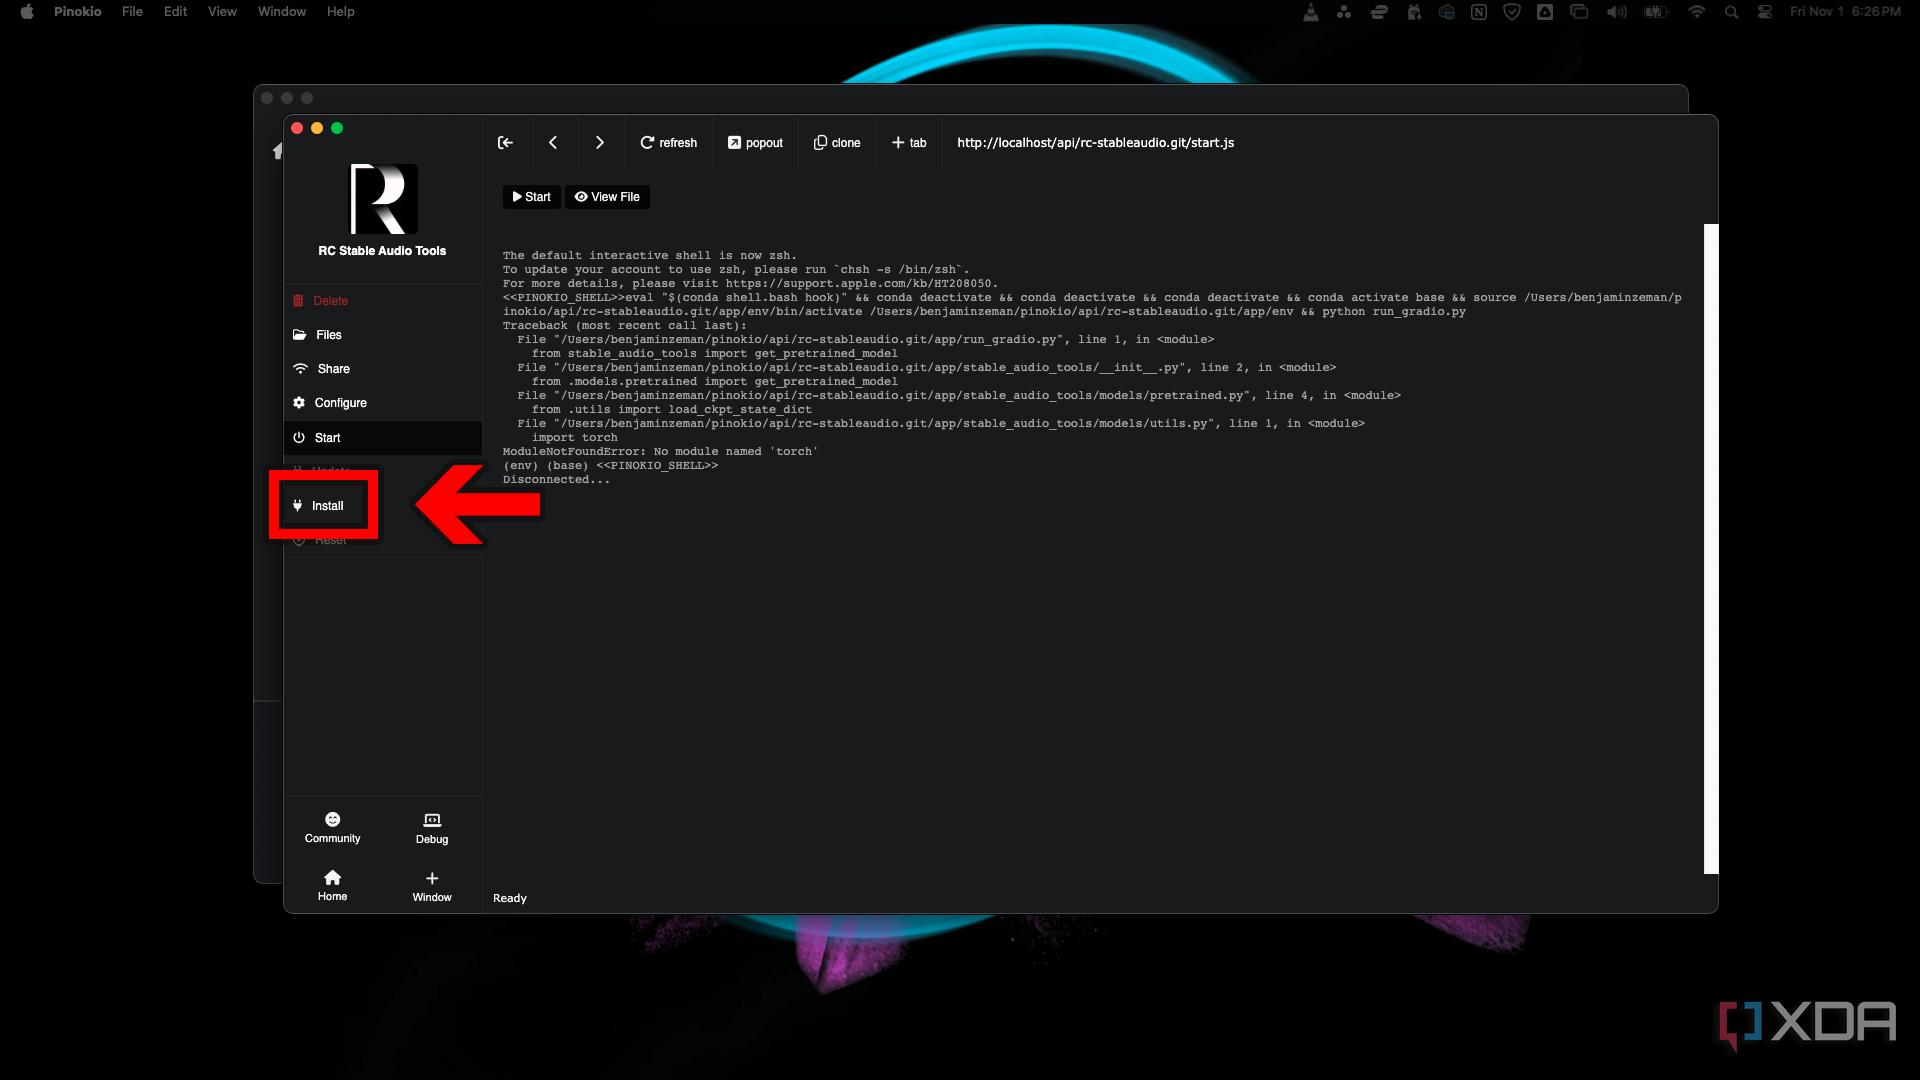
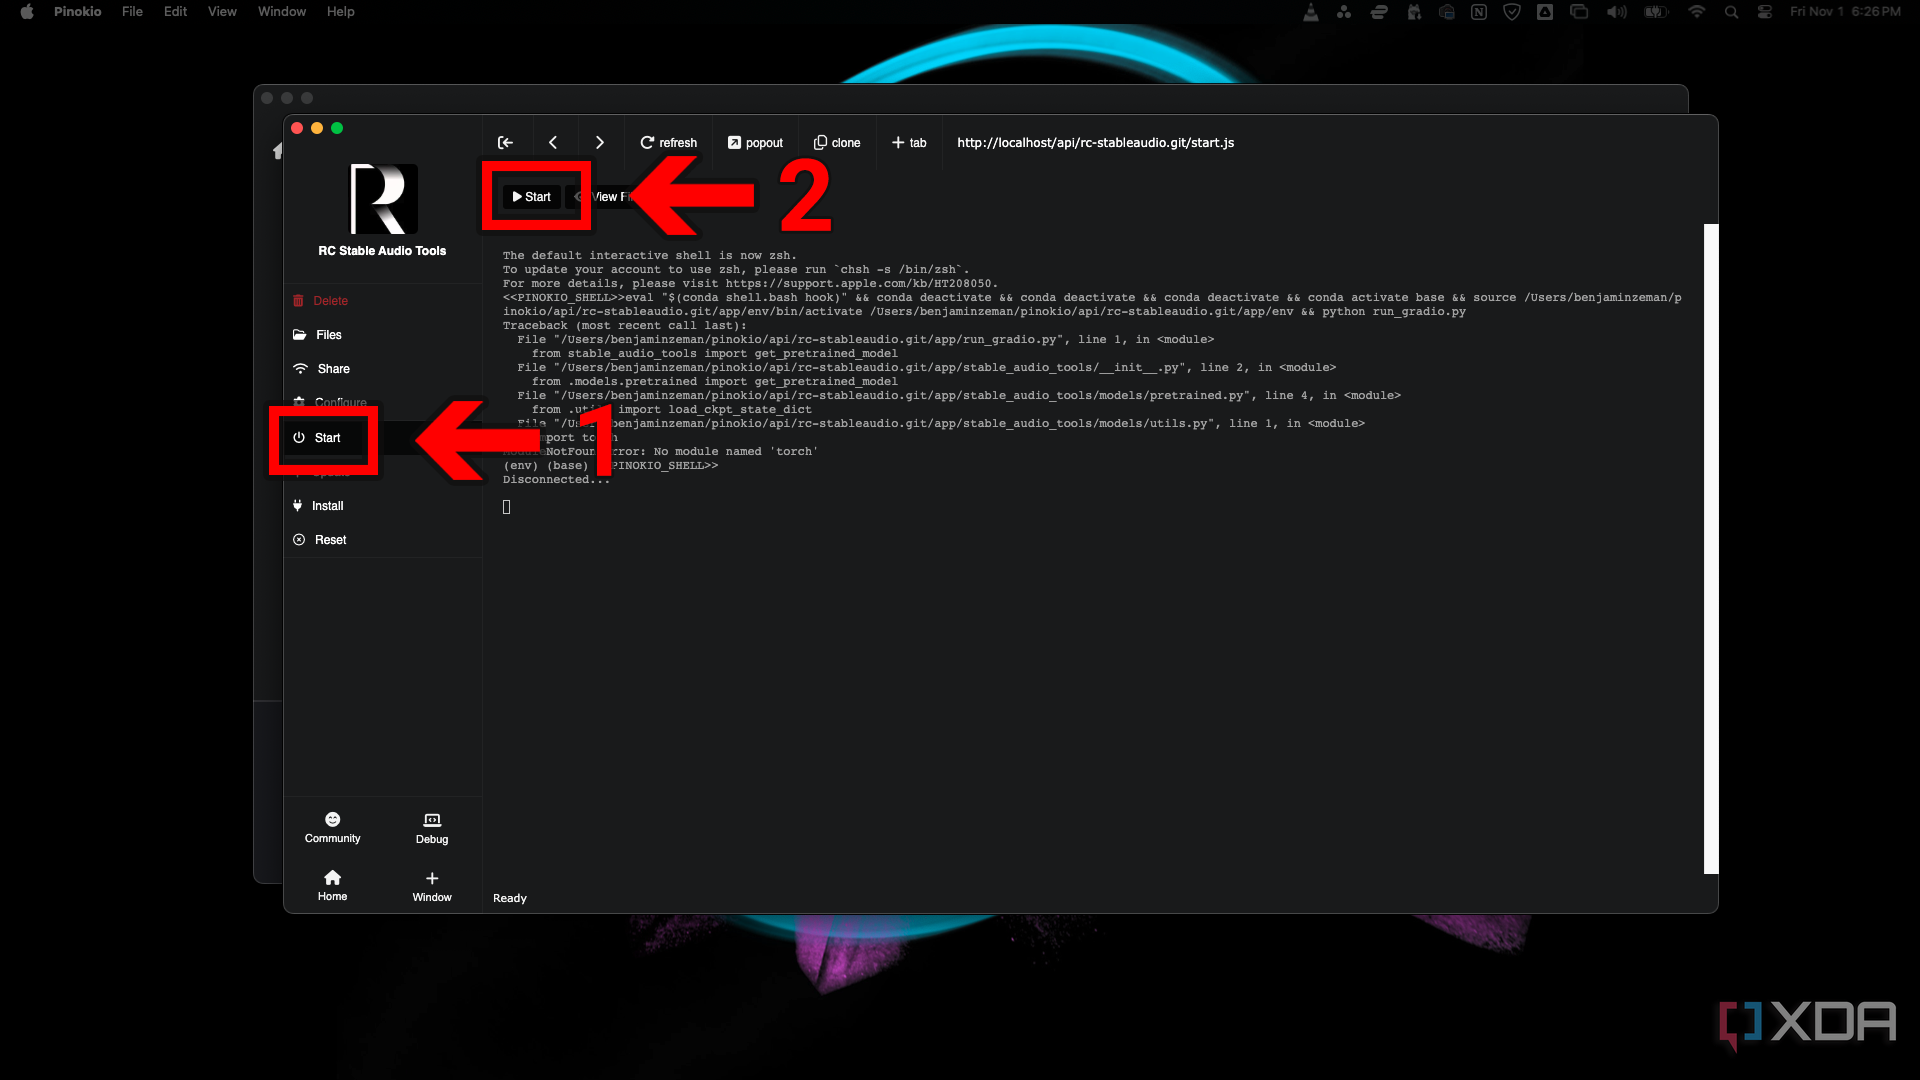
- Click Start in the left sidebar and then click Start near the top of the terminal.
- Click Open Web UI in the left sidebar if the app doesn’t open.
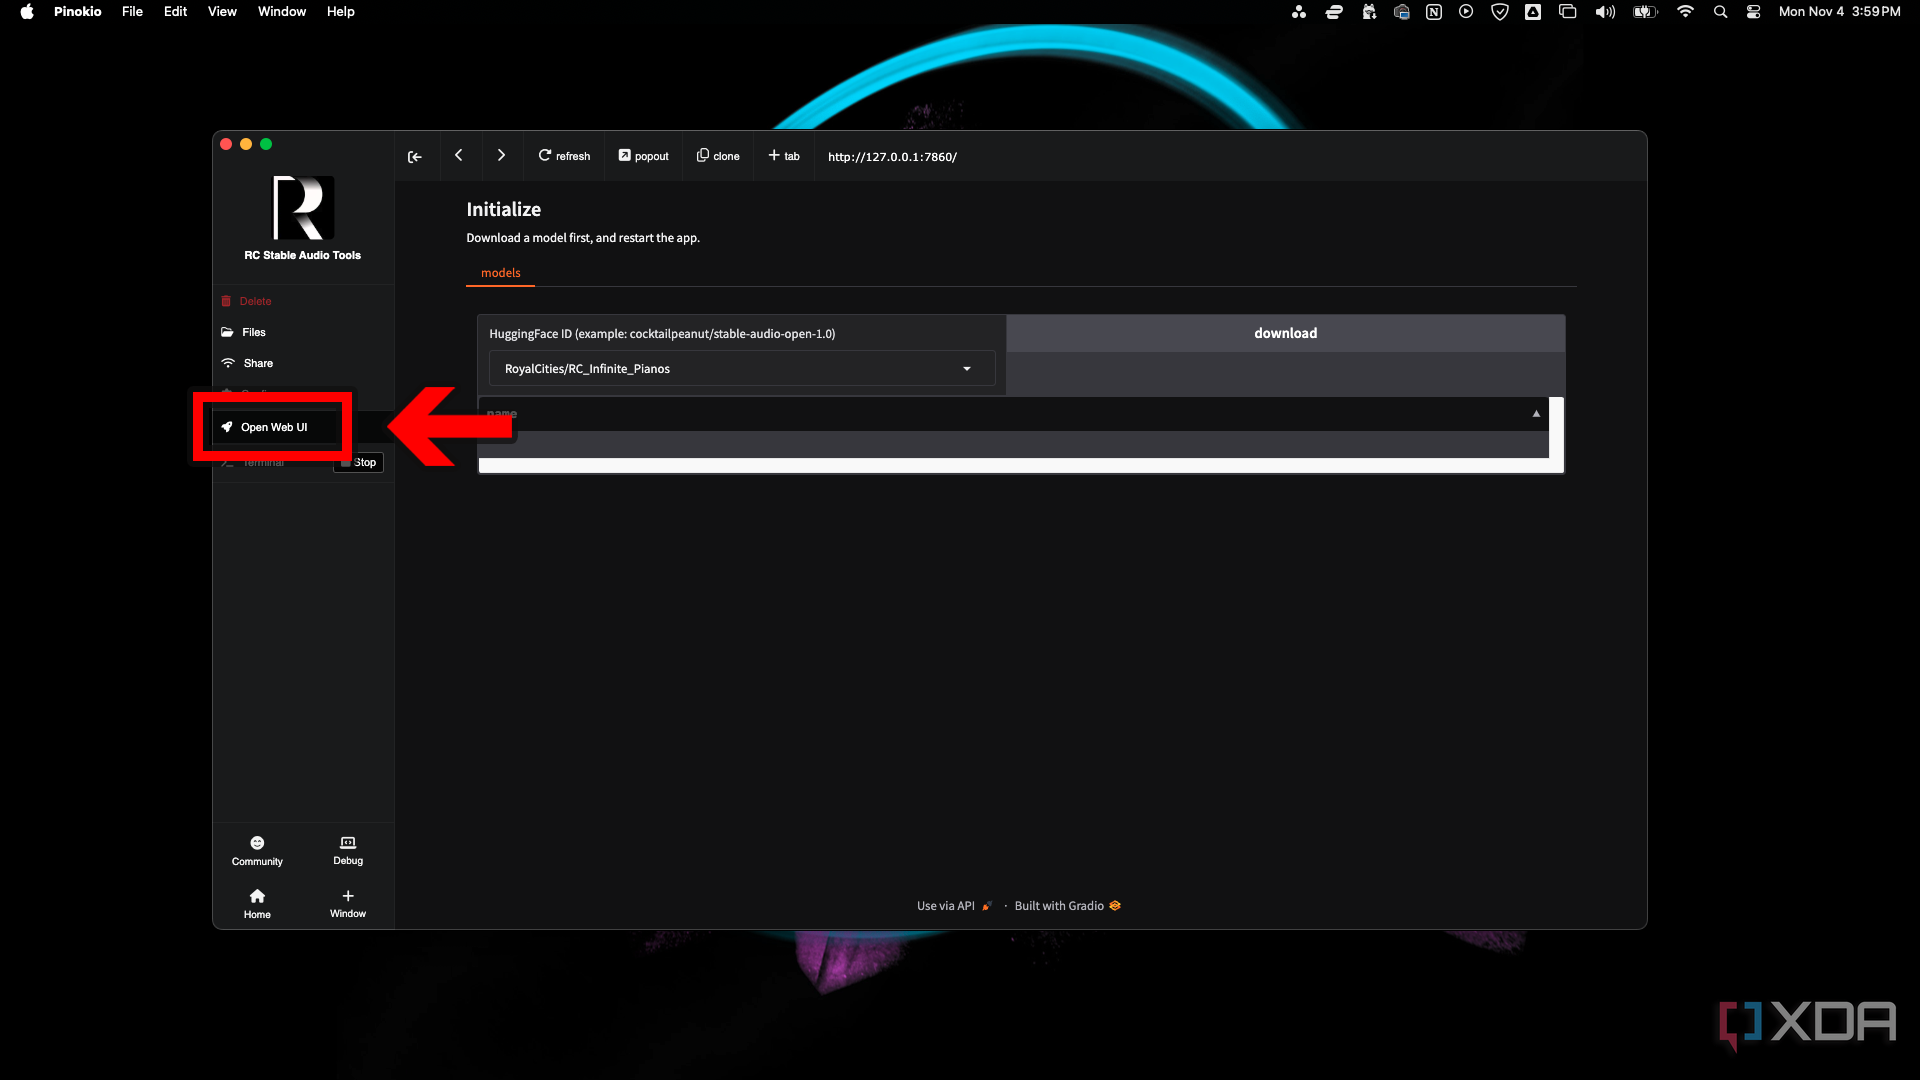


Clicking the
popout icon
in the top menu bar will open the GUI in your default browser.
Pinokio app testing results
Comparing Pinokio to local installs
ComfyUI is a node-based GUI for working with multiple types of AI tools, making it a good example for comparison. There are nodes for many of the apps available in Pinokio, and you can combine apps to perform complex tasks in a single workspace. There are currently over 1,500 custom node repositories available for use in ComfyUI.
ComfyUI worked great in Pinokio. Model loading, image generation speeds, and overall performance were the same as the local installs. Simple workflows for basic tasks don’t require many nodes.
Working with advanced workflows and complex projects, like this workflow by Redditor GianoBifronte, requires installing and managing multiple programs (ffpeg, conda, python, pip, brew, etc.). They are all managed in a single folder by Pinokio. Despite often using large workflows, ComfyUI performed the same in Pinokio as it did with my local install.

Source: GianoBifronte
I wanted to add some of my models instead of only testing the ones that came with the Pinokio install. It’s easy to place them in the correct folders, because the folder structure of everything I checked is the same. For the average user, it looks like the only difference with installs is that you don’t need to manage the more complicated stuff yourself, and you get a nice GUI that acts like an app store and app launcher. For advanced users, you can do everything you have been doing, and you can build a custom Pinokio app UI for apps not supported by Pinokio.
All other working app installs that were tested performed on par with their local installs. The apps that didn’t work failed as standalone installs and in Pinokio. I did very minimal troubleshooting, sticking to what an average user might try. ComfyUI, FaceFusion, and XTTS were all easy to install and worked immediately.
RC Stable Audio Tools worked on Windows and on macOS, but on macOS it wouldn’t load additional models. OpenVoice2 installation was successful on Windows and macOS, but on macOS audio generation returned errors. Bark wouldn’t install on Windows or macOS, but it looks like that’s due to the repository on HuggingFace being paused by the owner and not Pinokio.
Issues and solutions during app installation
Your default browser opens to Pinokio’s website when installing an app
Search for the app again in the default browser, click on the app, and then click Download.

A recently installed app won’t run or models you downloaded won’t load
Click the Refresh button in the top menu to refresh the page. If that doesn’t work, click the power button in the left menu to stop the app and start the app again.

There is a single line error message in your terminal
In some cases, you may see this error appear in your terminal when using Pinokio.
ENOENT: no such file or directory, stat '/Users//pinokio/api/comfy.git/{{input.event[0]}}’
Locally installed apps that use the same web URL will give you this error due to the address already being in use. Close your local app and then refresh the page, or turn the app off and on again, in Pinokio.

An app installation fails while in progress, and reinstalling the app doesn’t work
Click Settings in the upper right. Scroll down on the settings page and click the red buttons under Server Cache and Browser Cache to clear them. Delete the app and try to reinstall it. If that doesn’t work, go back to the settings page and reset the bin folder.

Should you try Pinokio?
When you start installing and running apps, you’ll notice terminals running inside Pinokio or your own systems terminal popping up outside Pinokio. If you’re new to this, it’s completely normal. You’d need to type every command into the terminal yourself if Pinokio weren’t managing it for you. The scripts available for each app enter all the commands for you.
Advanved users can also go take a look at the open source code for Pinokio or any of the AI apps on GitHub. There are enough users on the Discord server that you can usually get a trustworthy answer if you’re concerned about an app. With that said, Pinokio has no control over the code for any of those apps and their individual GitHub repositories.
There are categories for Verified scripts and Community scripts in the Pinokio browser. Verified scripts have been checked and approved, many of them written by cocktailpeanut themselves, while community scripts have not been approved yet. There is a prominent warning at the top of the community scripts category that includes an invitation to the Pinokio Community Discord. It’s highly recommended that you join the Discord server and check on community scripts before installing anything unverified.
Good for beginner and advanced users
Centralizing AI app installations on an easy-to-use virtual computer is a great concept. It’s not necessarily 1-click as advertised, but it’s great for beginners because you can just jump right into an app without being intimidated by terminal-based installation. I’ve run into my fair share of conflicts and troubleshooting sessions that I think wouldn’t have occurred if I were using Pinokio. I would definitely recommend it to anyone who’s been having trouble or hasn’t even tried installing apps on their own because of intimidating instructions.
Performance appears to be the same as a regular local installation for advanced users. I was skeptical at first, but I haven’t run into any negatives that would keep me from using Pinokio. Not needing to deal with virtual environments and dependencies has been a plus. I’ll be keeping my current installation of ComfyUI because I don’t really have a reason to move it to Pinokio, and I’ll be installing future apps in Pinokio, especially for a quick and easy way of testing.
#Pinokio #virtual #computer #local #apps
source: https://www.xda-developers.com/pinokio-how-to/

